SLUAAF8 October 2021 BQ24707 , BQ24707A , BQ24725A , BQ24735 , BQ24770 , BQ24780S , BQ24800 , BQ25700A , BQ25708 , BQ25710 , BQ25720 , BQ25730 , BQ28Z610-R1 , BQ4050 , BQ40Z50 , BQ40Z50-R1 , BQ40Z50-R2 , BQ40Z80
A.2 Gauge Setup - SMBus
Follow the bq40z50EVM Li-Ion Battery Pack Manager Evaluation Module user's guide to get started with hardware connections and basic gauge setup.
The first step is to set the number of cells used to change the DA configuration[CC0,1] bits (bqStudio -> data memory -> settings -> DA configuration[CC0,1]) the gauge may shutdown due to low voltage, if not configured correctly. The WAKE button may need to be held during this step. The Non-removable bit DA configuration[NR] also must be set to 1 to ignore the PRES pin.
Set the number of cells and DA configuration[NR] bit, then the voltage and current calibration needs to be completed. Applying a known voltage and current to the gauge, as described in the EVM users guide, is the best way to calibrate the gauge. The next step is to find the chemistry ID using the GPCCHEM tool and complete a learning cycle. After these two steps, the gauge needs to be configured for the more specific parameters for the application.
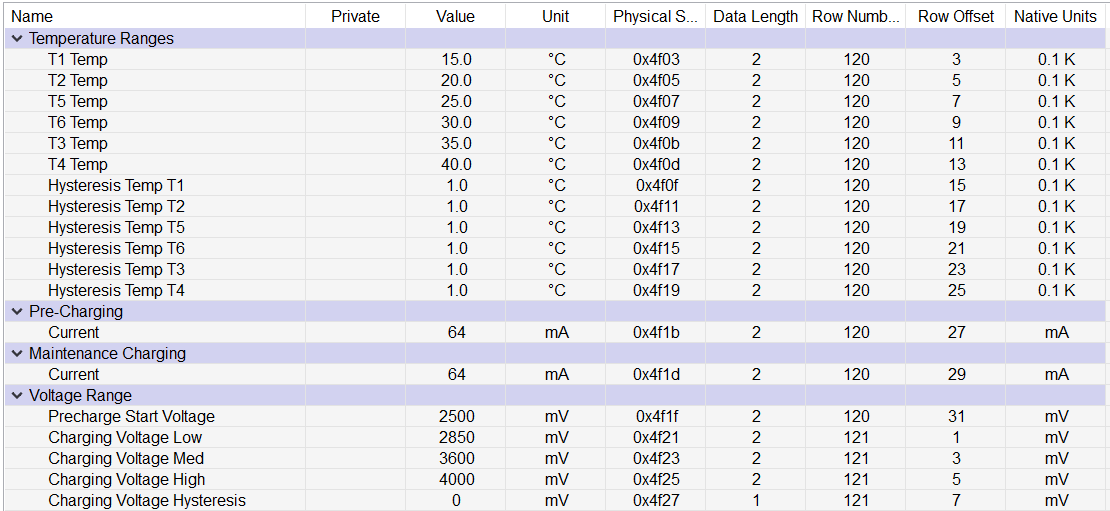
Follow the Section A.1 section for details on the battery setup and the parameters to set in the gauge. After the general gauge setup, the most important configuration is to set the SBS Configuration[BCAST] bit to transmit data from the gauge to the charger. As an example, Figure 6-1 is the Advanced Charge Algorithm setup page in bqStudio for the information the gauge broadcasts to the charger. Set the custom temperature profile or JEITA standard in the gauge registers. The temperature profile can widely vary, it is dependent on the cell manufacturer's ratings and the specific application needs.
 Figure 6-1 Example Temperature and
Voltage Range Settings.
Figure 6-1 Example Temperature and
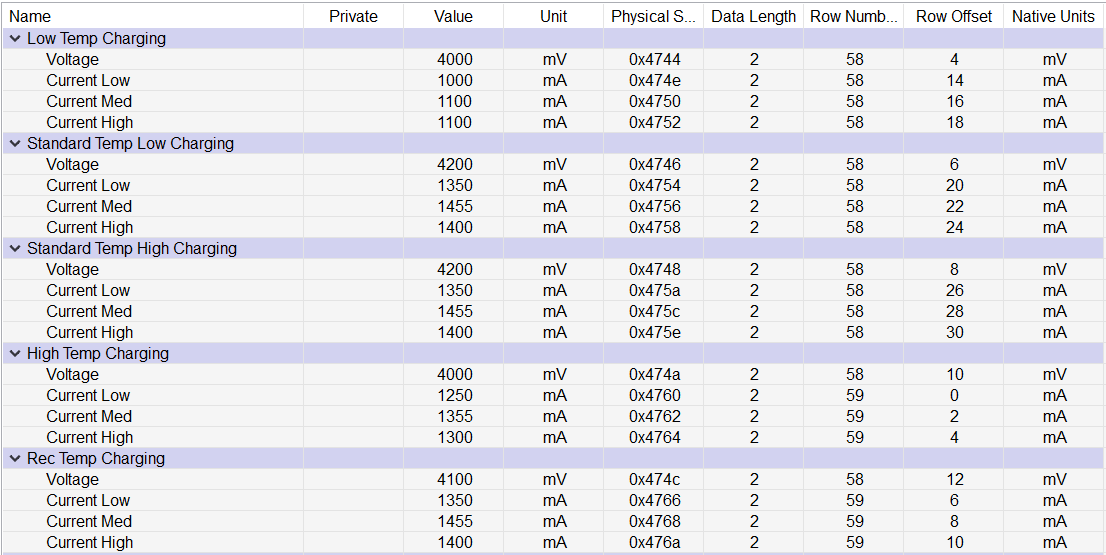
Voltage Range Settings.Now the current ranges must be set, the values are arbitrary just to show the feature can be used to setup many different charging profiles:
 Figure 6-2 Example Current Settings Based
on Temperature and Voltage
Figure 6-2 Example Current Settings Based
on Temperature and VoltageIf degradation to charging current and charging voltage over the lifetime of the battery is desired, the SOH or cycle count can be used to reduce the reported charging voltage and current to the charger. Newer BQ40Z50 firmware versions are adding features like runtime-based degradation as well for more flexibility depending on the end-application.
- The gauge writes all the bits of the charge current and charge voltage registers, but the reserved bits will remain unchanged. For example, the lowest charge current that can be supplied is 64 mA, because the charger has 64-mA resolution.
- If a lower precharge current is required than 64 mA, the FET Options[PCHG_COMM] bit can be used to charge at a lower rate while the voltage is within the precharge voltage region.