SPMU373A March 2021 – August 2022 TM4C1230C3PM , TM4C1230D5PM , TM4C1230E6PM , TM4C1230H6PM , TM4C1231C3PM , TM4C1231D5PM , TM4C1231D5PZ , TM4C1231E6PM , TM4C1231E6PZ , TM4C1231H6PGE , TM4C1231H6PM , TM4C1231H6PZ , TM4C1232C3PM , TM4C1232D5PM , TM4C1232E6PM , TM4C1232H6PM , TM4C1233C3PM , TM4C1233D5PM , TM4C1233D5PZ , TM4C1233E6PM , TM4C1233E6PZ , TM4C1233H6PGE , TM4C1233H6PM , TM4C1233H6PZ , TM4C1236D5PM , TM4C1236E6PM , TM4C1236H6PM , TM4C1237D5PM , TM4C1237D5PZ , TM4C1237E6PM , TM4C1237E6PZ , TM4C1237H6PGE , TM4C1237H6PM , TM4C1237H6PZ , TM4C123AE6PM , TM4C123AH6PM , TM4C123BE6PM , TM4C123BE6PZ , TM4C123BH6PGE , TM4C123BH6PM , TM4C123BH6PZ , TM4C123FE6PM , TM4C123FH6PM , TM4C123GE6PM , TM4C123GE6PZ , TM4C123GH6PGE , TM4C123GH6PM , TM4C123GH6PZ , TM4C123GH6ZXR , TM4C1290NCPDT , TM4C1290NCZAD , TM4C1292NCPDT , TM4C1292NCZAD , TM4C1294KCPDT , TM4C1294NCPDT , TM4C1294NCZAD , TM4C1297NCZAD , TM4C1299KCZAD , TM4C1299NCZAD , TM4C129CNCPDT , TM4C129CNCZAD , TM4C129DNCPDT , TM4C129DNCZAD , TM4C129EKCPDT , TM4C129ENCPDT , TM4C129ENCZAD , TM4C129LNCZAD , TM4C129XKCZAD , TM4C129XNCZAD
- Read This First
- 1Introduction to TivaWare SDK
- 2TivaWare Example Projects
- 3Linking Files and Libraries into a TivaWare Project in Code Composer Studio
- 4How to Debug a TivaWare Library
- 5How to Add TivaWare to an Existing CCS Project
- 6TivaWare Boot Loader
- 7Software Best Practices
- 8TM4C Resources
- 9Revision History
5.3 Predefined Variables
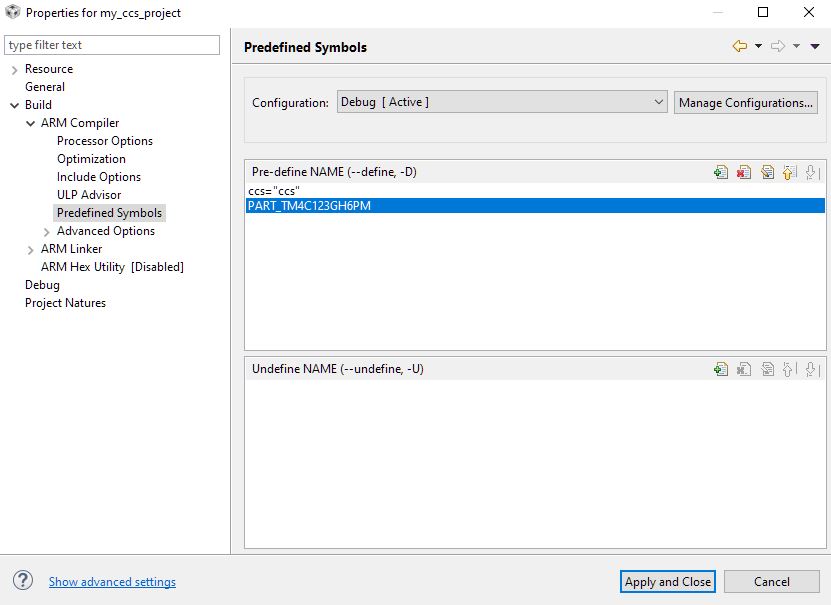
The next step is to add in a predefined symbol into the project. Predefined symbols are used by TivaWare files including in DriverLib to select code blocks based on the TM4C MCU family used. To add a symbol first go to CCS Project Properties and then navigate to Build → ARM Compiler → Predefined Symbols. There should already be at least one symbol defined for the TM4C microcontroller being used such as the PART_TM4C123GH6PM shown in Figure 6-3. If for some reason that is not present, it must be added as well. The part number that should be used after ‘PART_’ would be the device that was chosen in the ‘General’ section of the Project Properties.
To add a new symbol, click the ‘Add…’ button and type in the value into the box that pops up. The symbol that needs to be added depends on the MCU family used. If a TM4C123x device is used, then add TARGET_IS_TM4C123_RB1. If a TM4C129x device is used, then add TARGET_IS_TM4C129_RA2. Click ‘OK’ to add the new symbol.
 Figure 5-3 Predefined Symbols Menu in CCS
Project Properties