SLAA871 January 2019 AFE7422 , AFE7444
2.3.2 Software Setup and GUI Configuration
Programming the AFE74xx EVM in repeater mode is simple. After the AFE74xxEVM is programmed normally in a desired mode, a configuration file containing a specific sequence of register writes required to enable repeater mode must then be loaded to the device through the Low Level View tab in the AFE74xx GUI. The mode used to program the AFE74xx must have the same LMFSK values for both RX and TX. Table 1 shows the sequence of register writes that must be loaded to the AFE74xx EVM in order to enable repeater mode (RX-TX loopback mode).
NOTE
The configuration file containing the following register writes is provided in the AFE7444 product folder. Save the file titled loopback_mode_enable.cfg.
Table 1. Register Sequence for Repeater Mode (RX-TX Loopback)
| Process
(W for Write) |
Address
(Hex) |
Register Value
(Hex) |
Comment |
|---|---|---|---|
| W | 0x10 | 0x55 | Open txducp0 page for all TX |
| W | 0x7E | 0x1F | Set RBD register (0x7E) to hex value of 64 / F – 1. |
| For example:
LMFSHd = 44210, F= 2, RBD value is 64 / 2 – 1 = 31. Hex value for 31 = 0x1F. Therefore, register 0x7E is programmed to 0x1F. |
|||
| W | 0x10 | 0x00 | Close txducp0 page for all TX |
| W | 0x11 | 0x8 | Select TRAFFICCNTL page |
| W | 0xC5 | 0x5 | RX-TX loop-back enabled for both 2T2R_TOPs |
| W | 0xCF | 0x1 | Loopback FIFO init_state set |
| W | 0x11 | 0x0 | Close TRAFFICCNTL page |
| W | 0x17 | 0x0 | Select SerDes_JESD_TX page |
| W | 0x45 | 0xC0 | RX init_state clear |
| W | 0x45 | 0x80 | FB init_state clear |
| W | 0x45 | 0x0 | FIFO inti_state clear |
| W | 0x26 | 0x0 | RX jesd_clear_data clear |
| W | 0x17 | 0x0 | Close SerDes_JESD_TX page |
| W | 0x11 | 0x3 | Select TXDIG_P0 page |
| W | 0x20 | 0x0 | TX init_state clear for both TX_TOPs |
| W | 0x11 | 0x0 | Close TXDIG_P0 page |
| W | 0x11 | 0x8 | Select TRAFFICCNTL page |
| W | 0x1A0 | 0xFC | Gate SYSREF |
| W | 0x11 | 0x0 | Close TRAFFICCNTL page |
| If sync out is not looped back to sync in, use the following SPI programming to establish SYNC | |||
| W | 0x17 | 0xC | Select SerDes_JESD_TX page |
| W | 0x72 | 0xFF | Override STX output with K28.5 |
| Delay 100 ms | |||
| W | 0x72 | 0xF0 | Override STX output with K28.5 |
| W | 0x17 | 0x0 | Close SerDes_JESD_TX page |
The following steps show how to bring up the AFE74xx EVM and then enable repeater mode. In this example, the AFE74xx is programmed in mode 4 and then a config file enabling repeater is loaded in the Low Level View tab. For more details on how to bring up the AFE74xx EVM, reference the AFE74xxEVM user's guide. After the AFE74xx is powered up, launch the AFE74xx GUI, and then reference the following steps:
- Click the EVM Selection button, and verify that the proper EVM is selected, as shown in Figure 2.
- Click the Clock Selection button, and select Internal PLL, as shown in Figure 3.
- Click the DAC Frequency Selection button, and select a DAC clock frequency of 8847.36 MHz, as shown in Figure 4.
- Click the ADC Frequency Selection button, and choose a DIV factor of 3 to program the ADC clock to 2949.12 MHz, as shown in Figure 5.
- As shown in Figure 6, click the AFE Mode Selection button, and select Mode 4.
- Click Set Mode.
- Click Run Complete Startup Sequence to program the AFE.
- Select the Advanced tab, and click on the SYSREF continuous mode (SYSREF Cont. M) button shown in a red box in Figure 7.
- In the Low Level View tab, click on the open folder icon, as shown in Figure 8.
- Load the loopback_mode_enable.cfg config file that was saved previously.
- At this point, the input signal should be visible on the DAC A output. If the output is not visible, verify that register 0x7E is set to the correct RBD value for your configuration. The RBD value depends on the F value in the AFE74xx JESD configuration mode. The RBD should be set RBD register (0x7E) to a hex value of 64 / F – 1. For example, in mode 4, LMFSHd = 44210. where F= 2. Therefore, the RBD value is 64 / 2 – 1 = 31. The hex value for 31 = 0x1F. Therefore, register 0x7E is programmed to 0x1F.
- After the looped back input tone is verified, go back to the Advanced tab and adjust the RX and TX NCO values as desired, as shown in the red box of Figure 9. After the desired NCO frequency is entered, click the RX NCO Update or TX NCO Update button. The RX NCO downconverts the input signal to a digital baseband frequency. The baseband signal is upconverted to the frequency set by the TX RF NCO value. For example, the current RX NCO and TX NCO values are both set to 1700 MHz. If the input signal applied to the AFE74xxEVM is 1750 MHz, then the RX NCO downconverts the signal to a baseband frequency of 50 MHz. Then, the TX NCO upconverts the baseband signal to 1750 MHz.
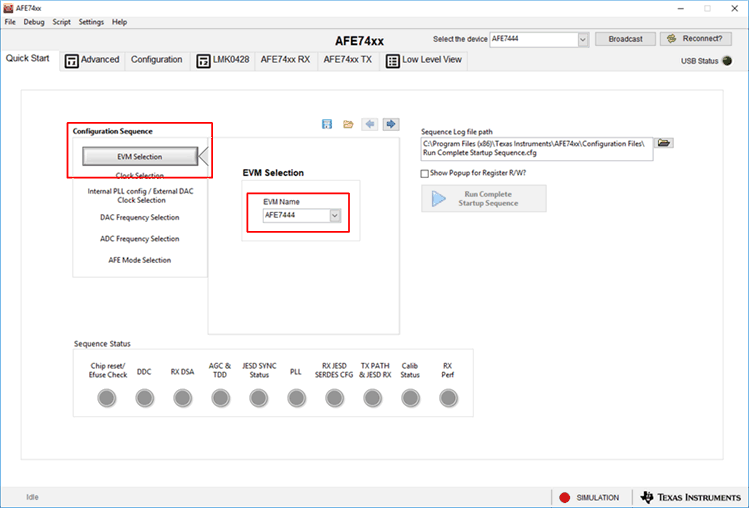 Figure 2. EVM Selection
 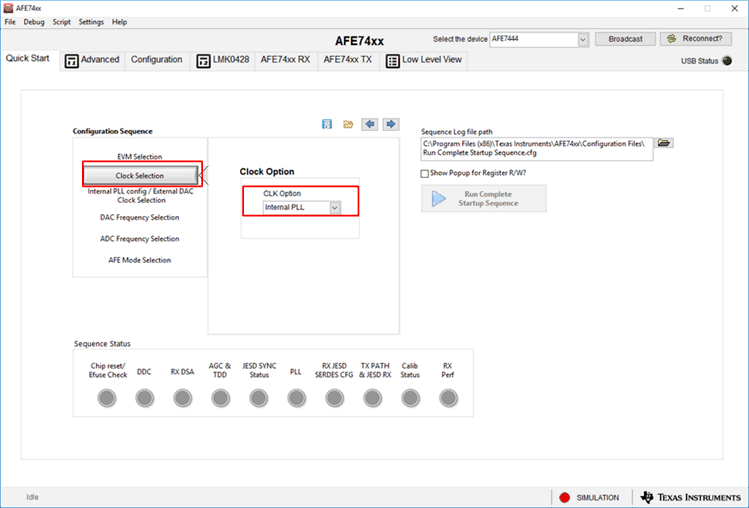 Figure 3. Clock Selection
 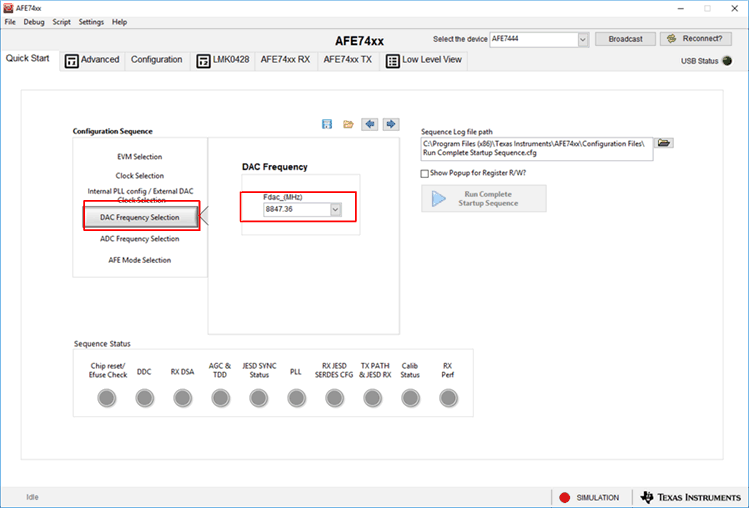 Figure 4. DAC Frequency Selection
 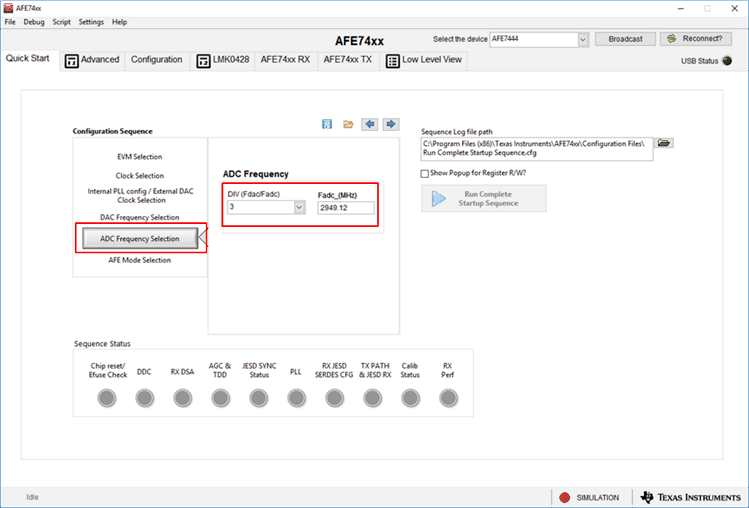 Figure 5. ADC Frequency Selection
 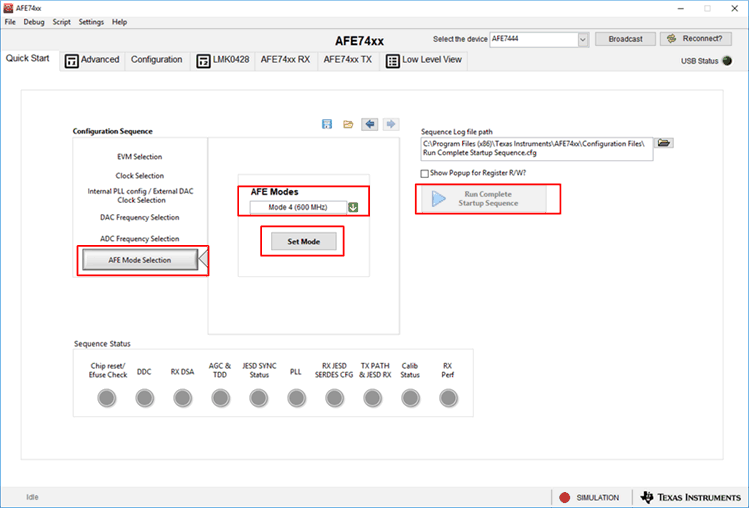 Figure 6. AFE Mode Selection
 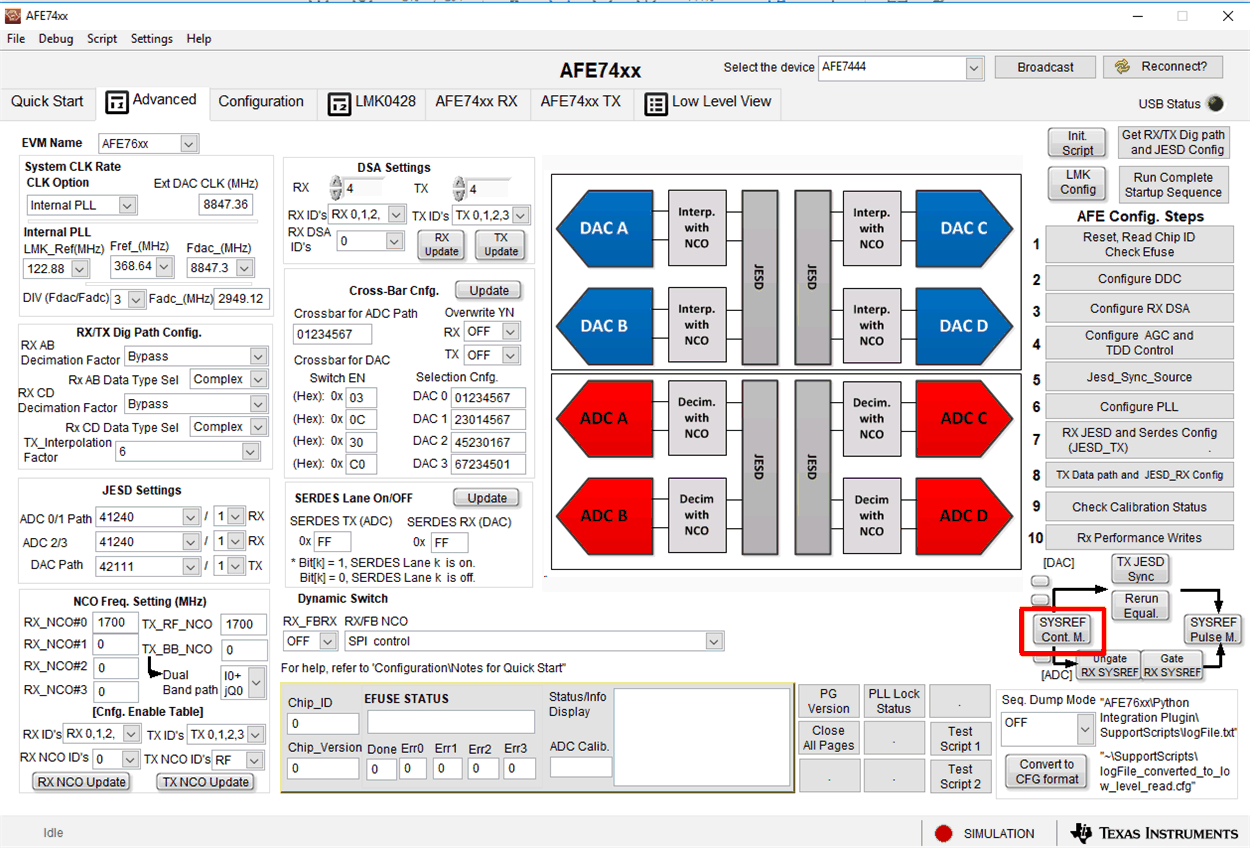 Figure 7. Advanced Tab
 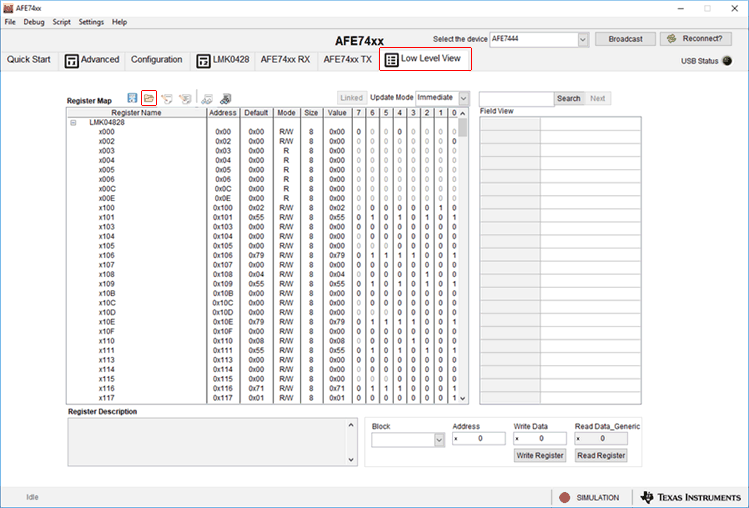 Figure 8. Low Level View Tab
 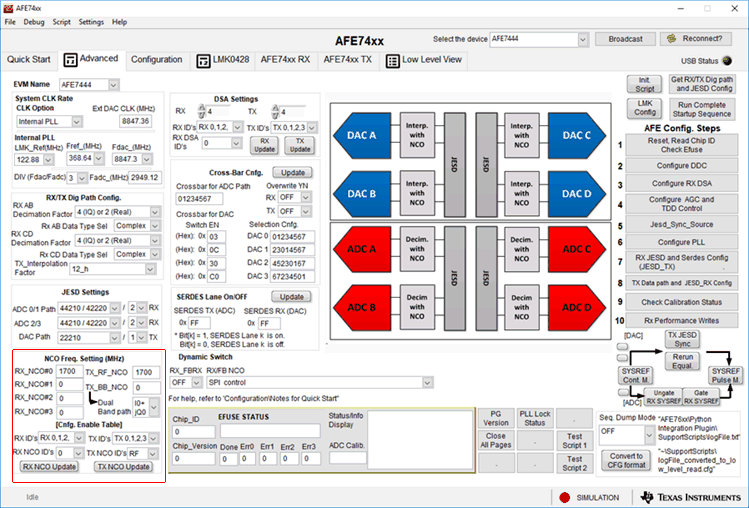 Figure 9. Adust RX and TX NCO Values to Desired Frequencies