SLAU640B April 2019 – March 2023
- Introduction
- 1Trademarks
- 2Equipment
-
3Setup Procedure
- 3.1 Install the High Speed Data Converter (HSDC) Pro Software
- 3.2 Install the Configuration GUI Software
- 3.3 Connect the EVM and TSW14J57EVM
- 3.4 Connect the Power Supplies to the Boards (Power Off)
- 3.5 Connect the Signal Generators to the EVM (RF Outputs Disabled Until Directed)
- 3.6 Turn On the TSW14J57EVM Power and Connect to the PC
- 3.7 Turn On the ADC12DJ5200RFEVM/SEEVM Power Supplies and Connect to the PC
- 3.8 Turn On the Signal Generator RF Outputs
- 3.9 Open the ADC12DJ5200RFEVM/SEEVM GUI and Program the ADC and Clocks
- 3.10 Calibrate the ADC Device on the EVM
- 3.11 Open the HSDC Software and Load the FPGA Image to the TSW14J57EVM
- 3.12 Capture Data Using the HSDC Pro Software
- 4Device Configuration
- 5Troubleshooting the ADC12DJ5200RFEVM/SEEVM
- 6References
- 7HSDC Pro Settings for Optional ADC Device Configuration
- 8Signal Routing
- A Analog Inputs
- B Jumpers and LEDs
- B Revision History
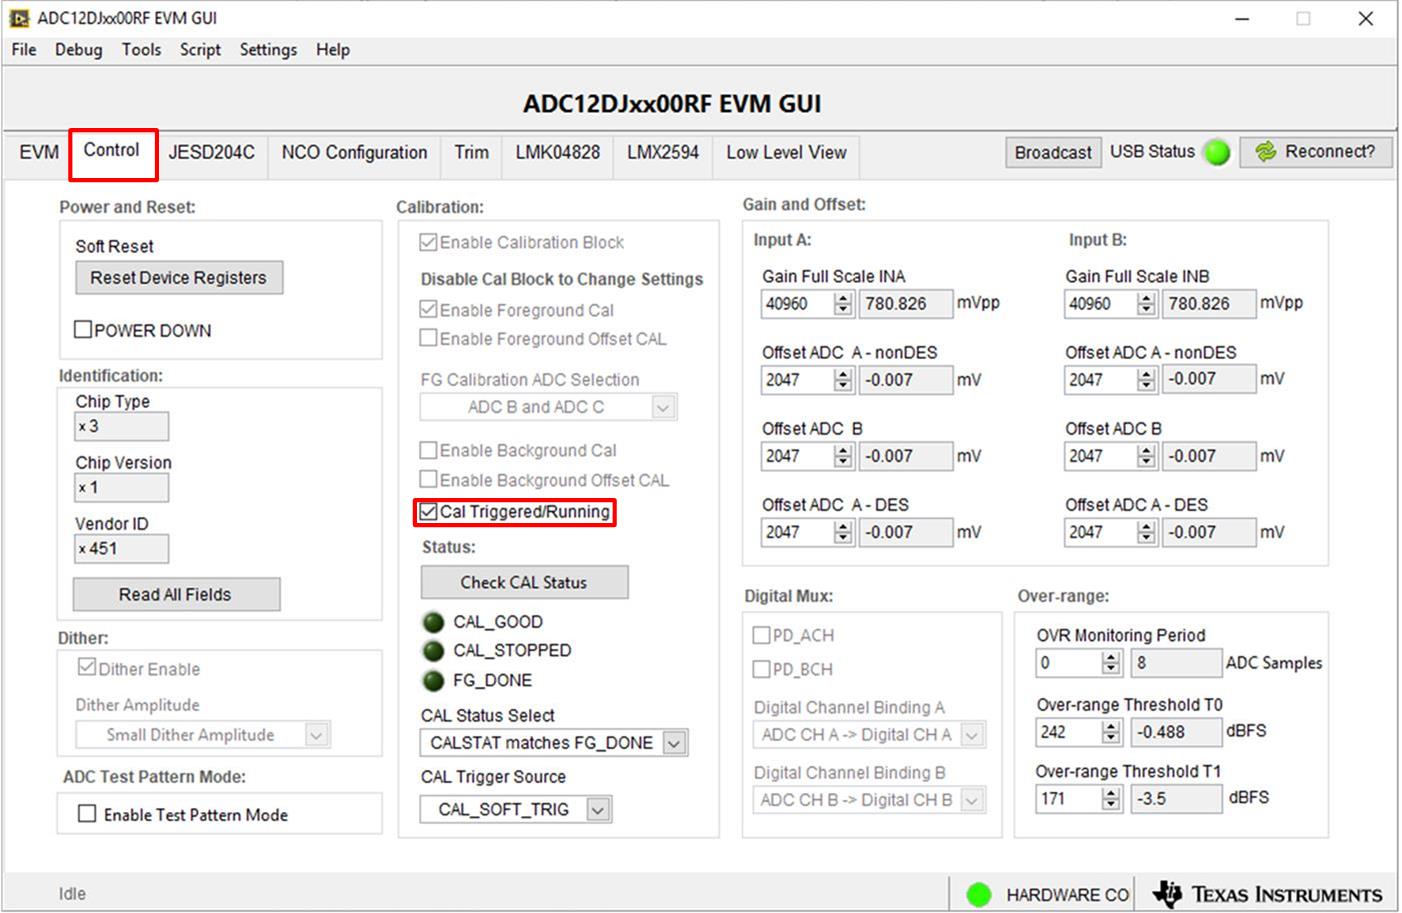
3.10 Calibrate the ADC Device on the EVM
 Figure 3-3 Configuration GUI ADC Control
- With the EVM GUI open on the PC, navigate to the Control tab.
- To calibrate the ADC, click Cal Triggered/Running once, then click it again. This will stop and re-start the Calibration engine. Note:
This calibrate button executes a calibration sequence that is required for full performance. This calibration is performed automatically during the GUID-A2E0454D-9666-4AC7-B7A2-355927C7E4C8.html#GUID-A2E0454D-9666-4AC7-B7A2-355927C7E4C8 step but must be performed again, any time the sampling rate changes, after significant temperature change of the ADC, or after exiting the power-down mode. See the ADC12DJ5200RF/SE device data sheet, (SLVSEN9) for details regarding the necessary calibration sequence.
- To enable background calibration, use the following steps:
- Navigate to the JESD204C tab and click on JESD Block Enable to stop the JESD204C block.
- Navigate back to the Control tab and click on Enable Calibration Block to disable calibration and allow setting changes.
- Click on Enable Background Cal.
- If background offset calibration is desired also, click on Enable Background Offset Cal.
- Click on Enable Calibration Block to re-enable the calibration subsystem
- Navigate to the JESD204C tab and click on JESD Block Enable to re-start the JESD204C block.
- Navigate back to the Control tab and click the Cal Triggered/Running button once, then click it again. This restarts the Calibration engine.
- To disable background calibration, use the following steps:
- Navigate to the JESD204C tab and click on JESD Block Enable to stop the JESD204C block.
- Navigate back to the Control tab and click on Enable Calibration Block to disable calibration and allow setting changes.
- If background offset calibration was enabled, click on Enable Background Offset Cal to disable the feature.
- Click on Enable Background Cal to disable the feature.
- Click on Enable Calibration Block to re-enable the calibration subsystem.
- Navigate to the JESD204C tab and click on JESD Block Enable to re-start the JESD204C block.
- Navigate back to the Control tab and click the Cal Triggered/Running button once, then click it again. This restarts the Calibration engine.