SPRAD86 March   2023 AM62A3 , AM62A3-Q1 , AM62A7 , AM62A7-Q1 , AM68A , AM69A


  1.   Abstract
  2.   Trademarks
  3. 1Introduction
  4. 2Tuning Overview
  5. 3Hardware Requirement
  6. 4Software Requirement
    1. 4.1 Processor SDK Linux
    2. 4.2 TI's Reference Imaging Software
    3. 4.3 ISP Tuning Tool
  7. 5Sensor Software Development and Integration
    1. 5.1 Adding Sensor Driver to SDK
    2. 5.2 Updating GStreamer Plugins to Support the Sensor
      1. 5.2.1 Update TIOVX Modules
        1. 5.2.1.1 Source Code Change
        2. 5.2.1.2 Rebuild Modules
      2. 5.2.2 Update GStreamer Plugins
        1. 5.2.2.1 Source Code Change
        2. 5.2.2.2 Rebuild Plugins
        3. 5.2.2.3 Verify New Sensor in GStreamer Plugin
  8. 6Tuning Procedure
    1. 6.1 Verify Functional Operation of Camera Capturing
    2. 6.2 Enable Camera Streaming with Initial VPAC Configuration
      1. 6.2.1 Generate Configuration Files
      2. 6.2.2 Generate DCC Binary Files
      3. 6.2.3 Stream Video with the Initial Configuration
    3. 6.3 Adjust Camera Mounting
    4. 6.4 Capture Raw Images and Perform Basic Tuning
      1. 6.4.1 Launch the Tuning Tool and Create a Project
      2. 6.4.2 Tuning Order
      3. 6.4.3 Black Level Subtraction
      4. 6.4.4 Hardware 3A (H3A)
      5. 6.4.5 Auto White Balance (AWB)
        1. 6.4.5.1 Capture Raw Images for Different Lighting Conditions
        2. 6.4.5.2 Tuning AWB
      6. 6.4.6 Color Correction
    5. 6.5 Perform Fine Tuning
  9. 7Summary

Launch the Tuning Tool and Create a Project

Locate and run the installed tuning tool executable in Windows, <installation folder>\bin\DCC.exe. Choose VPAC3L (AM62A) when prompted for the correct VPAC version. After the tool starts, create a project and enter raw image properties. #GUID-1997A11A-6856-4D0F-BB87-FAD449F01960 shows an example for IMX219 in 1080p streaming mode.
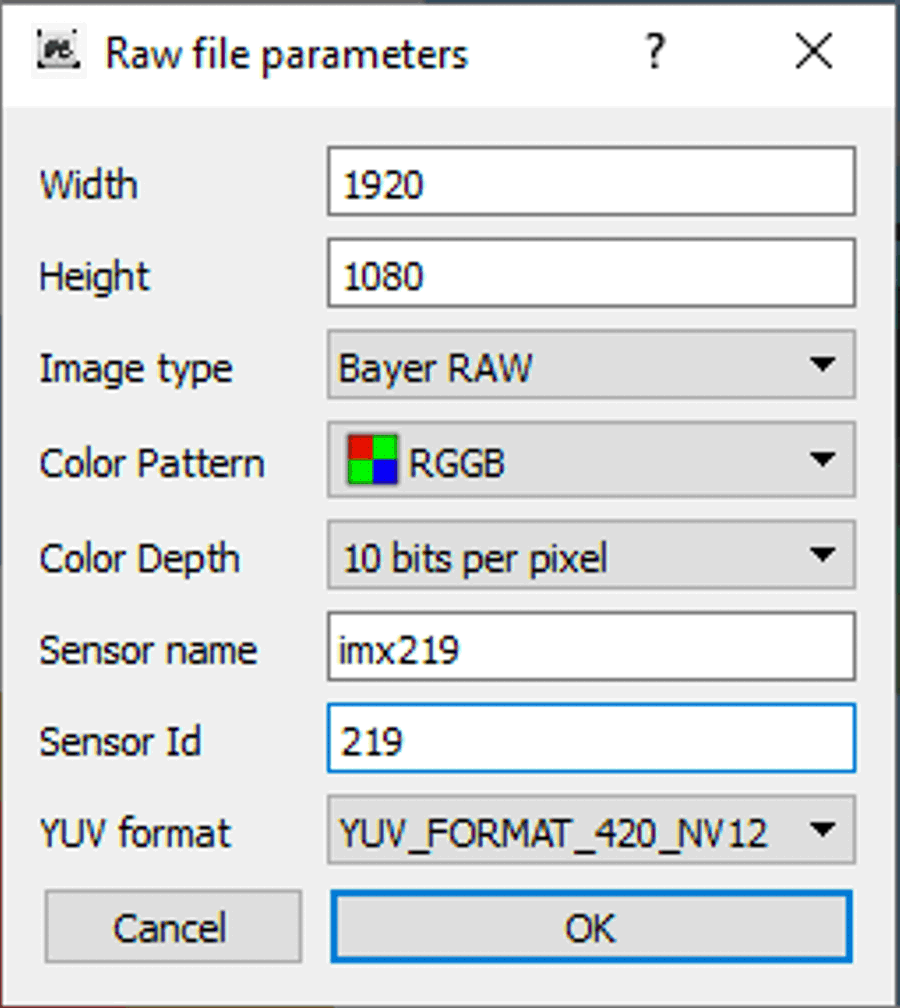
GUID-20230224-SS0I-MJ2F-2VXH-9R0FKCFTMCNQ-low.png Figure 6-1 Sensor Raw Image Parameters for Tuning
Note: Note that the image properties must match with what will be used for capturing raw images, and the sensor ID must match with the hard coded value in the GStreamer plugins.

Once a new project is created, raw images can be previewed through the tuning tool. Capture a raw image of the color checker with good lighting condition using the command for camera capturing verification. Select this image file in the tuning tool's "Browse" window and the image should display in the "Preview window". For example, below is an IMX219 raw image at 1920x1080 with 10 bits per pixel, displayed in the tuning tool.

GUID-20230224-SS0I-2G9L-JSQZ-PXVZ9MSJZZG8-low.png Figure 6-2 Image Preview by DCC Tuning Tool
Note: Only raw images captured with 10/12/16 bits per pixel can be previewed in the tuning tool. If captured with 8 bits per pixel, the image can be converted to 16-bit per pixel first and then previewed and used in the tuning tool.

Now that everything is ready, one can proceed to perform tuning, as described in following sections.