SLAAE27 June 2021 MSP430FR2155 , MSP430FR2155
3 Software
Figure 3-1 show the software flow chart for the motor module:
- 5 V power input is required to generate the necessary on-board supplies for all logic operations.
- Software initialization tristates the motor driver outputs and puts the motor drivers to sleep mode. Default motor voltage, speed, direction, pulse-count, PWM frequency, and step-mode are set as shown in Figure 3-1.
- Tilt, focus, and iris motors are
enabled as per the start or enable user variable for the respective motors.
- Tilt and focus motor: Direction, pulse-count (or number of steps) and micro-stepping are set for the respective motor. Outputs are enabled to drive the respective motor.
- Iris motor: Duty cycle required to achieve the required motor voltage is calculated and set. Output is enabled and PWM pulses are generated to drive the iris motor in the chosen direction.
- Operation is repeated until the pulse counter reaches zero or until time-out.
Figure 3-1 Software Flow Chart
The following steps are required to program the camera motor module:
- Pre-requisites: Download the software 'Motor_Module_Software' available at https://www.ti.com/lit/zip/slaae27. Install and launch the Code Composer Studio IDE. Unzip and import the Motor_Module_Software project in CCS.
- Variables: The control macros for controlling the speed, direction, step-mode, pulse-count and run-time for the motor drivers can be found in "Camera_Motor_EVM.h". These values can be set as per application requirements.
- Connections: Connect 5-V Power input to the motor control module. Connect a programmer from the PC (using MSP-FET JTAG or any MSP430 Launchpad) to the MSP430FR2155 on the motor module with jumper wires. It is required to connect GND, SBWTDIO, and SBWTCK.
- Program: In CCS, debug and build the code to program the motor module. This will run the code based on the input control macros from step 2.
- Using UART commands:
- Program the motor module’s MSP430FR2155 (as described in steps above).
- Hardware connections: Connect the UART lines (RX and TX) from any MSP430 Launchpad's programming header to the motor module’s UART pins.
- PC settings: Plug the MSP430 Launchpad to the USB port of the PC. Open any serial terminal and connect to the MSP430 serial port. Port settings: 115200 kbps, 8 bit, 1 stop, and no parity.
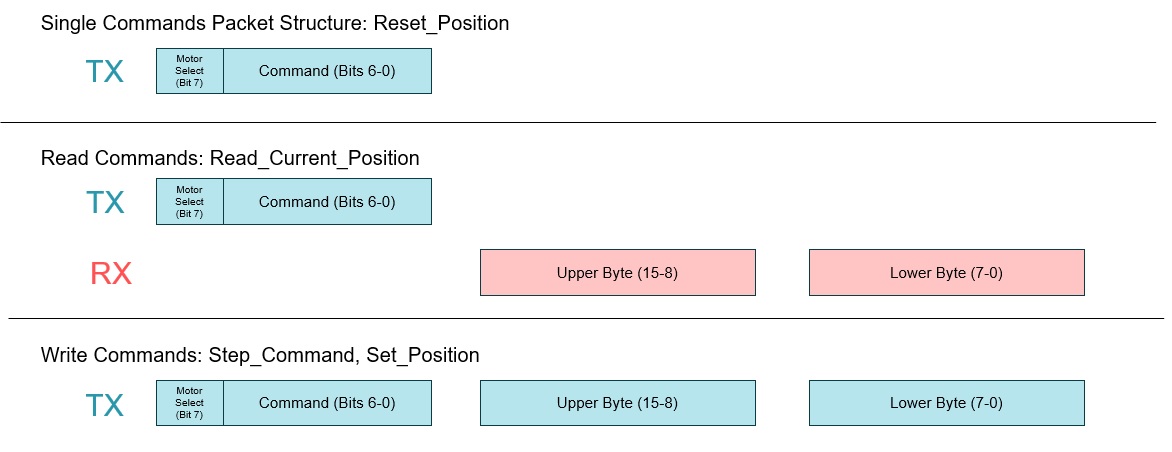
- Hex commands can be used to control the module as shown in Table 3-1, Table 3-2, and Figure 3-2.
Table 3-1 UART Commands
| Command | Hex Value | Notes |
|---|---|---|
| Reset_Position | 0x01 | Sets motor position counter to 0 |
| Read_Current_Position | 0x02 | Returns current motor position value |
| Step_Command | 0x04 | Steps motor forward or backwards. Send 16-bit signed number for # of steps and direction. (+ = Clockwise, - = Counter Clockwise) |
| Set_Position | 0x05 | Sets motor to a desired position. Send 16 bit signed number to indicate target position. |
Table 3-2 Motor Enable
| Motor | Motor Select Bit |
|---|---|
| Focus motor | 0 |
| Tilt motor | 1 |
 Figure 3-2 UART Commands