SLVU445C March   2011  – August 2021 TPS56121


  1.   Trademarks
  2. Introduction
  3. Description
    1. 2.1 Applications
    2. 2.2 Features
  4. Electrical Performance Specifications
  5. Schematic
  6. Test Setup
    1. 5.1 Test Equipment
      1. 5.1.1 Voltage Source
      2. 5.1.2 Meters
      3. 5.1.3 Load
      4. 5.1.4 Oscilloscope
      5. 5.1.5 Fan
    2. 5.2 Recommended Wire Gauge
      1. 5.2.1 VIN to J1
      2. 5.2.2 J2 to LOAD
    3. 5.3 Equipment Set Up Procedure
  7. Configurations
    1. 6.1 Enable Selection (J3)
  8. Test Point Descriptions
    1. 7.1 Input Voltage Monitoring (TP1 and TP2)
    2. 7.2 Output Voltage Monitoring (TP3 and TP4)
    3. 7.3 Enable/Soft-start Monitoring (TP5)
    4. 7.4 Power Good Monitoring (TP6)
    5. 7.5 Loop Response Testing (TP7, TP8, TP9 and TP10)
    6. 7.6 Switch Node Voltage Monitoring (TP11 and TP12)
  9. Test Procedures
    1. 8.1 Start Up/Shut Down Procedure
    2. 8.2 Output Ripple Voltage Measurement Procedure
    3. 8.3 Control Loop Gain and Phase Measurement Procedure
    4. 8.4 Equipment Shutdown
  10. Performance Data and Typical Characteristic Curves
    1. 9.1  Efficiency
    2. 9.2  Load Regulation
    3. 9.3  Line Regulation
    4. 9.4  Output Voltage Ripple
    5. 9.5  Switch Node
    6. 9.6  Load Transient
    7. 9.7  Start Up
    8. 9.8  Power Off
    9. 9.9  Over-Current Protection
    10. 9.10 Control Loop Bode Plot
    11. 9.11 Thermal Image
  11. 10EVM Assembly Drawings and PCB Layout
  12. 11List of Materials
  13. 12Revision History

Control Loop Gain and Phase Measurement Procedure

  1. Follow Section 8.1 to set VIN and LOAD to desired operating condition.
  2. Connect isolation transformer to test points TP7 and TP10 as shown in Figure 8-2.
  3. Connect input signal amplitude measurement probe (Channel A) to TP7 as shown in Figure 8-2.
  4. Connect output signal amplitude measurement probe (Channel B) to TP10 as shown in Figure 8-2.
  5. Connect ground lead of Channel A and Channel B to TP8 and TP9 as shown in Figure 8-2, respectively.
  6. Inject 10 mV or less signal through the isolation transformer.
  7. Sweep the frequency from 500 Hz to 500 kHz with 10-Hz or lower post filter.
  8. Control loop gain can be measured by
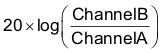
 GUID-10EEDFBD-3596-4EB5-A1B3-96CD8A94F6DB-low.gif.
  9. Control loop phase can be measured by the phase difference between Channel A and Channel B.
  10. Follow Section Section 8.1 to power down.
GUID-16D961C8-49D4-406A-8309-48AED0F6949A-low.gifFigure 8-2 Control Loop Measurement Setup