SPNA248 March 2021 TM4C1292NCPDT , TM4C1292NCPDT , TM4C1292NCZAD , TM4C1292NCZAD , TM4C1294KCPDT , TM4C1294KCPDT , TM4C1294NCPDT , TM4C1294NCPDT , TM4C1294NCZAD , TM4C1294NCZAD , TM4C1299KCZAD , TM4C1299KCZAD , TM4C1299NCZAD , TM4C1299NCZAD , TM4C129DNCPDT , TM4C129DNCPDT , TM4C129DNCZAD , TM4C129DNCZAD , TM4C129EKCPDT , TM4C129EKCPDT , TM4C129ENCPDT , TM4C129ENCPDT , TM4C129ENCZAD , TM4C129ENCZAD , TM4C129LNCZAD , TM4C129LNCZAD , TM4C129XKCZAD , TM4C129XKCZAD , TM4C129XNCZAD , TM4C129XNCZAD
- Trademarks
- 1 Introduction
- 2 Application Examples
- 3 Application Setup
- 4 Download and Import the Ethernet examples
- 5 Enet_tcpecho_server_lwip Example Overview
- 6 Enet_tcpecho_server_static_ip_lwip Example Overview
- 7 Enet_udpecho_server_lwip Example Overview
- 8 Enet_dns_lwip Example Overview
- 9 Enet_sntp_lwip Example Overview
- 10Enet_tcpecho_client_lwip Example Overview
- 11Enet_adcsensor_client_lwip Example Overview
- 12Enet_udpecho_client_lwip Example Overview
- 13References
7.1 Run the enet_udpecho_server_lwip Example
The SocketTest tool that is used acts as the client running on the PC. Make sure the PC is connected to the same network as the EK-TM4C1294XL with the same subnet mask.
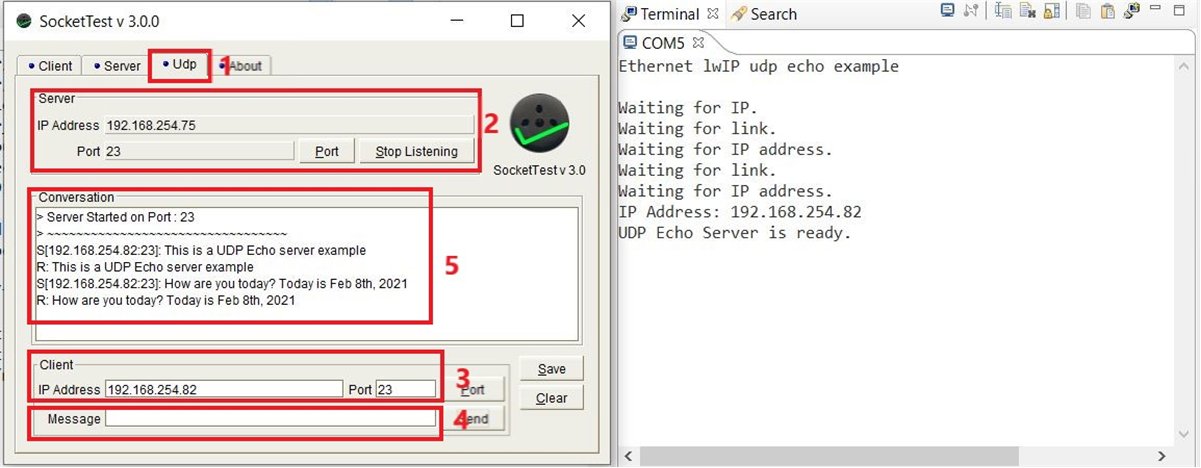
Follow the steps shown in Figure 7-2 to setup the SocketTest:
- Go to the “Client” tab.
- Enter the PC’s IP address and the port number 23 and press the “Start Listening” button. The server IP address should be the address of the PC running SocketTest. To find out the PC’s IP address in your network, you can use the Windows’ ipconfig command. Bring up a Windows command window and at the prompt types “ipconfig” and you will see the IP address assigned to your PC. For example, see Figure 7-1. Note in SocketTest, the Server address field will be the address of the PC regardless if the PC is the actual server or client. SocketTest just listens for any incoming data at the specified address and port.
- Enter the MCU’s IP address in the “IP Address for Client”. The IP address assigned to the MCU is shown in the terminal window.
- Go to the “Message” field and type in some messages and then hit the “Send” button.
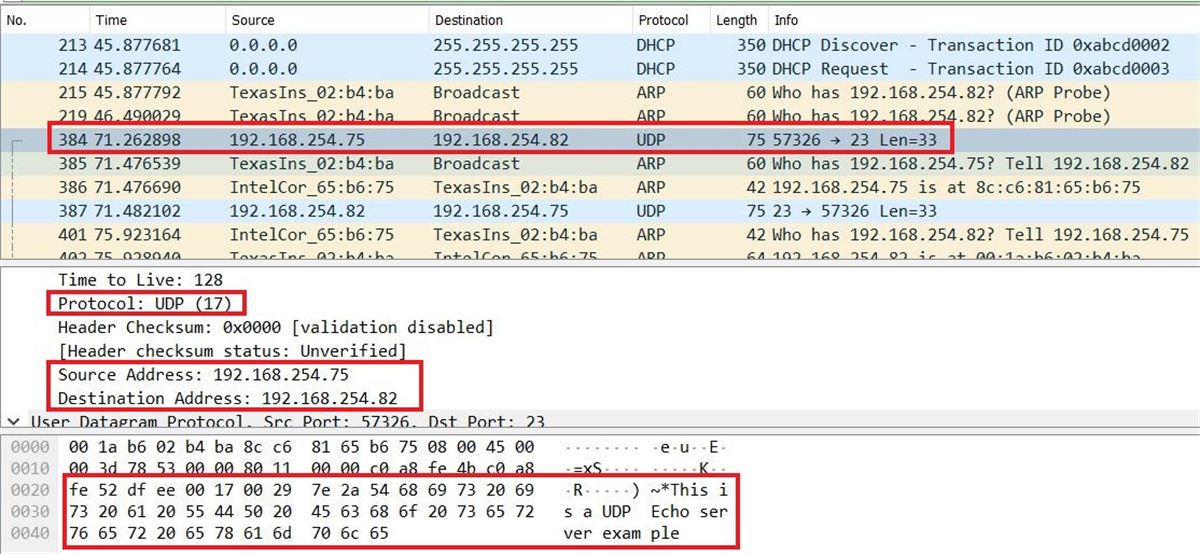
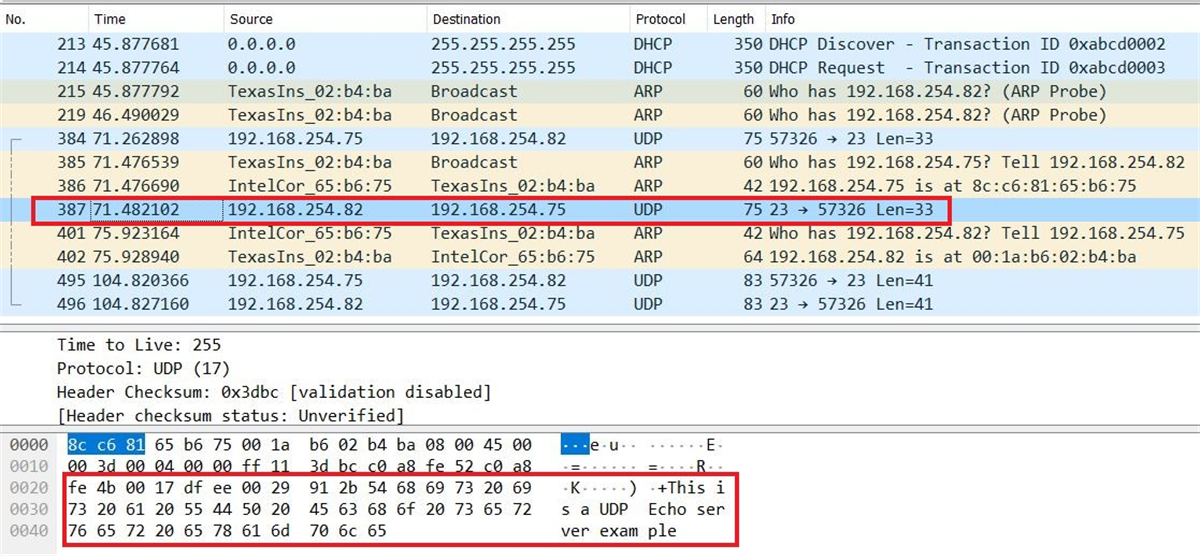
- Observe the conversation field in SocketTest as well as the Wireshark captures in Figure 7-3 and Figure 7-4.
 Figure 7-1 Query IP Address of the PC
 Figure 7-2 Enet_udpecho_server_lwip Output
 Figure 7-3 Client to Server Wireshark Capture for Enet_udpecho_server_lwip
  Figure 7-4 Server to Client Wireshark Capture for Enet_udpecho_server_lwip