SLAA980 October 2020 MSP430FR2433
Application Brief
Voltage monitoring is essential for battery- and bus-powered applications to save the system state through a power loss event. Often the real time should be saved as a timestamp to track the power loss event. The MSP430FR2433 microcontroller (MCU) can be used as a low-cost solution for this problem by leveraging the internal analog-to-digital converter (ADC) and its built-in window comparator, real-time clock (RTC) counter, and internal ferroelectric random access memory (FRAM). By using UART communication, the host can set the initial time in POSIX format, and it can query the MSP430™ MCU to read the current time in the same format. Additionally, the real time is saved as a timestamp in FRAM during a power loss event and can be retrieved afterwards. To get started, download the project files and example code demonstrating this functionality.
Implementation
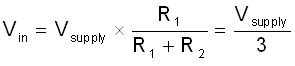
This solution uses the internal ADC window comparator of the MSP430FR2433 MCU and external resistors to monitor the supply voltage. Figure 1-1 shows how the supply voltage (Vsupply) is divided by resistors R1 and R2, and the divided voltage (Vin) is connected to the ADC input channel. The input voltage is calculated in Equation 1. If Vsupply is 3.3-V, then Vin would be 1.1-V.
The internal 1.5-V reference (VREF) is selected as the ADC reference voltage, but the firmware can easily be changed to select AVCC or an external reference. The initial high and low voltage thresholds for the ADC window comparator are defined by the ADC_THR_HIGH_INIT and ADC_THR_LOW_INIT macros in the firmware and are calculated in Equation 2 and Equation 3, respectively.


The RTC Counter module is used as an external RTC to provide the current real time in POSIX format. The host can set the initial time and then read the current time through a UART interface. The internal 32768-Hz REFO oscillator is used as the clock source for the FLL reference and the timer for the ADC trigger. The 16-MHz SMCLK is used as the clock source for the RTC Counter and UART modules. Alternatively, an external 32768-Hz crystal can be used as the clock source if the crystal selection resistors are changed on the MSP430FR2433 LaunchPad Development Kit and the __ENABLE_XT1__ symbol is added to the compiler settings in the CCS project.
 Figure 1-1 Voltage Monitor Block
Diagram.
Figure 1-1 Voltage Monitor Block
Diagram. If the supply voltage falls below 3-V, Vin falls below 1-V, which is lower than Vth(low). If the supply voltage spikes above 3.6-V, Vin rises above 1.2-V, which is higher than Vth(high). In either scenario, an ADC window comparator interrupt is triggered. In the ADC interrupt service routine (ISR), the current timestamp is stored in FRAM to record the power loss or spike event. By changing the resistor divider and the ADC_THR_HIGH_INIT and ADC_THR_LOW_INIT macros in the firmware, different voltage levels can be monitored based on specific application requirements.
The ADC window comparator input voltage (Vin) is set by the ratio of the two resistors in the divider. Even when keeping the ratio constant, there are tradeoffs to consider for selecting the actual resistor values. With lower resistances, the current through the divider is increased. For information on how to select optimally-sized resistors, see Optimizing Resistor Dividers at a Comparator.
Another scenario is connecting the ground of the voltage divider to one of the MCU’s GPIOs instead of connecting the board ground directly to the R1 resistor. Setting the GPIO output low when measuring Vin can replace the ground connected to the R1 resistor, and setting the GPIO output high when not measuring Vin can reduce the static power consumption of the voltage divider circuit.
The MSP430FR2433 LaunchPad Development Kit was used for testing this solution, but it can be used on any MSP430 MCU with the proper peripheral support and code migration. The LaunchPad's eZ-FET back-channel UART interface can be connected to a PC terminal program or GUI Composer at 9600 baud for evaluating and further testing.
The firmware implements the following UART communication protocol:
| COMMAND | D0 | D1 | D2 | D3 |
For the READ commands, the data bytes are requested as a response from the MSP430 MCU. The command byte for each response is included for identifying the data more easily. For the WRITE commands, the data bytes are sent to the MSP430 MCU to be processed. Both the timestamp and threshold data are sent LSB first. The timestamp data should be interpreted as D3D2D1D0h, and the threshold data as D1D0h.
| RTC_READ_TIME Command | ||||||
| 00h | D0 | D1 | D2 | D3 | ||
| RTC_WRITE_TIME Command | ||||||
| 01h | D0 | D1 | D2 | D3 | ||
| RTC_READ_THR_HIGH Command | ||||||
| 02h | D0 | D1 | D2 | D3 | ||
| RTC_READ_THR_LOW Command | ||||||
| 03h | D0 | D1 | D2 | D3 | ||
| ADC_READ_THR_HIGH Command | ||||||
| 04h | D0 | D1 | ||||
| ADC_READ_THR_LOW Command | ||||||
| 05h | D0 | D1 | ||||
| ADC_WRITE_THR_HIGH Command | ||||||
| 06h | D0 | D1 | ||||
| ADC_WRITE_THR_LOW Command | ||||||
| 07h | D0 | D1 | ||||
| = Response | ||||
Performance
This solution uses the ADC window comparator to monitor the supply voltage, and a timestamp is stored in FRAM whenever a power loss or spike event is detected. By default, the FRAM is write-protected. The FRAM is only unprotected when a timestamp must be stored, and then it is protected again after the write.
Different voltage thresholds can be easily set with the ADC window comparator. The main advantage of the ADC window comparator compared to a normal ADC input is that the CPU does not need to evaluate the input voltage. The thresholds are automatically monitored by the ADC module without needing to wake up the CPU, which reduces power consumption and increases overall bandwidth. Because this solution uses an external resistor voltage divider, voltages higher than the MCU supply voltage can also be monitored. The host can request the current thresholds from the MSP430 MCU by sending the ADC_READ_THR_HIGH and ADC_READ_THR_LOW commands. The host can also change the thresholds by sending the ADC_WRITE_THR_HIGH and ADC_WRITE_THR_LOW commands with new thresholds.
The RTC Counter module in the device updates the real time once per second. The host can request the current real time by sending the RTC_READ_TIME command to the MSP430 MCU. If the real time must be updated, the host can send the RTC_WRITE_TIME command along with the current real time. The latest timestamps for the high and low thresholds can also be requested by sending the RTC_READ_THR_HIGH and RTC_READ_THR_LOW commands, respectively. For example, after the MSP430 MCU powers back up after a power loss, the host can send the RTC_READ_THR_LOW command to know when the power loss occurred. Also, the firmware automatically sends the timestamp to the host whenever the thresholds are exceeded.
For the standalone demo, a PC terminal program (for example, Docklight, Tera Term, and so forth) can be used as the host. An example demonstrating all of the commands and data including reading the initial RTC time, setting a new time and reading the time to confirm it was updated is shown in Figure 1-2. Observe that the RTC_WRITE_TIME command was sent to the MSP430 MCU at 09:54:06 and set to 78563412h. 1 second later at 09:54:07, the RTC_READ_TIME command was sent, and the reply shows the current timestamp value was incremented by 1 second to 78563413h. Notice that an unsupported command of 95h was sent but was correctly ignored by the MSP430 MCU.
 Figure 1-2 Voltage Monitor with a
Timestamp Standalone Demo.
Figure 1-2 Voltage Monitor with a
Timestamp Standalone Demo. For the GUI demo, the GUI can be used as the host as shown in Figure 1-3. The RTC can be read by clicking the CURRENT TIMESTAMP button in the first section. A new timestamp can be set by entering an 8-digit POSIX timestamp in the text box and pressing Enter. The high and low thresholds for the ADC window comparator can be adjusted in the second section by moving the sliders or entering new values in the text boxes and then pressing Enter. The buttons in this section can also be used to request the thresholds from the MSP430 MCU. The GUI automatically prevents the thresholds from overlapping or exceeding the maximum value. The latest timestamps can be requested from the MSP430 MCU by clicking the HIGH THRESHOLD and LOW THRESHOLD buttons (for example, after a power failure) in the third section. Otherwise, the timestamps are updated in the text boxes automatically whenever the input voltage exceeds one of the thresholds. Note that the GUI demo code can be used in standalone mode by deleting the __ENABLE_GUI__ symbol in the compiler settings in the CCS project, recompiling the code and programming the device.
 Figure 1-3 Voltage Monitor with a
Timestamp GUI Demo.
Figure 1-3 Voltage Monitor with a
Timestamp GUI Demo. To Get Started
- Watch the training video “Voltage Monitor with a Timestamp using a Housekeeping MCU” to learn how to use the GUI to set a timestamp and then find out when a power failure occurred.
- Order a MSP430FR2433 LaunchPad Development Kit to evaluate the Voltage Monitor with a Timestamp example GUI and code.
- Download and test the Voltage Monitor with a Timestamp example GUI to easily configure and view the timestamps and thresholds.
- Evaluate the Voltage Monitor with a Timestamp example code using the MSP430FR2433 LaunchPad Development Kit.
| Part Number | Key Features |
|---|---|
| MSP430FR2433 | 16KB FRAM, 4KB SRAM, 10-bit ADC, UART/SPI/I2C, Timer |
| MSP430FR2422 | 8KB FRAM, 2KB SRAM, 10-bit ADC, UART/SPI/I2C, Timer |