SLAU866 November   2021 DAC43204 , DAC53202 , DAC53204 , DAC63202 , DAC63204


  1.    DAC63204EVM
  2.   Trademarks
  3. 1Overview
    1. 1.1 Kit Contents
    2. 1.2 Related Documentation from Texas Instruments
  4. 2System Setup
    1. 2.1 Software Setup
      1. 2.1.1 Operating Systems
      2. 2.1.2 Software Installation
    2. 2.2 Hardware Setup
      1. 2.2.1 Electrostatic Discharge Caution
      2. 2.2.2 Power Configurations and Jumper Settings
      3. 2.2.3 Connecting the Hardware
  5. 3Detailed Description
    1. 3.1 Hardware Description
      1. 3.1.1 Theory of Operation
        1. 3.1.1.1 Signal Definitions
    2. 3.2 Software Description
      1. 3.2.1 Starting the Software
      2. 3.2.2 Software Features
        1. 3.2.2.1 High Level Configuration Page
          1. 3.2.2.1.1 Basic DAC Subpage
          2. 3.2.2.1.2 Margining Subpage
          3. 3.2.2.1.3 Functions Generation Subpage
        2. 3.2.2.2 Low Level Configuration Page
  6. 4Schematic, PCB Layout, and Bill of Materials
    1. 4.1 Schematic
    2. 4.2 PCB Layout
    3. 4.3 Bill of Materials

Starting the Software

To launch the software, locate the Texas Instruments folder in the All Programs menu, and select the DAC63204EVM icon.
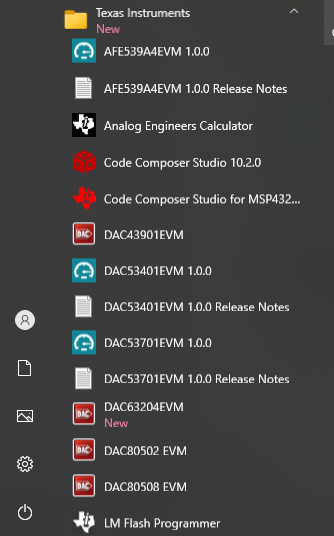
GUID-E5583D6F-A49C-4FC2-B01C-6FF1F4CE80C4-low.pngFigure 3-2 DAC63204EVM GUI Location

If the onboard controller is connected correctly, the status bar at the bottom of the screen displays CONNECTED as shown in Figure 3-3. If the controller is not properly connected or not connected at all, the status displays DEMO. If the GUI is not displaying, the CONNECTED status while the EVM is connected, unplug and reconnect the EVM, and then relaunch the GUI software.

GUID-E68D2479-C68A-4A1F-925F-FCE3BFFB5353-low.pngFigure 3-3 DAC63204EVM GUI Connection Detection