SLAU869E October 2022 – January 2024
- 1
- Abstract
- Trademarks
- 1Getting Started
-
2Hardware
- 2.1 Jumper Map
- 2.2 Block Diagram
- 2.3
Hardware Features
- 2.3.1 MSPM0L1306 MCU
- 2.3.2 XDS110-ET Onboard Debug Probe With EnergyTrace Technology
- 2.3.3 Debug Probe Connection: Isolation Jumper Block
- 2.3.4 Application (or Backchannel) UART
- 2.3.5 Using an External Debug Probe Instead of the Onboard XDS110-ET
- 2.3.6 Using the XDS110-ET Debug Probe With a Different Target
- 2.3.7 Special Features
- 2.4 Power
- 2.5 External Power Supply and BoosterPack Plug-in Module
- 2.6 Measure Current Draw of the MSPM0 MCU
- 2.7 Clocking
- 2.8 BoosterPack Plug-in Module Pinout
- 3Software Examples
- 4Resources
- 5Schematics
- 6Revision History
2.3.7.1 Thermistor
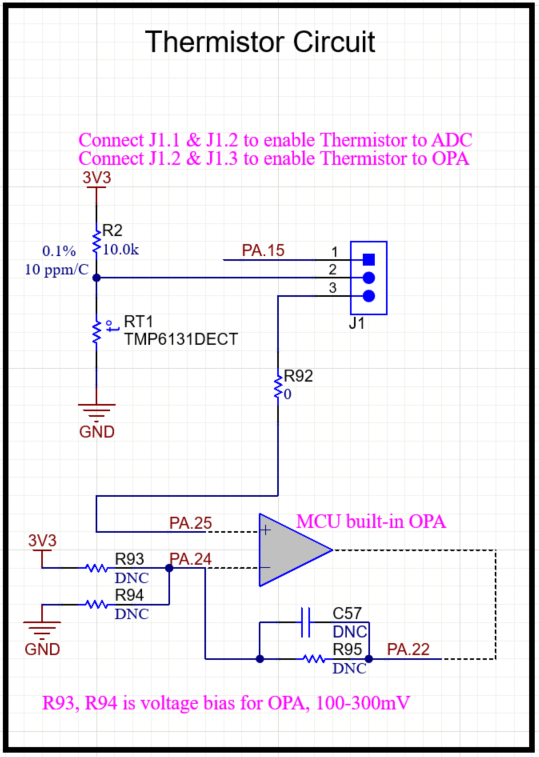
The LaunchPad kit includes a 10k linear thermistor (PTC) – TMP6131. Figure 2-7 shows the circuit. The PTC is in a low-side configuration with a 10kΩ 10ppm pullup resistor. Default position of jumper in header indicated (1-2 position) connects this circuit directly to the ADC. In this mode, the output voltage is approximately 1.6V at room temperature. See Section 3 for code examples. See Table 2-1 for device-specific module connections.
The jumper can also be set to the 2-3 position to allow an OPA connection to the thermistor. The OPA output can be connected internally, using software, to the negative OPA terminal. This allows the OPA to be used as a buffer for the thermistor with an internal connection to an ADC channel for sampling. If an external connection or additional biasing or filtering is wanted, then the passives identified in Figure 2-7 need to be populated.
 Figure 2-7 Thermistor Circuit