SLVUC36 April   2021 TPS23882B


  1.   Trademarks
  2. 1Description
    1. 1.1 Features
    2. 1.2 Applications
  3. 2Quick Start
    1. 2.1 Input Power
      1. 2.1.1 Input Power (Labeled VPWR)
      2. 2.1.2 Local 3.3 V (Labeled 3.3 V)
      3. 2.1.3 External 3.3 V (Labeled 3.3 V_USB)
    2. 2.2 PoE Port Interfaces
      1. 2.2.1 IEEE802.3bt 2-Pair Ports
    3. 2.3 I2C Interfaces
      1. 2.3.1 USB2ANY
      2. 2.3.2 MSP-EXP430FR5969
    4. 2.4 Basic Test Setup Using Autonomous Mode
    5. 2.5 Basic Test Setup Using USB2ANY for I2C Interface (Auto Mode or Semi-Auto Mode Operation with I2C Monitoring)
    6. 2.6 Advanced Test Setup Using MSP-EX430FR5969 LaunchPad
  4. 3General Use Features
    1. 3.1 EVM Input/Output Connectors and Switches
    2. 3.2 EVM LEDs
    3. 3.3 EVM Test Points
    4. 3.4 EVM Test Jumpers
  5. 4TPS23882B1 GUI Setup
    1. 4.1 TPS23882B1 GUI Installation
    2. 4.2 TPS23882B1GUI Operation
    3. 4.3 MSP-EXP430FR5969 Details
      1. 4.3.1 Basic CCS and Terminal Setup
    4. 4.4 MSP430 Reference Code
      1. 4.4.1 Overview
      2. 4.4.2 Auto Mode
      3. 4.4.3 Semi Auto Mode
  6. 5EVM Schematic, Layout Guidelines, PCB Assembly and Layer Plots
    1. 5.1 Schematic
    2. 5.2 Layout Guidelines
      1. 5.2.1 Supply Voltage Decoupling
      2. 5.2.2 Port Current Kelvin Sensing
      3. 5.2.3 Ground Plane Spacing and Isolation (GND, GND1, and EARTH nets)
    3. 5.3 PCB Drawings
  7. 6Bill of Materials

Advanced Test Setup Using MSP-EX430FR5969 LaunchPad

The LaunchPad (not included) running a custom software program can communicate with the TPS23882B1 devices on the TPS23882B1EVM-008. Figure 2-3 shows the advanced setup using LaunchPad.
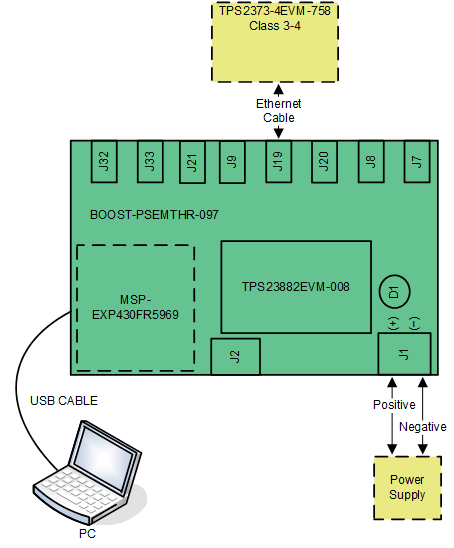
GUID-A42C410C-A8E2-4C3F-B06D-C9AAFD32E4F9-low.gifFigure 2-3 Advanced Setup Using LaunchPadâ„¢
CAUTION:

If wanting to run TPS23882B1 in semi-auto mode, remove the jumper installed on J5 of the TPS23882B1 daughterboard before powering on the board.

CAUTION:

Do not press the RESET button (S1) on the motherboard while communicating over I2C. Pressing this button will set all ports to off mode and the reference code will not be able to recover.