SSZTAZ9 August 2016 TLC59116

The smart home is no longer just for movie and millionaires. New products are hitting the market every day to connect you to every part of your house. There are products to turn on your lights from the other room and you can even find a device to monitor your dog from afar. With advancing technology it’s now easier than ever to create your own automated system using a microcontroller. You can even add light emitting diodes, or LEDs, for visual feedback and status indication! In this blog, we’ll take a further look at designing LEDs for home automation designs.
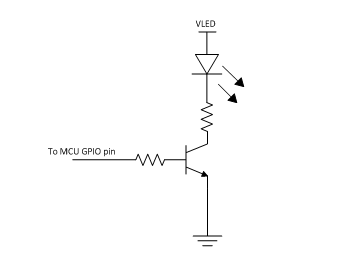
When you’re first taught to use a microcontroller with higher current LEDs, you’re taught to use a transistor for the input control, and to place a resistor in series with the LED to set the forward current. This is fairly simple to do with a single LED, but adding additional LEDs takes up a lot of space. Soon, you will be looking for a bigger microcontroller with more general-purpose input/output (GPIO) pins. This becomes costly and requires more processing effort to control the multiple LEDs.
 Figure 1 A discrete implementation to
drive an LED using a microcontroller unit (MCU)
Figure 1 A discrete implementation to
drive an LED using a microcontroller unit (MCU)LED drivers help solve this problem by simplifying the control of multiple LEDs. They also add to the overall solution by adding features such as blinking, pulse width modulation (PWM) dimming, and error detection. A home automation system can communicate its status to the user using the blinking and PWM signaling using the functionality of the LED driver instead of relying on the microcontroller.
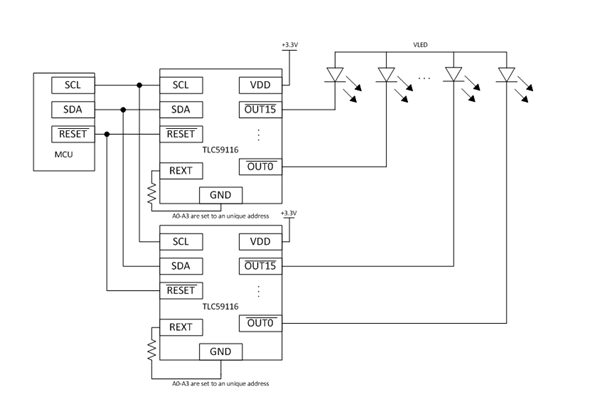
One of the biggest advantages of using an LED driver over traditional current setting resistors is the ability to control a large number of LEDs with minimal GPIO pins. TI’s TLC59116 I2C LED driver can control 16 different channels on a single device using only three microcontroller pins. The four hardware address pins allow the user to go from 16 channels to 224 channels using the same three pins. This means that as the home automation project becomes more complex, the number of LEDs needed to communicate the device status can be scaled as needed.
 Figure 2 Multiple TLC59116 can be added using the same SCL, SDA, and RESET
pins.
Figure 2 Multiple TLC59116 can be added using the same SCL, SDA, and RESET
pins.Not only can the number of GPIO pins for the microcontroller be minimized, the processing effort required by the microcontroller to create the LED effects can also be reduced. The TLC59116 supports both PWM dimming and blinking of LEDs using internal frequency control. Combined with the functionality to set every LED at the same time, the TLC59116 can control a variety of LEDs using basic I2C commands.
So how will you enhance your home automation project? Maybe you want to warn that a room is getting too cold, or notify that your favorite pet hasn’t been fed. Feel free to add some RGB LEDs for status indication. Multiple pets? Add more LEDs to make sure that no puppy goes hungry. With LED drivers like the TLC59116, you can scale your project with ease!
Additional Resources:
- Learn more about TI’s LED driver portfolio.