SBAA483 February 2021 ADS1120 , ADS112C04 , ADS112U04 , ADS114S06 , ADS114S06B , ADS114S08 , ADS114S08B , ADS1220 , ADS122C04 , ADS122U04 , ADS124S06 , ADS124S08 , ADS125H02 , ADS1260 , ADS1261 , ADS1262 , ADS1263
- Abstract
- Trademarks
- 1Introduction
- 2Features Used to Detect Wire Breaks in RTD Systems
- 3Wire-Break Detection Methods for Different RTD Configurations
- 4Settling Time Considerations for RTD Wire-Break Detection
- 5Summary
- A How Integrated PGA Rail Detection Helps Identify Wire Breaks
- B Pseudo-Code for RTD Wire-Break Detection
3.3.1 Detecting Lead 2 and Lead 3 Breaks in a 4-Wire RTD System Using a Low-Side RREF
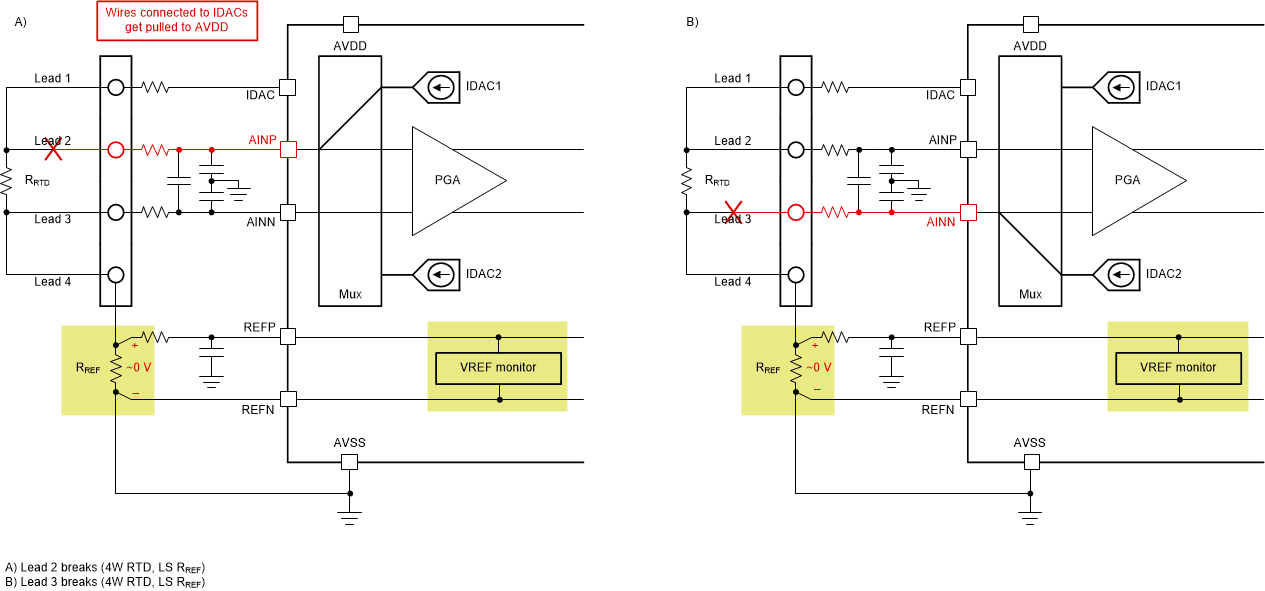
The diagnostic routine used in the 4-wire RTD, low-side RREF case is similar to the method described in Section 3.2.2.1: reroute the IDAC pins to drive current through lead 2 and lead 3, then check the VREF monitor. Figure 3-11 shows how current flows when performing these diagnostic measurements, assuming that lead 2 or lead 3 are broken.
 Figure 3-11 Diagnostic Measurement Checks
if Lead 2 (Left) and Lead 3 (Right) are Broken in a 4-Wire RTD System Using a
Low-Side RREF
Figure 3-11 Diagnostic Measurement Checks
if Lead 2 (Left) and Lead 3 (Right) are Broken in a 4-Wire RTD System Using a
Low-Side RREFThe main difference between the previous diagnostic measurements in the 3-wire RTD system and the 4-wire RTD case is that the latter requires two steps to fully determine if both lead 2 and lead 3 are still intact. In other words, two measurement steps must be implemented as part of the diagnostic cycle, further increasing the system latency compared to the 3-wire RTD case. Therefore, this increased latency must be balanced with the required system response time to a fault condition when choosing how often to interleave diagnostic measurements.