SNVA484B October   2011  – March 2024 LM5113


  1.   1
  2.   Description
  3.   IC Features
  4.   4
  5. 1Evaluation Module Overview
    1. 1.1 Introduction
    2. 1.2 Kit Contents
  6. 2Hardware
    1. 2.1 Powering and Loading Considerations
      1. 2.1.1 Proper Board Connection
      2. 2.1.2 Source Power
      3. 2.1.3 Output Current Derating
      4. 2.1.4 Air Flow
      5. 2.1.5 Quick Start-Up Procedure
  7. 3Implementation Results
    1. 3.1 Performance Characteristics
  8. 448V to 3.3V Conversion
  9. 5Hardware Design Files
    1. 5.1 Evaluation Board Schematic
    2. 5.2 PCB Layouts
    3. 5.3 Bill of Materials (BOM)
  10. 6Additional Information
    1. 6.1 Trademarks
  11. 7Revision History

Quick Start-Up Procedure

  1. Set the current limit of the source supply to provide about 1.5 times the anticipated output power. Connect the source supply to J1 and J3.
  2. Connect the load cable between J2 and J4. Disable the load.
  3. Set the input voltage and turn on the power supply without load current. Check that the output voltage is 10V.
  4. Slowly increase the load current while monitoring the output voltage.

When the evaluation board is powered off, wait for 30 seconds before powering on the evaluation board again to allow the full discharge of the soft start capacitor.
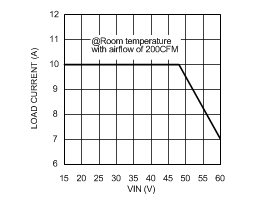
GUID-5CA8C36A-32A9-447D-A626-C328BCA821B3-low.gifFigure 2-3 Load Current Derating Curve