SSZTCM2 june 2015 CC2650
The SimpleLink™ multi-standard CC2650 wireless MCU from Texas Instruments is an amazing piece of hardware that enables communication over Bluetooth low energy as a peripheral device to a central unit. The SimpleLink SensorTag, based on the CC2650, has a lot of services and it would be great to be able to access the kit from anywhere in the world.
The Mission
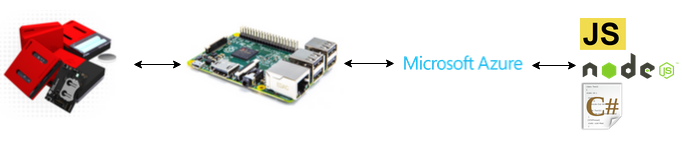
In this post we will take a look at how we can extend communication with CC2650 wireless MCU by adding a full-duplex communication layer behind the Bluetooth low energy central, so that we can read and write into CC2650 from anywhere in the world. Since this might feel a bit abstract the image below might help to visualize what we are going to do.
There are many ways to connect to a peripheral Bluetooth low energy device, but in this post we will be using a Raspberry Pi 2 as the BLE central device.
The image illustrates that the CC2650 wireless MCU communicates with the RaspberryPi over Bluetooth low energy. Then the Pi has a TCP/IP connection with XSockets (in this case using NodeJS) to be able to send/receive data in full-duplex. XSockets will then be able to send/receive data from any TCP/IP connection so that we can read/write to the CC2650 from anywhere. In the image above the clients is represented by a few selected ones, but it can be anything that has TCP/IP.
IoT & Real-Time Communication
In the world of the Internet of Things (IoT), real-time communication is almost a requirement. The most popular IoT protocols use full-duplex communication, and for a good reason. The IoT is often about sending data at a high frequency or receiving data when something happens. Solving this with a request response driven architecture is often a bad idea. With the half duplex technique you risk to get a very chatty solution with large overhead and messages that are sent when not needed.
Setting up the Raspberry Pi for Real-Time Communication
Since the library we use to communicate with the SensorTag from the Raspberry Pi is based on NodeJS, we will use NodeJS for real-time communication as well.
Installing NodeJS
Installing NodeJS on a Raspberry Pi is very easy.
sudo wget http://node-arm.herokuapp.com/node_latest_armhf.deb
sudo dpkg -i node_latest_armhf.deb
Then you can verify the version by running (and this will probably output v0.12.0 or higher)
node -v
The Solution
The mission with this article is to show how to read/write in full-duplex to CC2650 from anywhere in the world. To be able to do so we need three parts.
- A sensor client on the Raspberry Pi that communicates with the Bluetooth low energy device and also has a full-duplex connection to our real-time server.
- A real-time server that can dispatch messages to the clients monitoring the sensors as well as dispatching messages to the sensor client when the monitoring clients want to write data to the sensor.
- A monitoring client (can be several types) that display sensor data and send command to the sensor client via the real-time server.
These three implementations will be covered below.
Sensor Client
The sensor client (NodeJS) on the Raspberry Pi is pretty easy to build.
Setup
Create a folder called CC2650 and navigate to it.
Install SensorTag Library
npm install sensortag
Install Xsockets.net Library
npm install xsockets.net
Code
The complete code for the client (~70 lines) can be found in the github repository, but the important parts is covered here. Just place the app.js file in the folder where you installed the packages above.
Connection to server, note that the ip and port here is used for development only. When deployed to Azure the IP and port will be replaced with the public endpoint.
//Connecting to XSockets
var conn = new xsockets.TcpClient('192.168.1.3', 4502, ['sensor']);
//Getting the sensorcontroller
//The controller is used to listen for data as well as sending data
var sensorcontroller = conn.controller('sensor');
When temperature changes on the sensortag
tagInstance.on('irTemperatureChange', function (ot, at) {
//call server method 'irTempChange' and pass new value
sensorcontroller.send('irtempchange', { obj: ot, amb: at });
});
When a monitoring client enables IR-Temperature
sensorcontroller.on('enableirtemp', self.enableIrTemperature);
When a monitoring client some where in the world disables the IR-Temperature
sensorcontroller.on('disableirtemp', self.disableIrTemperature);
Real-Time Server
Since XSockets.NET has state, you can connect anything and it allows you to talk cross-protocol etc. it will be very easy to build the server-side communication.
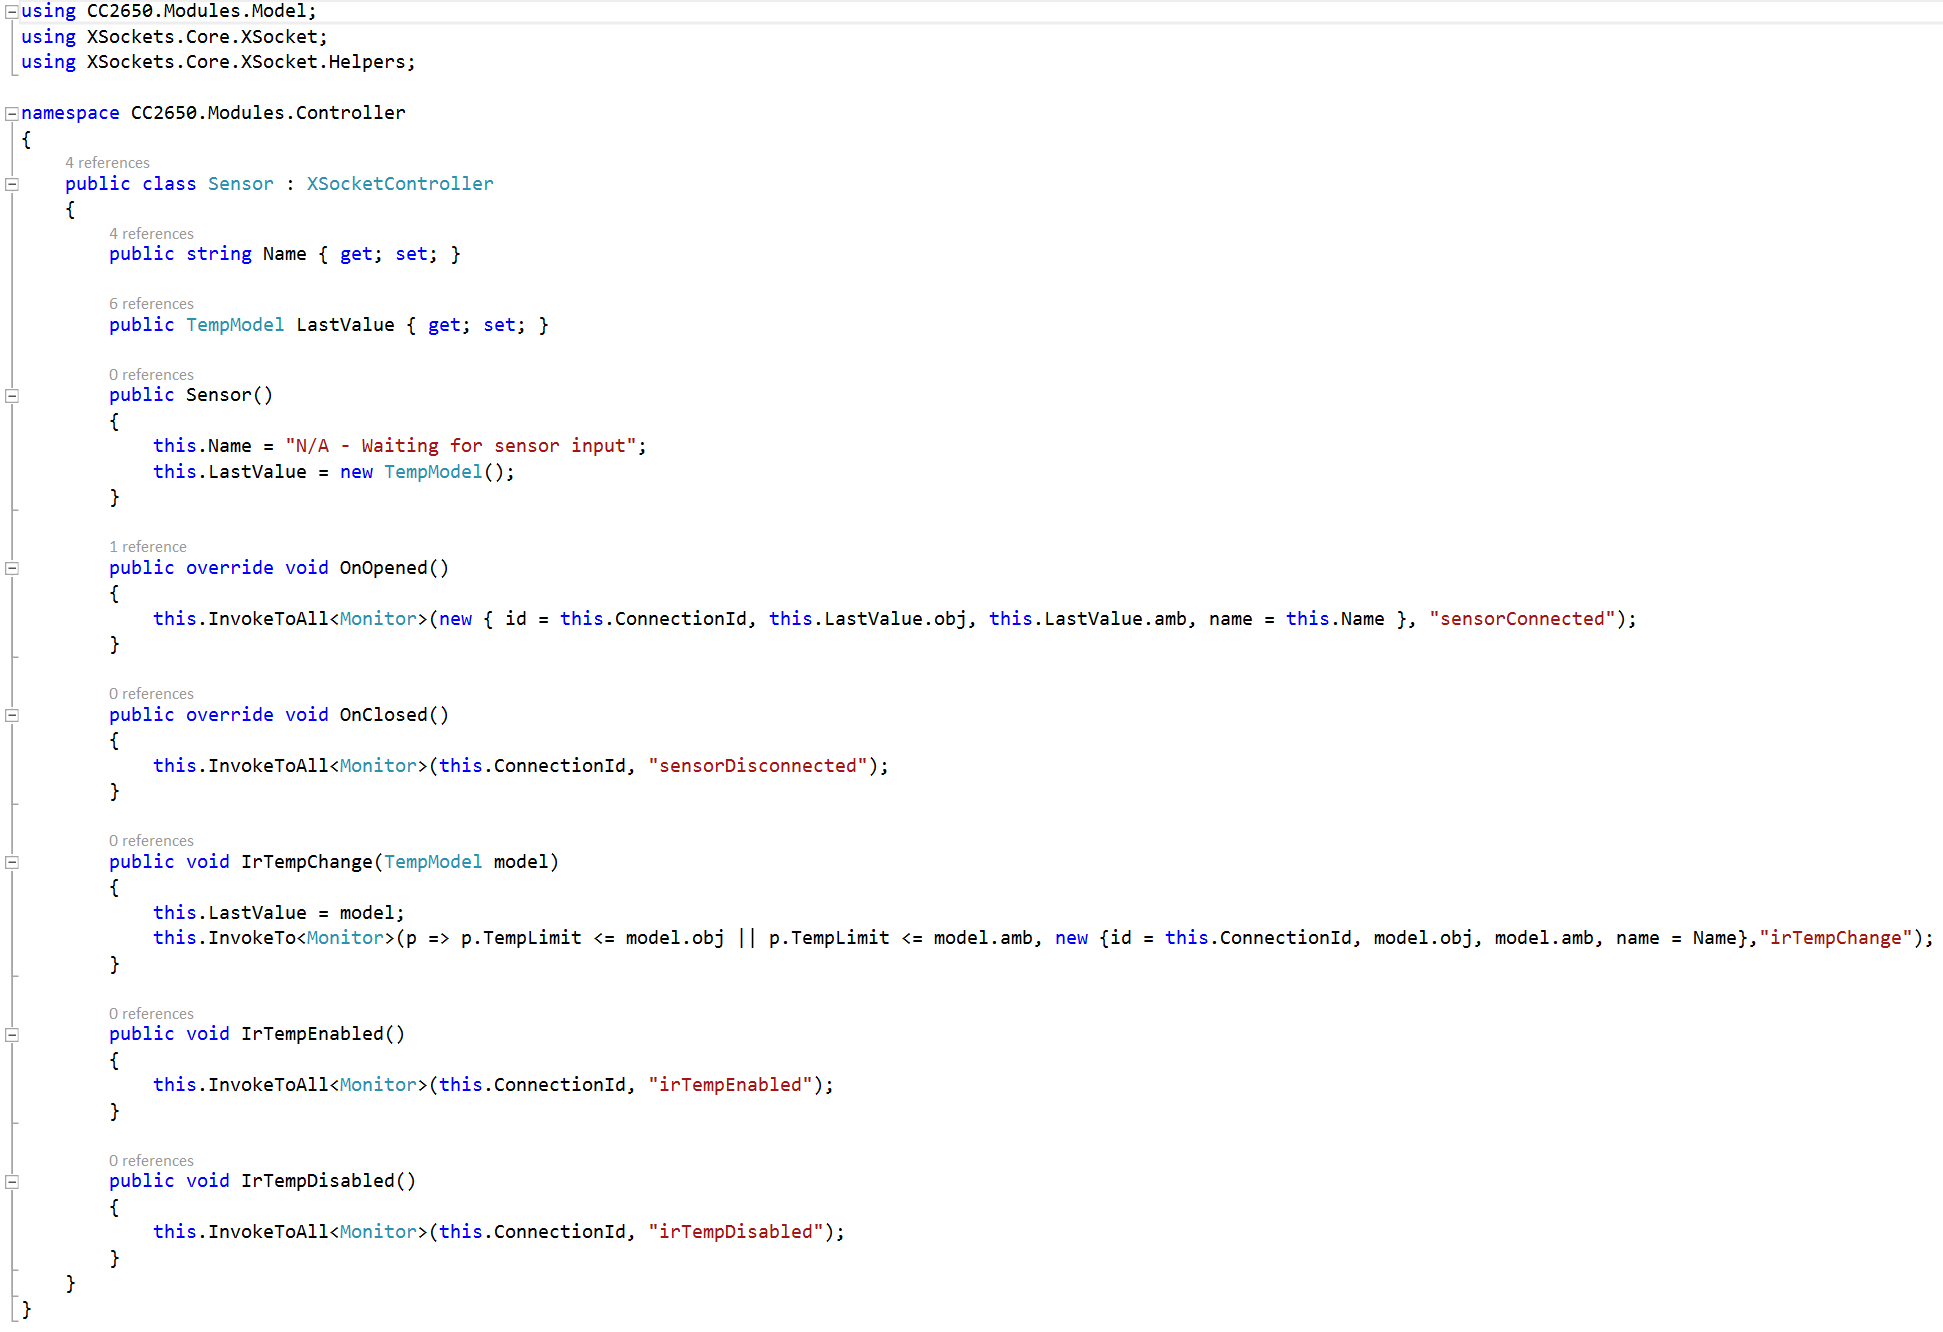
Sensor Controller
This is the controller that the sensor client will use to send data to. The concept is simple yet efficient. When a sensor client send a message to the sensor controller, the message is dispatched to all clients having an instance of the monitor controller. This way all clients monitoring will get notifications about.
- Sensors that connect/disconnect
- Sensors that get IR-Temperature enabled/disabled
- Changed in temperature on the sensor
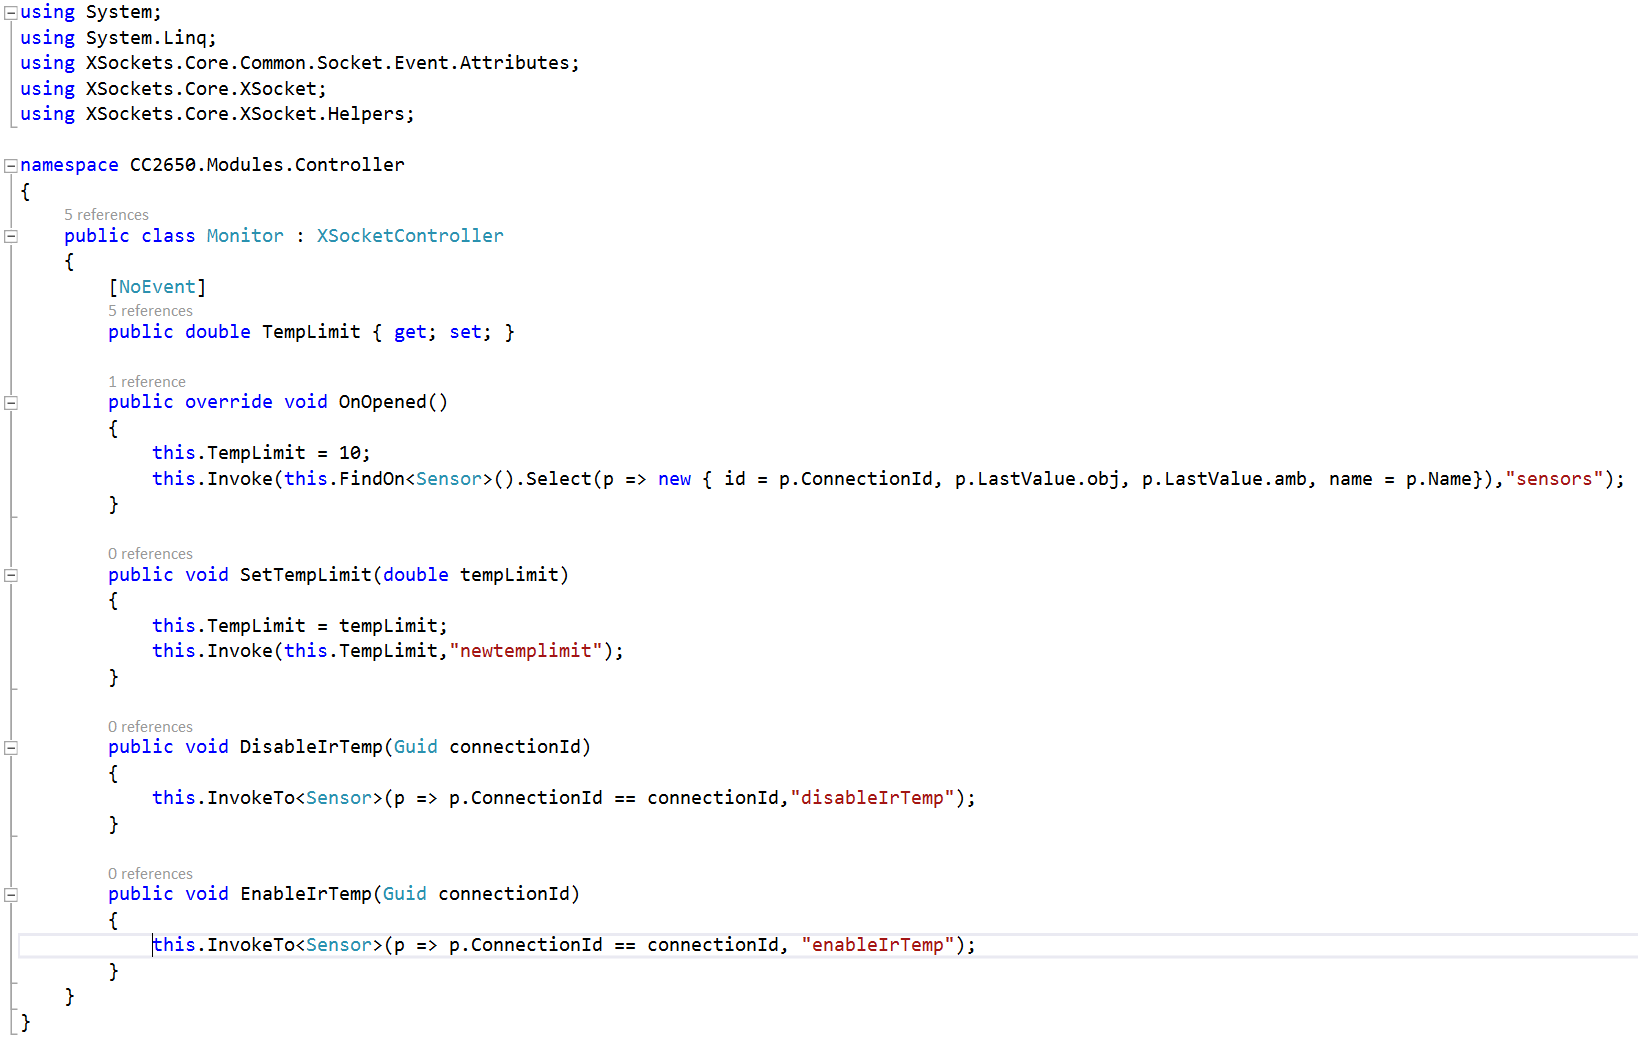
Monitor Controller
The monitor controller is even simpler than the sensor controller. This only has three methods.
- First one to be able to get information about all sensors being online (OnOpened).
- Second one for disabling the IR-Temperature notifications on the sensor.
- Third one for enabling the IR-Temperature on the sensor.
By passing in the connection id that we know from the sensor client the server can target the correct sensor to disable/enable.
Monitoring Client
Since you can connect anything to the real-time server (XSockets) you can control the sensor from pretty much anything. Your imagination sets the limits! In this sample I will only use a basic webpage and JavaScript to read/write data from the sensor.
Code
The complete code for the client can be found in the github repository, but the important parts is covered here.
Connection to server, note that the ip and port here is used for development only.
//Connecting to XSockets
var conn = new XSockets.WebSocket('ws://192.168.1.3:4502', ['monitor']);
//Getting the monitorcontroller
//The controller is used to listen for data as well as sending data
var monitor = conn.controller('monitor');
When the server send notificaiton about temperature changes
monitor.on('irTempChange', function(d) {
console.log('irtempchange', d);
vm.update(d);
});
Enable the IR-Temperature from the webpage
monitor.invoke('enableIrTemp', vm.id());
Disable the IR-Temperature from the webpage
monitor.invoke('disableIrTemp', vm.id());
When a monitoring client some where in the world disables the IR-Temperature
monitor.on('irTempDisabled', function(id) {
vm.disable(id);
});
When a monitoring client some where in the world enables the IR-Temperature
monitor.on('irTempEnabled', function(id) {
vm.enable(id);
});
Up & Running
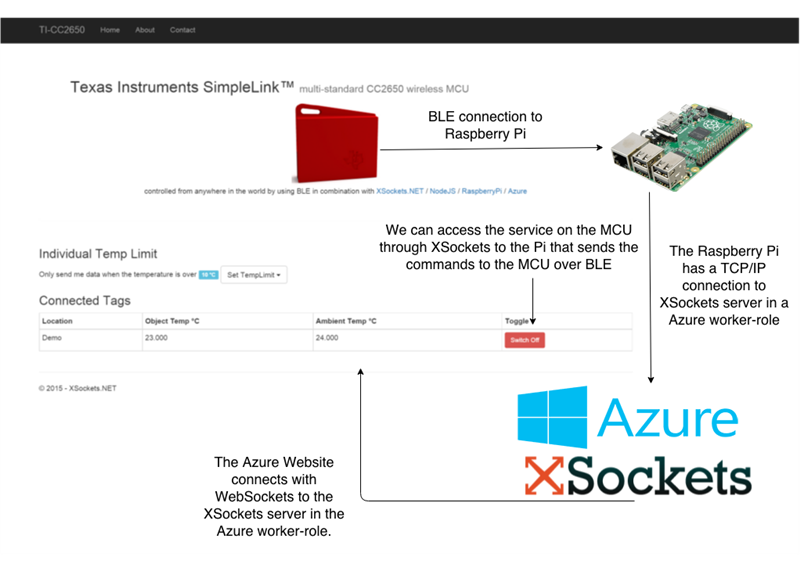
An image showing the result from my development machine. We see the sensor tag connected over BLE to a Raspberry Pi that uses NodeJS to communicate with XSockets. Then XSockets sends data to all clients, in this case just a webpage. We can also enable/disable the sensors services directly from the webpage (or any other client).
Summary
The biggest challenge (for me) when building this was to setup BLE on the Raspberry Pi, but the reason for that is probably my limited skills in Linux and BLE. The Raspberry Pi 2 is extremely great to work with and the Texas Instruments SensorTag is very stable and easy to use. I also want to give some credit to Azure since deploying XSockets on Azure was extremely easy.
What’s next?
This post only uses the IR-Temperature service from the CC2650. We will continue to improve the solution and add support for more services as well as support for multiple SensorTags so that people around the world can register their own tags to be shown on Azure.
GitHub Repository
The complete solution is available on GitHub.
Resources
- The sensortag lib on-top of Noble https://github.com/sandeepmistry/node-sensortag
- Noble https://github.com/sandeepmistry/noble
- Raspberry PI resources http://www.raspberrypi.org/downloads/
- Raspberry PI - Noobs setup http://www.raspberrypi.org/help/noobs-setup/
- Texas Instruments CC2650: www.ti.com/sensortag
- Michael Saunby http://mike.saunby.net/2013/04/raspberry-pi-and-ti-cc2541-sensortag.html
To Read the Full Article, Visit the XSocket Blog here .