SBAA274A September 2018 – March 2023 ADS1118 , ADS1119 , ADS1120 , ADS112C04 , ADS112U04 , ADS1146 , ADS1147 , ADS1148 , ADS114S06 , ADS114S06B , ADS114S08 , ADS114S08B , ADS1219 , ADS1220 , ADS122C04 , ADS122U04 , ADS1246 , ADS1247 , ADS1248 , ADS124S06 , ADS124S08 , ADS125H02 , ADS1260 , ADS1261 , ADS1262 , ADS1263
- A Basic Guide to Thermocouple Measurements
- Trademarks
- 1Thermocouple Overview
-
2Thermocouple Measurement Circuits
- 2.1 Thermocouple Measurement With Pullup and Pulldown Bias Resistors
- 2.2 Thermocouple Measurement With Biasing Resistors Attached to the Negative Lead
- 2.3 Thermocouple Measurement With VBIAS for Sensor Biasing and Pullup Resistor
- 2.4 Thermocouple Measurement With VBIAS For Sensor Biasing and BOCS
- 2.5 Thermocouple Measurement With REFOUT Biasing and Pullup Resistor
- 2.6 Thermocouple Measurement With REFOUT Biasing and BOCS
- 2.7 Thermocouple Measurement With Bipolar Supplies And Ground Biasing
- 2.8 Cold-Junction Compensation Circuits
- 3Summary
- 4Revision History
2.8.2.2 Design Notes
Similar to the RTD, thermistors are sensors that have a resistance that vary with temperature. The thermistor may be a PTC type (positive temperature coefficient) or an NTC type (negative temperature coefficient). The resistance varies significantly with temperature and are far more non-linear than the RTD, but are used for a more limited temperature range. Figure 2-10 shows an NTC thermistor measurement used for cold-junction compensation. This example thermistor has a resistance of 5 kΩ at 25°C. Two resistors are added to the circuit for linearizing the measurement at a cold-junction temperature near room temperature.
The measurement circuit requires:
- AINP and AINN inputs
- Enabled internal reference for the ADC and driving the thermistor circuit
- Precision resistors for thermistor linearization circuit
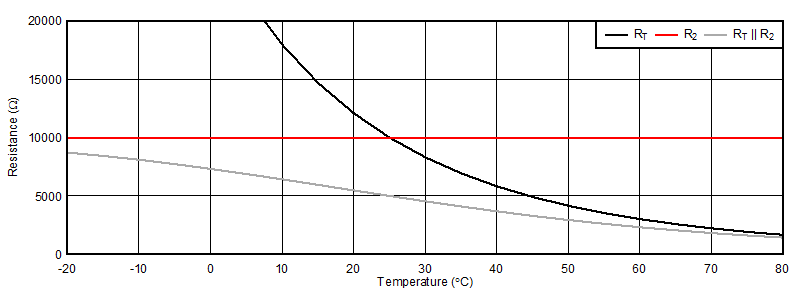
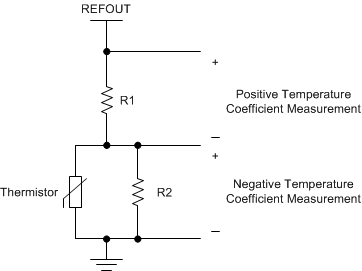
For the topology shown in Figure 2-9, the thermistor circuit is driven by the ADC internal reference. R2 is added in parallel with the thermistor resistance to give a more linear response near room temperature. Figure 2-10 shows a plot of the resistance versus temperature for the linearization.
 Figure 2-10 Thermistor and Linearization Responses Over Temperature
The NTC thermistor has a resistance (RT) that is non-linear over temperature. At low temperatures, there is a large change in the resistance for a small change in temperature. At higher temperatures, there is a small change in resistance for a large change in temperature. As mentioned earlier, the thermistor has a resistance of 5 kΩ at a temperature of 25°C.
R2 has a resistance of 10 kΩ that is constant over temperature. By adding R2 in parallel, the resulting resistance is linear for a smaller range of operation. For this measurement it is acceptable because the cold-junction temperature is at a moderate value compared to the thermocouple measurement temperature.
Adding R1 as a voltage divider to the parallel combination of R2 and the thermistor resistance, measuring R1 gives a positive temperature coefficient to the thermistor measurement (measuring across the thermistor and R2 results in a negative temperature coefficient). Thermistor linearization is shown in Figure 2-11.
 Figure 2-11 Linearization of Thermistor With Parallel Resistor and Voltage Divider
It is likely that this measurement does not require PGA amplification. If the PGA is enabled, ensure that this measurement over temperature is within the absolute and common-mode input ranges of the PGA. Note that many PGAs are not be able to measure the ground node. For this example, the ADC measured the positive temperature coefficient voltage across R1. If the negative temperature coefficient measurement is required, then R1 is placed at the bottom connected to the ground node and REFOUT drives the parallel combination of the thermistor and R2.
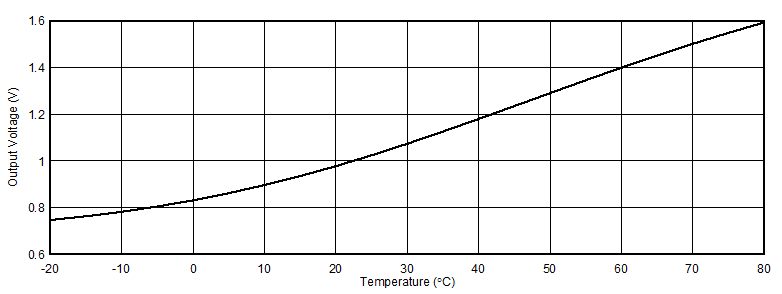
Choosing R1 to be a resistance of 5 kΩ, the output voltage (measured across R1) be 1.024 V at a temperature of 25°C. This assumes that the reference voltage is 2.048 V. The output voltage measured from the thermistor circuit is shown in Figure 2-12.
 Figure 2-12 Linearized Output of Thermistor Circuit
The temperature response may be adjusted so that the result is more linear at different temperatures. Adjusting R1 can set the best linearity for a higher or lower temperature for easy calculation with the best sensitivity of the cold-junction temperature. In this example, the measurement linearity is best from 40°C to 50°C, to center the non-linearity closer to room temperature, raise the value of R1.