SLVU179B October 2006 – February 2022 TPS51117
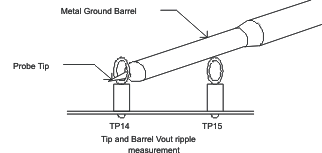
2.4.2 Output Ripple Measurement
- Ensure the load is set to constant current mode and set to 0 ADC.
- Make sure the switch SW 1 is in the “OFF” position.
- Turn on VBAT supply, increase to 12 V, and use DMM1 to measure the voltage.
- Turn on the 5.0-V bias supply, increase to 5 V, and use DMM2 to measure the voltage.
- Set the load to 10 ADC.
- Attach an oscilloscope probe to TP16 and ground to TP15.
- Set the oscilloscope as follows:
- Horizontal sweep: 2 μs/div
- Trigger mode: auto, falling edge
- Channel should be set to AC coupled, bandwidth 20 Mhz
Measurement should be similar to Figure 3-5.
 Figure 2-2 Tip and Barrel Measurement for VOUT Ripple