SSZT799 february 2018 LPV821
In the first installment of this two-part series, I discussed the mechanism offset voltage (VOS) and offset voltage drift (TCVOS) in DC gain, and how to select a nanopower operational amplifier (op amp) with the right level of precision to minimize error in the signal path of an amplified low-frequency signal. In this second installment, I’ll review some basics of current sensing and show ways in which you can use an op amp to help minimize system power consumption while still providing accurate readings.
Current Sensing
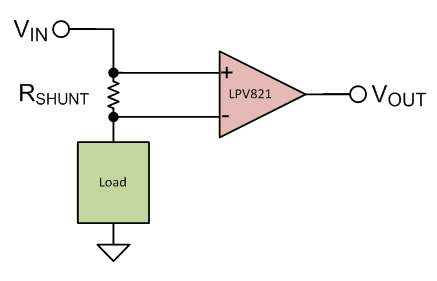
 Figure 1 High-side current
sensing
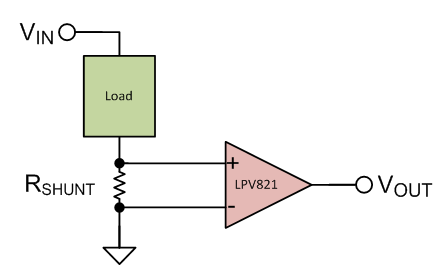
 Figure 2 Low-side Current
Sensing
Figure 2 Low-side Current
SensingIn both cases, to sense current with a known resistor value, the op amp measures the voltage across the terminals of the shunt resistor. Using Ohm’s law (Equation 1), you can determine the current consumption:
where V is the voltage, I is the current and R is the resistance.
Choose the shunt resistor and op amp so that they will have minimal impact on the circuit’s behavior. In selecting a resistor, there are two factors driving the need for a low-value resistor:
- Keeping the voltage drop across the resistor as small as possible so that the load’s negative terminal is as close to ground as possible in low-side sensing, or as close to the supply as possible in high-side sensing.
- Keeping power dissipation low. Equation 2 shows that, since you are measuring current and it is therefore the independent variable, the resistance should be as small as feasible:
A point of clarification: Since you are measuring current rather than trying to minimize current (as I did in the first installment of this series), you need to minimize the value of the resistor to also minimize power dissipation – this is the opposite thought process of managing power dissipation in DC gain configurations.
Ultra-low-power current-measurement techniques are useful in end equipment like power bank battery charging and monitoring, mobile phone battery charging and monitoring, and even to ensure the correct functioning of industrial Internet of Things applications.
So just how low can you go when selecting resistor values? Simply put, the voltage drop across the resistor should be larger than the offset voltage of the op amp you’re using.
Example
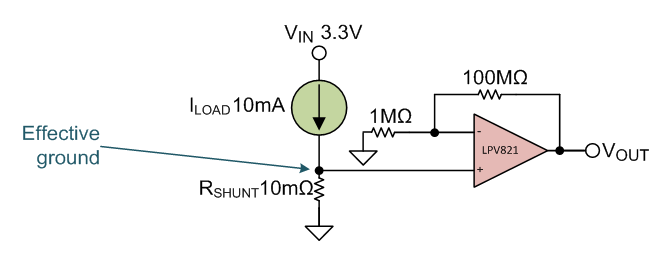
 Figure 3 Low-side Differential Current
Measurement
Figure 3 Low-side Differential Current
MeasurementThe supply voltage is 3.3V. The system draws a maximum of 10mA when operating correctly, and you don’t want the effective ground that the load sees to be any higher than 100µV. The first thing you’ll realize is that your shunt resistor must exhibit a voltage drop (due to current) less than or equal to 100µV.
If you use Equation 3 to determine the maximum shunt resistance:
Your effective ground will be 100µV, as shown in Equation 4:
You must choose an op amp that is able to detect changes in this voltage drop, which indicate a fault condition. Since the system is in a normal operating condition when the load current is within ±10% of its typical value of 10mA. Your op amp will then be able to detect the change in voltage across the sense resistor when the current changes by at least 10%.
When there is a fault condition (such as an open circuit, a brownout from low current, or a short-circuit or brownout from high current), Equation 5 expresses the change in current (IΔ) as:
Equation 6 calculates the resulting change in voltage drop across VSHUNT:
In this example, I would choose the LPV821 zero-drift nanopower amplifier. Its zero-drift technology enables a maximum offset voltage of only 10µV, allowing it to detect the fault condition. Zero-drift op amps are ideal for high accuracy (<100µV) measurements. Additionally, the LPV821 is also a nanopower amplifier, which means you can leave it always-on, and it will continue to deliver accurate current-sense measurements with very little impact to the system power budget.
Thanks for reading this second installment of the “How to make precision measurements on a nanopower budget” series. We hope that this series provided some insight on the benefits of using nanopower zero-drift op amps in DC gain and low-side current-sensing applications. If you have any questions about precision measurements, log in and leave a comment, or visit the TI E2E™ Community Precision Amplifiers forum.
Additional Resources
- Download the LPV821 data sheet.
- For more configurations of op
amps in current sensing applications or about designing on a nanopower budget,
check out these TI TechNotes:
- “Advantages of Using Nanopower, Zero Drift Amplifiers for Battery Voltage and Current Monitoring in Portable Applications.”
- “Current Sensing in No-Neutral Light Switches.”
- “Simplifying Measurements in Power Conscious Industrial Analytics Systems with Nanopower Op Amps.”
- Check out all of TI’s amplifier devices.