SBOS181F December 2000 – February 2017 INA139 , INA169
PRODUCTION DATA.
- 1 Features
- 2 Applications
- 3 Description
- 4 Revision History
- 5 Pin Configuration and Functions
- 6 Specifications
- 7 Detailed Description
-
8 Application and Implementation
- 8.1 Application Information
- 8.2 Typical Applications
- 9 Power Supply Recommendations
- 10Layout
- 11Device and Documentation Support
- 12Mechanical, Packaging, and Orderable Information
Package Options
Refer to the PDF data sheet for device specific package drawings
Mechanical Data (Package|Pins)
- DBV|5
Thermal pad, mechanical data (Package|Pins)
Orderable Information
10 Layout
10.1 Layout Guidelines
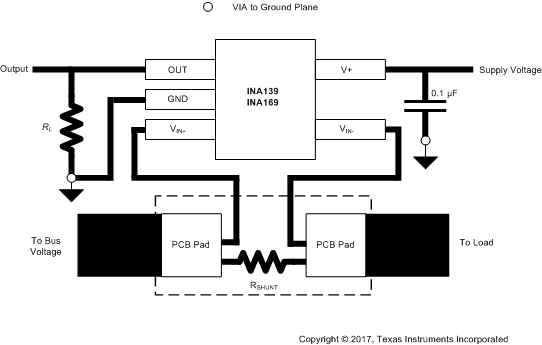
Figure 19 shows the basic connection of the INA139. The input pins (VIN+ and VIN–) must be connected as closely as possible to the shunt resistor to minimize any resistance in series with the shunt resistance. The output resistor, RL, is shown connected between pin 1 and ground. Best accuracy is achieved with the output voltage measured directly across RL. This is especially important in high-current systems where load current could flow in the ground connections, affecting the measurement accuracy.
No power-supply bypass capacitors are required for stability of the INA139. However, applications with noisy or high-impedance power supplies may require decoupling capacitors to reject power-supply noise; connect the bypass capacitors close to the device pins.
10.2 Layout Example
 Figure 19. Typical Layout Example