SLAA600E June   2013  – January 2024


  1.   1
  2.   Abstract
  3.   Trademarks
  4. 1Introduction
    1. 1.1 Glossary
    2. 1.2 Conventions
  5. 2Implementation
    1. 2.1 Main
    2. 2.2 Application Manager
      1. 2.2.1 Boot and Application Detection
        1. 2.2.1.1 Force Bootloader Mode
        2. 2.2.1.2 Application Validation
        3. 2.2.1.3 Jump to Application
      2. 2.2.2 Vector Redirection
      3. 2.2.3 Interrupt Vectors in Flash Devices
      4. 2.2.4 Dual Image Support
        1. 2.2.4.1 Jumping to Application in Dual Image Mode
    3. 2.3 Memory Interface (MI)
      1. 2.3.1 Dual Image Support
    4. 2.4 Communication Interface (CI)
      1. 2.4.1 Physical-DataLink (PHY-DL)
        1. 2.4.1.1 I2C
          1. 2.4.1.1.1 Time-out Detection
        2. 2.4.1.2 UART
        3. 2.4.1.3 SPI
        4. 2.4.1.4 CC110x
        5. 2.4.1.5 Comm Sharing
      2. 2.4.2 NWK-APP
        1. 2.4.2.1 BSL-Based Protocol
          1. 2.4.2.1.1 Security
          2. 2.4.2.1.2 BSL-Based Protocol using CC110x
          3. 2.4.2.1.3 Examples Using I2C
          4. 2.4.2.1.4 Examples Using UART or CC110x
  6. 3Customization of MSPBoot
    1. 3.1 Predefined Customizations
  7. 4Building MSPBoot
    1. 4.1 Starting a New Project
      1. 4.1.1 Creating a New MSPBoot Project
        1. 4.1.1.1 MSPBootProjectCreator.pl
        2. 4.1.1.2 Importing Project Spec File in CCS
        3. 4.1.1.3 Modifying Generated Source Code
          1. 4.1.1.3.1 Modifying MSPBoot Main.c
          2. 4.1.1.3.2 Modifying TI_MSPBoot_Config.h
          3. 4.1.1.3.3 Modifying TI_MSPBoot_CI_PHYDL_xxxx_xxx.c
          4. 4.1.1.3.4 Modifying TI_MSPBoot_AppMgr.c
          5. 4.1.1.3.5 Modifying Application Main.c
          6. 4.1.1.3.6 Modifying TI_MSPBoot_Mgr_Vectors_xxxx.c
      2. 4.1.2 Loading Application Code With MSPBoot
        1. 4.1.2.1 Convert Application Output Images
    2. 4.2 Examples
      1. 4.2.1 LaunchPad Development Kit Hardware
      2. 4.2.2 CC110x Hardware
      3. 4.2.3 Building the Target Project
      4. 4.2.4 Building the Host Project
      5. 4.2.5 Running the Examples
  8. 5References
  9. 6Revision History

Building the Host Project

The host project can be built following the next steps:

  1. Import the project into CCS. The project files are located in MSPBoot\Host_Examples\Host_Examples_for_<target>_target\<communication interface>\.
  2. Find the TODO in main.c located above the definition of several addressed including the CRC address
    1. Update the values to match the addresses defined in the target device linker command file.
  3. Add the target application C file generated from step 8 of Section 4.2.3 to the excluded TargetApps Folder in the host project
  4. Find the TODO in main.c located above the definition of the target application files
    1. Update the name of these files to match the target application C file referenced in step 3.
  5. Build the host project
    1. Select the host project
    2. Select the proper target configuration (single or dual image)
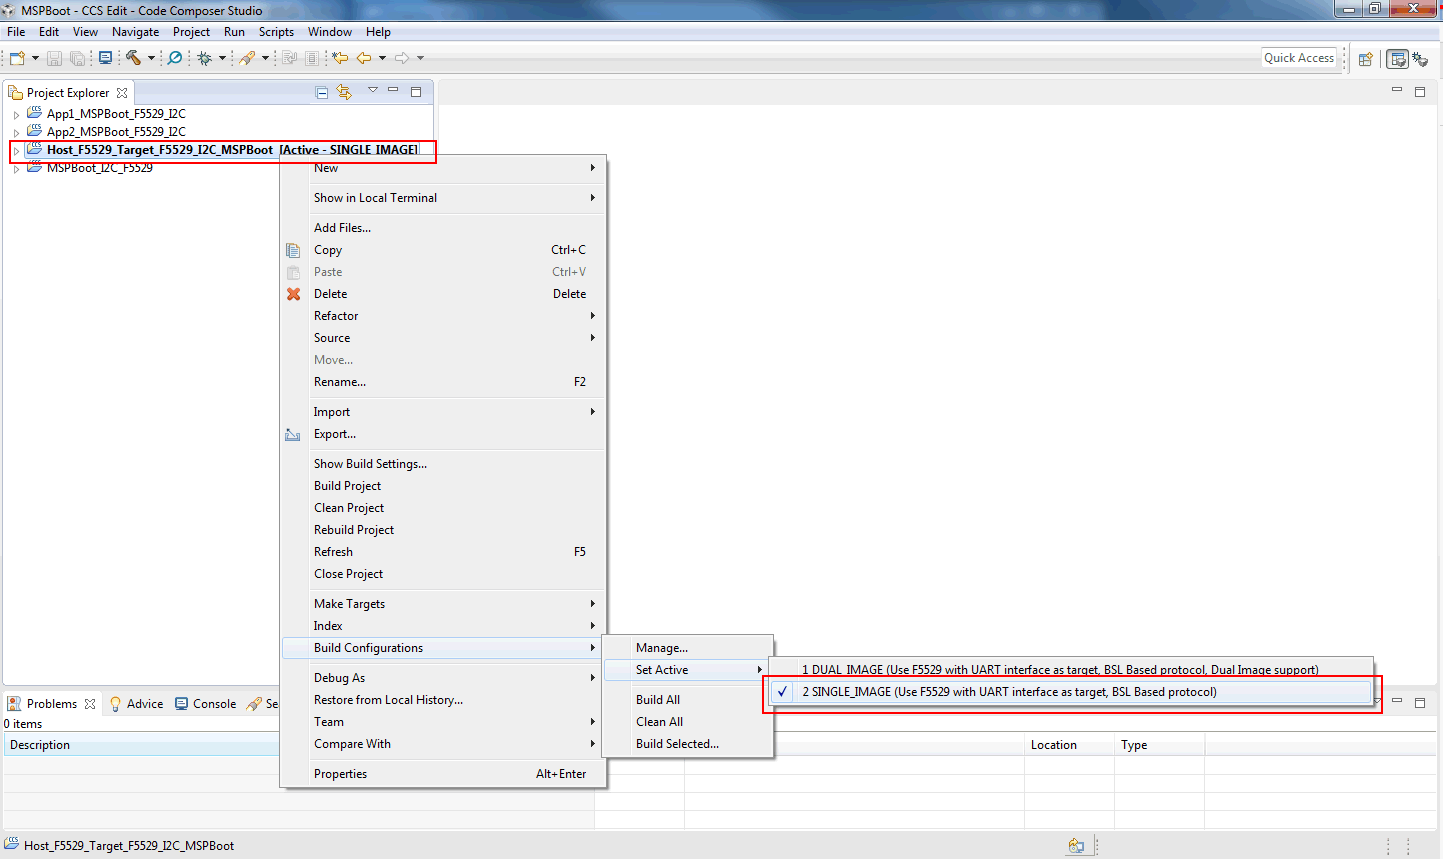
    GUID-B229A891-7D9E-467F-91B7-B435AC1C993E-low.pngFigure 4-9 Target Selection for Host Project in CCS
  6. Build GUID-27AD69B9-226A-44E5-BD63-CF5C7C6CA892-low.png and Download GUID-36DF6234-9B17-431F-BC4A-D372D6AF7779-low.png . Only the host LaunchPad development kit should be connected to the PC.

The project uses the application images located in the following folder:

<Project_Dir>\Target_Apps

Where Project_Dir is the directory where the host project is located. This folder should also be excluded from the host build by default. Prebuilt images are included, but target applications can be replaced or updated by following the procedure described in Section 4.2.3 and Section 4.1.2.1.