SLAA600E June   2013  – January 2024


  1.   1
  2.   Abstract
  3.   Trademarks
  4. 1Introduction
    1. 1.1 Glossary
    2. 1.2 Conventions
  5. 2Implementation
    1. 2.1 Main
    2. 2.2 Application Manager
      1. 2.2.1 Boot and Application Detection
        1. 2.2.1.1 Force Bootloader Mode
        2. 2.2.1.2 Application Validation
        3. 2.2.1.3 Jump to Application
      2. 2.2.2 Vector Redirection
      3. 2.2.3 Interrupt Vectors in Flash Devices
      4. 2.2.4 Dual Image Support
        1. 2.2.4.1 Jumping to Application in Dual Image Mode
    3. 2.3 Memory Interface (MI)
      1. 2.3.1 Dual Image Support
    4. 2.4 Communication Interface (CI)
      1. 2.4.1 Physical-DataLink (PHY-DL)
        1. 2.4.1.1 I2C
          1. 2.4.1.1.1 Time-out Detection
        2. 2.4.1.2 UART
        3. 2.4.1.3 SPI
        4. 2.4.1.4 CC110x
        5. 2.4.1.5 Comm Sharing
      2. 2.4.2 NWK-APP
        1. 2.4.2.1 BSL-Based Protocol
          1. 2.4.2.1.1 Security
          2. 2.4.2.1.2 BSL-Based Protocol using CC110x
          3. 2.4.2.1.3 Examples Using I2C
          4. 2.4.2.1.4 Examples Using UART or CC110x
  6. 3Customization of MSPBoot
    1. 3.1 Predefined Customizations
  7. 4Building MSPBoot
    1. 4.1 Starting a New Project
      1. 4.1.1 Creating a New MSPBoot Project
        1. 4.1.1.1 MSPBootProjectCreator.pl
        2. 4.1.1.2 Importing Project Spec File in CCS
        3. 4.1.1.3 Modifying Generated Source Code
          1. 4.1.1.3.1 Modifying MSPBoot Main.c
          2. 4.1.1.3.2 Modifying TI_MSPBoot_Config.h
          3. 4.1.1.3.3 Modifying TI_MSPBoot_CI_PHYDL_xxxx_xxx.c
          4. 4.1.1.3.4 Modifying TI_MSPBoot_AppMgr.c
          5. 4.1.1.3.5 Modifying Application Main.c
          6. 4.1.1.3.6 Modifying TI_MSPBoot_Mgr_Vectors_xxxx.c
      2. 4.1.2 Loading Application Code With MSPBoot
        1. 4.1.2.1 Convert Application Output Images
    2. 4.2 Examples
      1. 4.2.1 LaunchPad Development Kit Hardware
      2. 4.2.2 CC110x Hardware
      3. 4.2.3 Building the Target Project
      4. 4.2.4 Building the Host Project
      5. 4.2.5 Running the Examples
  8. 5References
  9. 6Revision History

Building the Target Project

  1. Select a target processor: MSP430F5529 or MSP430G2553.
  2. Select a communication interface: I2C, UART, or SPI with CC110x.
  3. Open CCS and select or create a workspace.
  4. Import the MSPBoot CCS projects into the workspace. The projects are located in MSPBoot\<target>_Examples\<communication_interface>\
    1. Select the Copy projects into workspace checkbox to ensure you're working on the project located within your workspace instead of somewhere else on your PC.
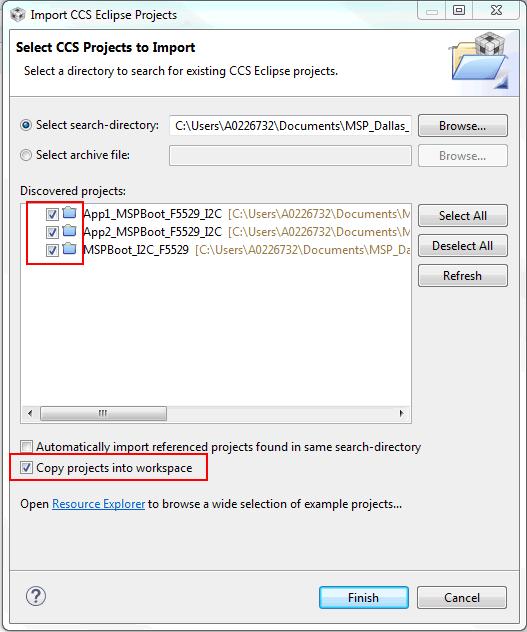
    GUID-F5FEE297-BD06-4DCF-A2E5-4C68CF84DCDF-low.pngFigure 4-6 Import MSPBoot CCS Projects
  5. Build the bootloader
    1. Select the MSPBoot project
    2. Select the proper target configuration (single image or dual image)
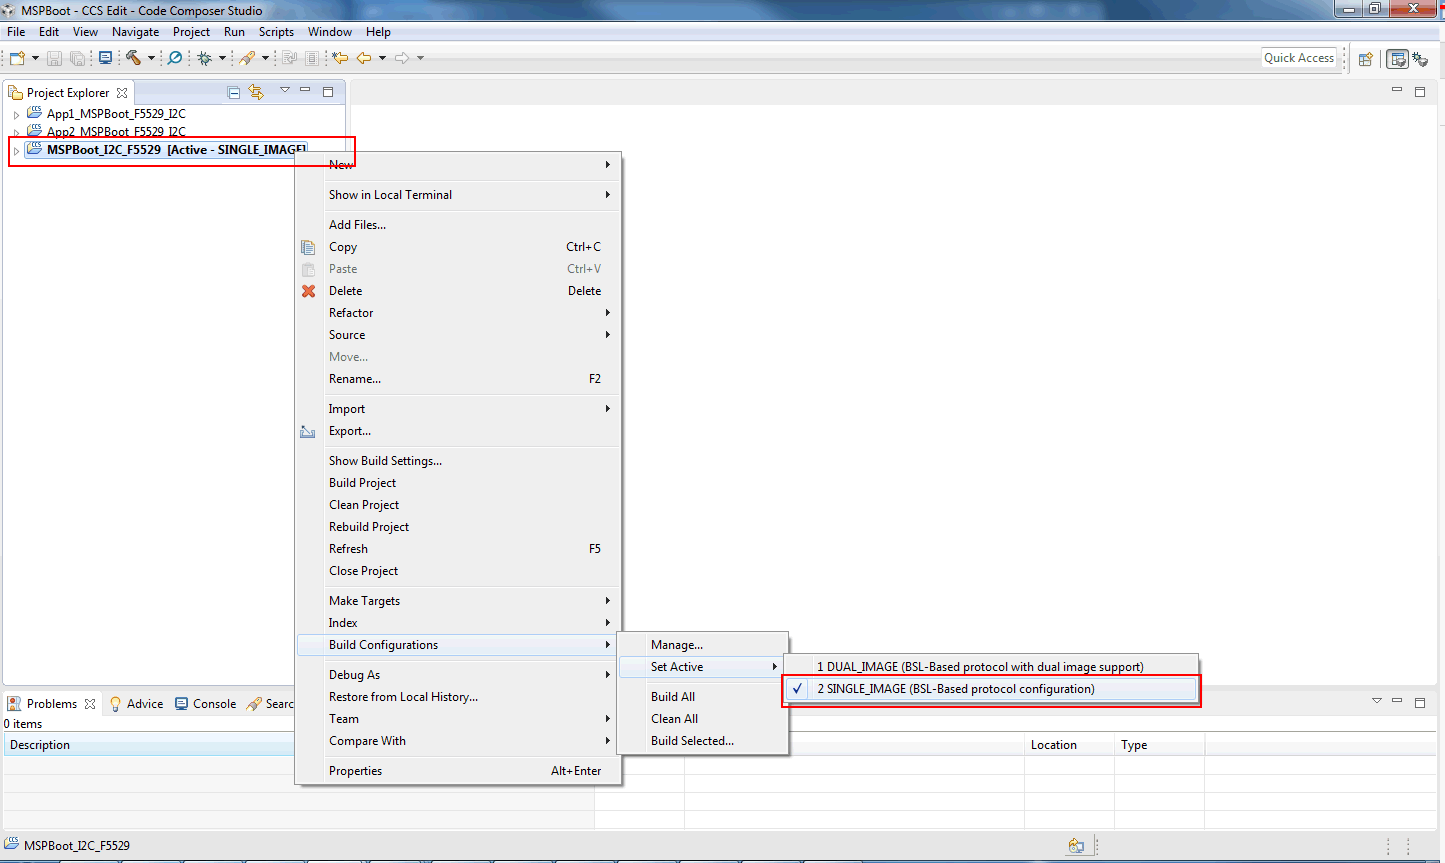
    GUID-FD09AA8D-1666-4A11-920E-68D6ABF6600D-low.pngFigure 4-7 Select Target Configuration
  6. Build GUID-27AD69B9-226A-44E5-BD63-CF5C7C6CA892-low.png and Download GUID-36DF6234-9B17-431F-BC4A-D372D6AF7779-low.png . Only the target LaunchPad development kit should be connected to the PC
  7. Build both applications.
    1. Select the App1_MSPBoot project and select the same configuration as the bootloader.
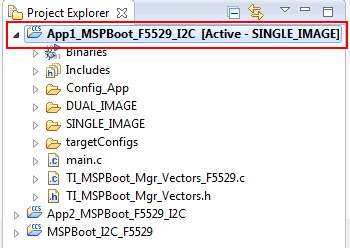
    GUID-18FD722C-124A-4BF2-A79C-0E965B56B23A-low.pngFigure 4-8 Select App1_MSPBoot Project
  8. Click the Build GUID-27AD69B9-226A-44E5-BD63-CF5C7C6CA892-low.png project. The output is generated after this step, but the output will be converted and downloaded through the host processor. Section 4.1.2.1 explains how to convert the image and Section 4.2.4 explains how to download it using a host demo.
  9. Repeat Step 6 for App2_MSPBoot