SPMU373A March 2021 – August 2022 TM4C1230C3PM , TM4C1230D5PM , TM4C1230E6PM , TM4C1230H6PM , TM4C1231C3PM , TM4C1231D5PM , TM4C1231D5PZ , TM4C1231E6PM , TM4C1231E6PZ , TM4C1231H6PGE , TM4C1231H6PM , TM4C1231H6PZ , TM4C1232C3PM , TM4C1232D5PM , TM4C1232E6PM , TM4C1232H6PM , TM4C1233C3PM , TM4C1233D5PM , TM4C1233D5PZ , TM4C1233E6PM , TM4C1233E6PZ , TM4C1233H6PGE , TM4C1233H6PM , TM4C1233H6PZ , TM4C1236D5PM , TM4C1236E6PM , TM4C1236H6PM , TM4C1237D5PM , TM4C1237D5PZ , TM4C1237E6PM , TM4C1237E6PZ , TM4C1237H6PGE , TM4C1237H6PM , TM4C1237H6PZ , TM4C123AE6PM , TM4C123AH6PM , TM4C123BE6PM , TM4C123BE6PZ , TM4C123BH6PGE , TM4C123BH6PM , TM4C123BH6PZ , TM4C123FE6PM , TM4C123FH6PM , TM4C123GE6PM , TM4C123GE6PZ , TM4C123GH6PGE , TM4C123GH6PM , TM4C123GH6PZ , TM4C123GH6ZXR , TM4C1290NCPDT , TM4C1290NCZAD , TM4C1292NCPDT , TM4C1292NCZAD , TM4C1294KCPDT , TM4C1294NCPDT , TM4C1294NCZAD , TM4C1297NCZAD , TM4C1299KCZAD , TM4C1299NCZAD , TM4C129CNCPDT , TM4C129CNCZAD , TM4C129DNCPDT , TM4C129DNCZAD , TM4C129EKCPDT , TM4C129ENCPDT , TM4C129ENCZAD , TM4C129LNCZAD , TM4C129XKCZAD , TM4C129XNCZAD
- Read This First
- 1Introduction to TivaWare SDK
- 2TivaWare Example Projects
- 3Linking Files and Libraries into a TivaWare Project in Code Composer Studio
- 4How to Debug a TivaWare Library
- 5How to Add TivaWare to an Existing CCS Project
- 6TivaWare Boot Loader
- 7Software Best Practices
- 8TM4C Resources
- 9Revision History
4.1 How to Direct Code Composer Studio to a Source File
If there is a need to access the source file for a library call while debugging code then CCS needs to be pointed to the source code file. This can be achieved during debug with a combination of using breakpoints and code stepping techniques to prompt the IDE to try and find the file that can then be manually located on the local file system.
The first step will be to set a breakpoint on the exact function call that needs to be debugged. This can be done by double-clicking on the grey space next to that line of code or by right-clicking the line of code and selecting 'Breakpoint' at the top of the menu that pops up. When the breakpoint is set, a small blue orb will appear in the grey space next to the line of code as seen in Figure 5-1.
 Figure 4-1 Setting a Breakpoint on a
DriverLib Call
Once the breakpoint is set, execute code until the breakpoint is triggered. Once that occurs, the execution of the code will stop, and the toolbar at the top will have the options seen in Figure 5-2. Use the 'Step Into' feature, highlighted in the figure or keyboard shortcut F5, to trigger the IDE to search for the source code file.
 Figure 4-2 CCS Debug Control
Options
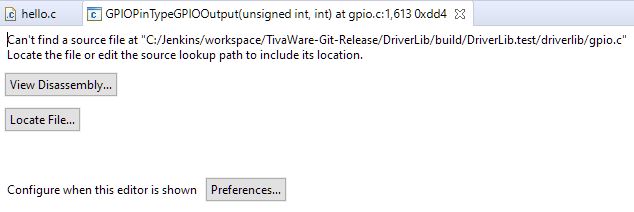
Once the IDE is prompted to look for the source file, it will not be able to locate the file and will pop-up a notification (Figure 5-3). As part of this pop-up, the user is given the option to 'Locate File...' and this is what is used to help direct the IDE to the right files. After clicking on 'Locate File...', navigate to the DriverLib folder on the local file system and select it. The entire folder is selected for this, not an individual file, so there is no need to know exactly what source code file is needed. The IDE will search all files in the folder and bring up the correct one automatically.
 Figure 4-3 Locate File Pop-Up
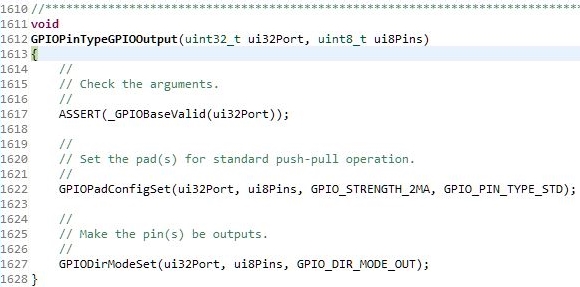
After providing the directory for the source code, then the pop-up will go away and the source code file will be opened up and the cursor will be placed inside of the function that was being stepped into as shown in Figure 5-4. Debugging can continue from here like normal.
 Figure 4-4 DriverLib Source Code File
Successfully Located and Loaded