SSZTBB5 may 2016 CC3100 , CC3200
Mongoose is one of the most widely used embedded web servers and multi-protocol networking libraries available. Engineers use it as an Internet of Things (IoT) middleware, solving various tasks from internal servers to creating customer facing dashboards.
Mongoose integrates seamlessly with TI’s SimpleLink™ Wi-Fi® CC3200 wireless microcontroller (MCU) and MSP432™ MCUs. It runs on SimpleLink Wi-Fi’s on-chip user dedicated MCU, and utilizes its embedded HTTP server and built in TCP\IP stack, in order to provide a high-level interface for protocols like TCP, UDP, HTTP, WebSocket, MQTT, CoAP and DNS - for both client and server side.
A deeper dive into Mongoose
Mongoose is both a server and client networking library. It is available on multiple platforms and offers a common programming model. For example, you can write client/device code and cloud/server code using the same programming model.
Mongoose uses a unique approach to the SimpleLink Wi-Fi built-in HTTP server. You can create a connection manager object and then one or more connections. Each connection has an associated handler function which is invoked for all events associated with it. The connection can be a server listener or an outgoing client connection, with or without a protocol handler (such as HTTP or MQTT) attached to it.
The handler function’s signature is the same for all event types:
void ev_handler(struct mg_connection *nc, int ev, void *ev_data)
The particular set of events (ev) received by the connection will differ depending on which protocol is used.
The best way to learn is to read the documentation or browse through some examples.
Working Examples
Let’s take a look at SimpleLink Wi-Fi CC3200 wireless MCU examples (everything described below also applies to the MSP432 MCU with a SimpleLink Wi-Fi CC3100 wireless network processor BoosterPack™ plug-in module).
You will need:
- CC3200-LAUNCHXL dev board
- CC3200SDK1.2.0 installed in TI_PRODUCTS_DIR/CC3200SDK_1.2.0 (typically
C:\ti\CC3200SDK_1.2.0 on Windows)
- The accompanying CC3200SDK-SERVICEPACK should also be installed and flashed to the device
- Code Composer Studio 6 IDE
- Mongoose source code. Either clone the Git repo or download the ZIP archive.
Mongoose - The library project
The Mongoose project produces Mongoose.lib - a static library meant to be used by other projects, such as the demo projects below.
Feel free to use it as a dependency for your own projects or just copy mongoose.c and mongoose.h. Note that by default a lot of features are enabled, including file serving (which we use in our examples). You can trim a lot of fat by turning various build options off. A minimal HTTP server configuration is about 25 K (compiled for ARM® Cortex®M4 with GCC 4.9 with size optimization on).
MG_hello - A simple demo
MG_hello project is a simple web server that serves files from the SimpleLink file system and allows them to be uploaded. This project depends on the Mongoose library project. Make sure you import them both. When importing, ensure the “copy project to workspace” checkbox is unchecked, otherwise file references will be broken.
When built and run on the device, by default, the example will set up a Wi-Fi network called “Mongoose” (no password).
Assuming everything works [1], you should see the following output in CIO:
| main | Hello, world! |
| mg_init | MG task running |
| mg_init | Starting NWP... |
| mg_init | NWP started |
| wifi_setup_ap | WiFi: AP Mongoose configured |
Note: If the demo does not proceed past “Starting NWP…”, please reset the board (possibly related to our workaround is not always effective).
And, after connecting to Wi-Fi network Mongoose:
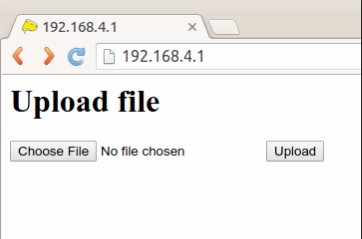
Pick a small file (at most 64K; say favicon.ico) and upload. You should get “Ok, favicon.ico - 16958 bytes.” and it will be served back to you (link). If you upload index.html, it will be served instead of the form.
Now let’s look at how it works under the hood. Mongoose is event-driven. User code is executed in event handler function, which receives an event and can either react to it or ignore. Roughly, the plan is as follows:
- Create and install a connection manager
- Add a listener
- Invoke mg_poll periodically to process events.
- Handle incoming connections in the event handler.
An even simpler, non-TI-specific example called simplest_web_server illustrates this.
The ev_handler function is where all the action is. It receives event, one of them being MG_EV_HTTP_REQUEST, which it then passes on to a built-in mg_serve_http function, which serves files from the file system. Other events - MG_EV_ACCEPT, MG_EV_CLOSE - are ignored.
Let’s go back to our SimpleLink Wi-Fi CC3200 wireless MCU example. Here we take a slightly different approach. First, we don’t want to block main thread and instead spawn a separate task which will do the mg_polling business for us (line 216). You can find the definition of mg_start_task in mongoose.c. It’s a pretty straightforward utility function which creates a queue and a task.
Mongoose is single-threaded. Internally, it does not perform any kind of synchronization. You as the user must ensure that everything that touches the state (the mg_connection struct) happens in a thread-safe manner. The easiest way, without introducing mutexes, is to either do everything in the event handler function itself or in a callback invoked from the same task. For this purpose, mg_run_in_task function is provided. It takes a callback pointer as well as a data pointer and will execute it on next iteration.
The event handler function in our example is somewhat more elaborate. More events are handled and for http requests we check the URL and existence of index.html and either serve the static file upload form or fall through to file serving. We also handle events related to streaming file uploads, which we ultimately just forward to the built in file upload handler to serve /upload.
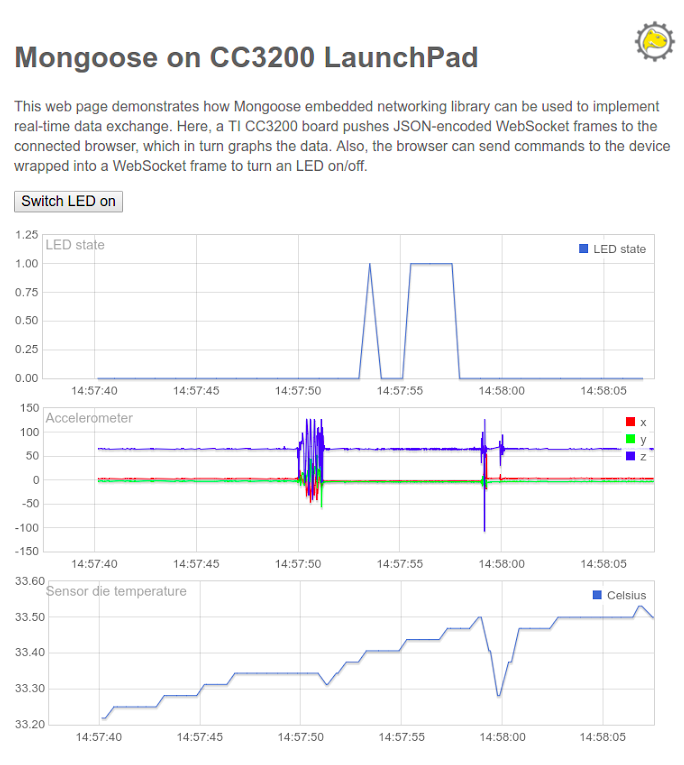
MG_sensor_demo - A more elaborate demo project
This demo shows the use of timers and serving a WebSocket data stream to multiple subscribers. Data from the on-board temperature sensors and accelerometer is streamed to any clients connected over WebSocket, which allows building of responsive, near-real time dashboards.
MG_sensor_demo’s event handler function in main.c does everything MG_hello’s function does, but also handles the websocket connection event - when MG_EV_WEBSOCKET_HANDSHAKE_DONE arrives, it switches the event handler to a different one - data_conn_handler (defined here in data.c). Doing this is not required, but it keeps the code modular and function size manageable.
Data acquisition is performed at regular intervals by a timer. Mongoose’s timers work well for this case. Remember, everything is executed in single thread.The timer is first set in mg_init(), and the MG_EV_TIMER event is handled in the main handler. Mongoose timers must be re-armed manually.
To try this demo from Code Composer Studio™ integrated development environment (IDE), follow the steps above for MG_hello. As for MG_hello, you will only see an upload for initially. Please upload main.js and index.html from the slfs folder and reload the page. You should see something like this:
This short video shows the demo in action.
Try it for yourself
Feel free to check out the code yourself, especially the WebSocket data connection handler.
You can download Mongoose here.
The good news are that as long as you are testing and prototyping, the use of Mongoose is free under GPLv2 licensing. For commercial use you have a choice between acquiring a license or open source your solution. . We’d be happy to discuss this with you, feel free to contact us.
But for now, feel free to dive in and experiment today!
Additional Resources:
- Learn more about TI’s SimpleLink Wi-Fi CC3200 wireless MCU
- Order now
- Learn more about TI’s MSP432 MCUs
#Dummy#
[1] If the network does not appear or you cannot connect to it, please use existing Wi-Fi network - enter the SSID and password at the beginning of main.c.