SSZT423 august 2019 ADC12DJ3200
Frequency response is the ratio of the reflected wave at the output port to the incident wave at the input port. The VNA can directly measure the incident wave, but it cannot measure the reflected wave since it is contained in the ADC’s digital output stream.
This can be solved by capturing the ADC samples and processing them to determine the reflected wave. Before combining to calculate frequency response we need to take care of a few calibration issues.
First, SOLT calibration only corrects for ratios required for S-parameter measurement (with the reference plane at the end of the test cables). The actual incident power must be known in absolute terms, since the ratio must be computed from two sources.
Secondly, port extension cannot be used since this is not a self-contained VNA measurement function.
Finally, we do not know the phase between the incident wave at the ADC inputs and the resulting capture event at the FPGA capture card.
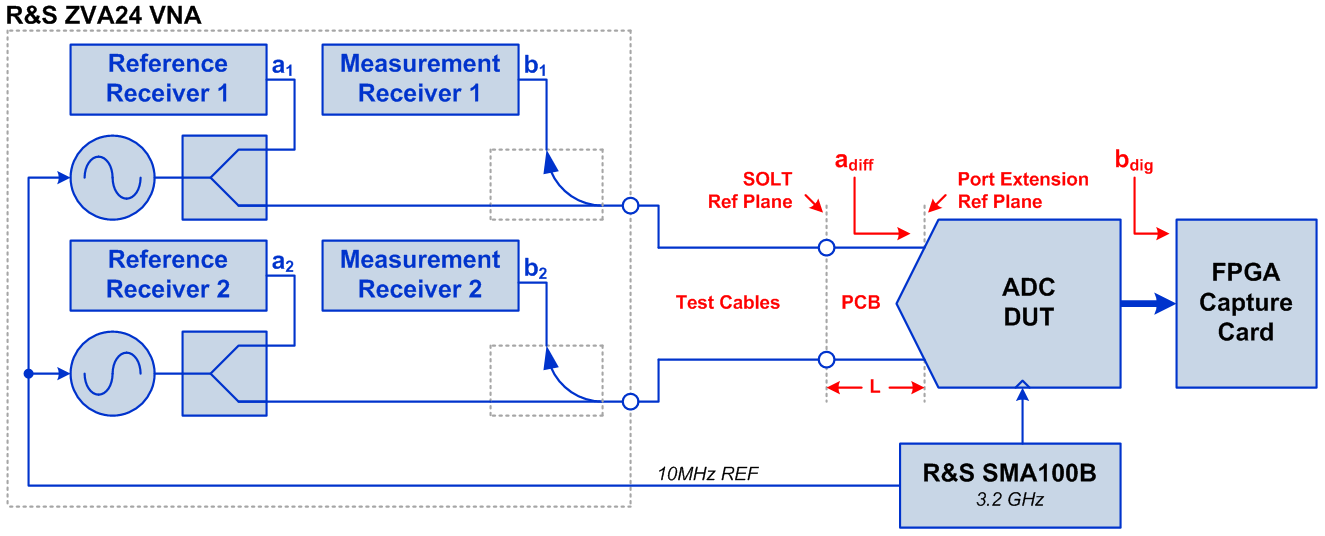
Taking this step by step, Figure 6 shows the measurement setup. To obtain the frequency response, we calibrate the VNA using the SOLT standards, which places the reference plane at the end of the VNA cables. The impact of the connector and traces on the test fixture will be compensated for in post processing, which will be discussed shortly.
 Figure 1 Frequency Response Measurement
Setup
Figure 1 Frequency Response Measurement
SetupAs we mentioned SOLT calibration only corrects for wave ratios. To measure absolute quantities, you need to perform power calibration which entails connecting a power meter to each test port at the end of the test cables. The VNA executes a routine to adjust the incident power at each test frequency to the desired value while compensating for the incident wave measurement bridge.
The zero length through (ZLT) structure is included on the test fixture to compensate for the interconnect between the connectors and DUT. The ZLT is equivalent to a pair of reflect structures connected back to back, which can be used to measure the loss between the test cables and the DUT terminals. To estimate this, we measure the insertion loss of the ZLT vs. frequency and then divide by 2 to find the loss from the connector to the DUT terminal.
Using the ZLT for this purpose is only valid if the return loss of the test fixture is sufficiently low enough that errors due to mismatch are negligible, which can be verified by measuring the ZLT’s return loss.
| Designing for demanding requirements? | |

|
Meet the requirements of tomorrow's test and measurement applications with the fastest-ever ADC. |
Measuring the Frequency Response
To take a frequency response measurement, the VNA is placed in constant wave mode so that the stimulus frequency can be manually swept while capturing the data with the FPGA capture card. The VNA and ADC clock source are synchronized to enable un-windowed fast Fourier transform (FFT) estimation of the amplitude.
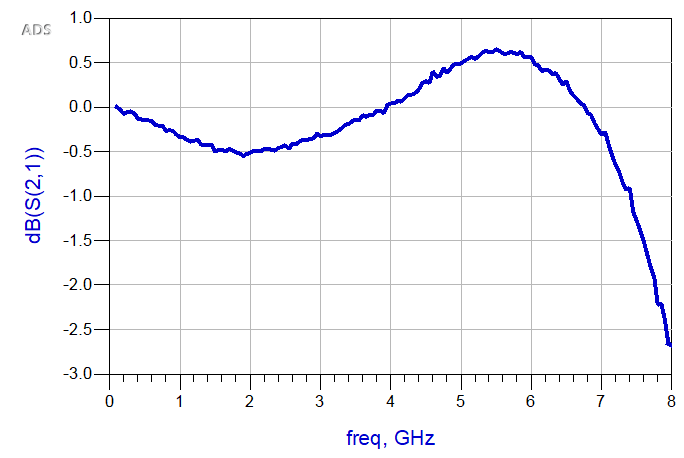
We can then collect the incident wave amplitude (in dBm) and the FFT fundamental level (in dBFS) and form a ratio. To finish the measurement, we subtract half the ZLT insertion loss at each frequency and normalize to the amplitude at the starting frequency. Figure 2 shows the result.
 Figure 2 ADC12DJ3200 Frequency Response Measurement in Dual-channel Mode
Note that this is a scalar measurement, because there is no straightforward way to know the phase between the VNA and the FPGA capture card. We are currently investigating methods to measure the relative phase which could mitigate the standing wave issue.
Putting Everything Together for an S-parameter Model
S-parameter models are typically represented in the Touchstone text file format. Figure 3 shows this file format, which is organized into columns. The first line of the file indicates that this is an S-parameter measurement, with frequency units of hertz, magnitude/angle format and a port impedance of 100 Ω.
 Figure 3 Touchstone Model Format
The first column gives the stimulus frequency, followed by two columns for each S-parameter (in this case magnitude and angle). The first two columns take data from the input impedance measurement; the next two columns are from the frequency response; and the final four columns are set to zero since port 2 is digital (that is, the reflection coefficient and isolation are perfect).
Figure 4 shows how the model is used in Keysight ADS. Port 1 is the ADC RF input and port 2 is the digital output. The RF input is represented as a single-ended port to simplify model creation. An ideal transformer is added to convert the input back to differential.
 Figure 4 Final S-parameter Model Simulation Setup
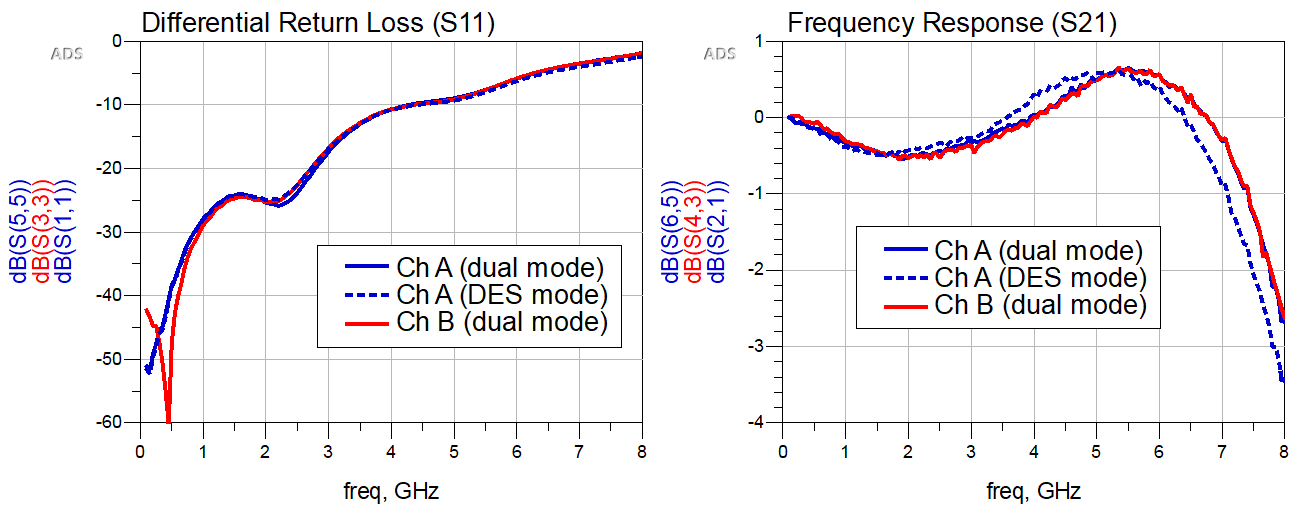
Figure 5 shows the simulated model for the ADC12DJ3200. This ADC can operate in dual-channel mode at 3.2 GSPS or single-channel dual-edge sampling (DES) mode at 6.4 GSPS.
 Figure 5 Final S-parameter Model Simulation Results
Conclusion
The approach we’ve described in this article makes it possible to construct very useful models of high speed ADCs for system-level or PCB designs. In the next installment of this series, we’ll show how to put the model to work in the design of a receiver front-end PCB design.