TIDU312A May 2014 – November 2020
- Trademarks
- 1Introduction
- 2Software Overview
- 3Procedure for Running the Incremental Builds
- 4Test Results
- 5References
- 6Revision History
3.2.3.1 Step 2.1: Build and Load Project
Follow the steps below to execute this build:
- Follow steps 1 through 7 exactly as in build 1(Section 3.1.4) except that in step 6 select build 2 option instead of build 1. Then complete step 6 as below:
- Locate and inspect the following
code in the main file under initialization code specific for build 2. This is
where all the software blocks related to build 2 are connected in the control
flow.
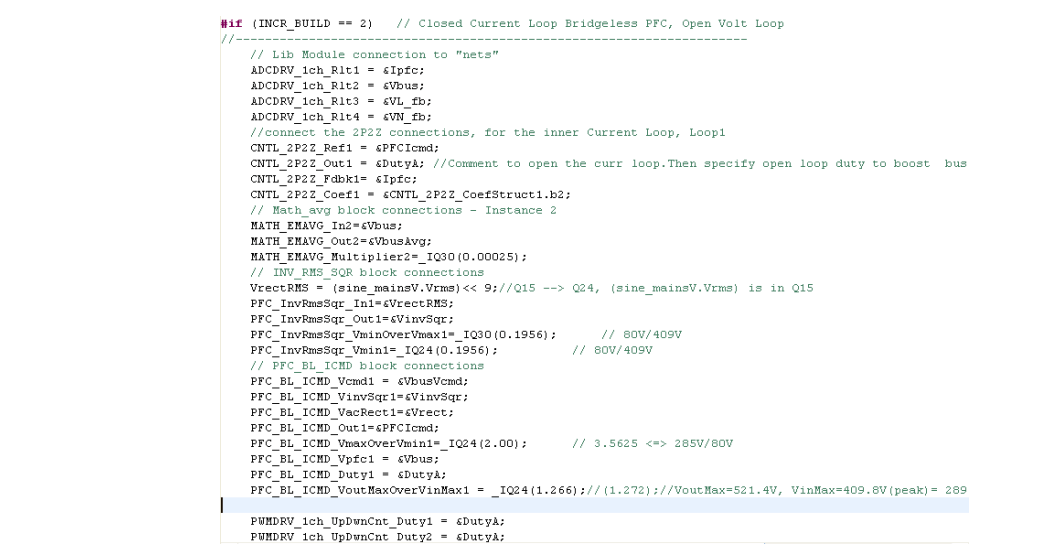
- Open and inspect BridgelessPFC-DPL-ISR.asm. Notice the _DPL_Init and _DPL_ISR sections under build 2. This is where all the macro instantiations under build 2 are done for initialization and runtime, respectively.
- Select the Incremental build
option as 2 in the BridgelessPFC-Settings.h file. Then follow steps 10
through 17 as in build 1 in order to run the code. When all these steps are
completed you should now be at the start of Main(). Note:
Whenever you change the incremental build option in BridgelessPFCSettings. h always do a “Rebuild All”.
- Run the code by using the <F8> key, or by using the Run button on the toolbar, or using Target -> Run on the menu bar.
- In the watch view, add the variable VpfcVcmd and set it to 0.05 (=838861 in Q24). This variable sets the magnitude of the reference current command for the current control loop.
- Apply an appropriate resistive load to the PFC system at the DC output. For example, a 8.0 KΩ resistor of 40W rating can be used. This will provide a load of 5W at 200 V bus voltage.
- Slowly
apply AC Power to the board from an isolated AC source. Monitor the DC bus
voltage as the input voltage is raised slowly to 50 V rms. The bus voltage now
should be around 200 V. Adjust the value for VpfcVcmd to set the bus
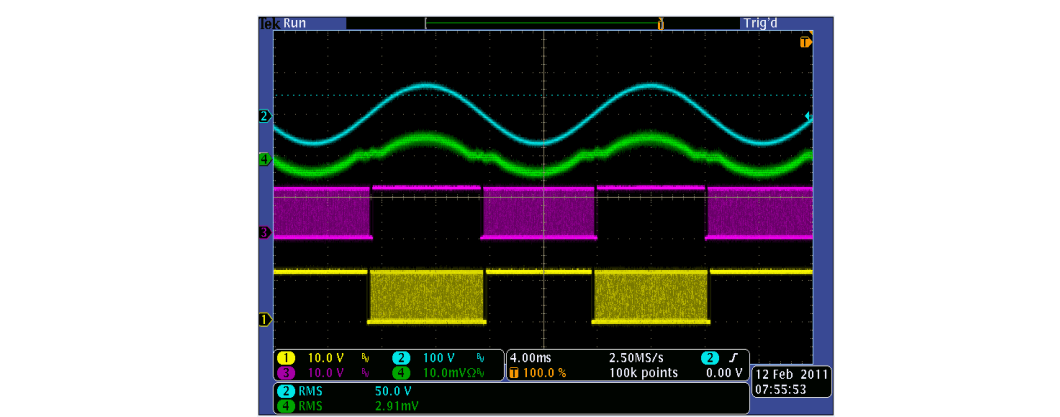
voltage to about 200 V. Use an oscilloscope with voltage and current probes to
observe the input voltage, input current and the PWM outputs. With a 50 V rms
input, 8.0 kΩ resistive load and bus voltage set to 200 V you should see the
following waveforms. Here, Ch1 and Ch3 show the PWM outputs. Ch2 is the input
voltage and Ch4 is the input current. With the current loop closed the input
current should have the same shape of the input voltage with good power factor.
- Increase VpfcVcmd slightly (in steps of 0.01) and observe the bus voltage settles to a higher value. Increasing VpfcVcmd increases the magnitude of the current reference signal and, since the PFC voltage loop is open, the bus voltage will rise. Therefore, apply caution and set the overvoltage protection threshold to a value less than 350V. This threshold parameter is labeled as VBUS_OVP_THRSHLD inside the file BridgelessPFC-Settings.h. Now change the input voltage or the load resistance to see the PFC operation under current control loop.
- Increase VpfcVcmd slightly (in steps of 0.01) and observe the bus voltage settles to a higher value. Increasing VpfcVcmd increases the magnitude of the current reference signal and, since the PFC voltage loop is open, the bus voltage will rise. Therefore, apply caution and set the overvoltage protection threshold to a value less than 350V. This threshold parameter is labeled as VBUS_OVP_THRSHLD inside the file BridgelessPFC-Settings.h. Now change the input voltage or the load resistance to see the PFC operation under current control loop.
- End of Exercise