SPNA248 March 2021 TM4C1292NCPDT , TM4C1292NCPDT , TM4C1292NCZAD , TM4C1292NCZAD , TM4C1294KCPDT , TM4C1294KCPDT , TM4C1294NCPDT , TM4C1294NCPDT , TM4C1294NCZAD , TM4C1294NCZAD , TM4C1299KCZAD , TM4C1299KCZAD , TM4C1299NCZAD , TM4C1299NCZAD , TM4C129DNCPDT , TM4C129DNCPDT , TM4C129DNCZAD , TM4C129DNCZAD , TM4C129EKCPDT , TM4C129EKCPDT , TM4C129ENCPDT , TM4C129ENCPDT , TM4C129ENCZAD , TM4C129ENCZAD , TM4C129LNCZAD , TM4C129LNCZAD , TM4C129XKCZAD , TM4C129XKCZAD , TM4C129XNCZAD , TM4C129XNCZAD
- Trademarks
- 1 Introduction
- 2 Application Examples
- 3 Application Setup
- 4 Download and Import the Ethernet examples
- 5 Enet_tcpecho_server_lwip Example Overview
- 6 Enet_tcpecho_server_static_ip_lwip Example Overview
- 7 Enet_udpecho_server_lwip Example Overview
- 8 Enet_dns_lwip Example Overview
- 9 Enet_sntp_lwip Example Overview
- 10Enet_tcpecho_client_lwip Example Overview
- 11Enet_adcsensor_client_lwip Example Overview
- 12Enet_udpecho_client_lwip Example Overview
- 13References
10.2 Configure the SocketTest Server and Run the enet_tcpecho_client_lwip Example
Since this is a client application, the server must be setup first and be in a listening state before the client can connect to it.
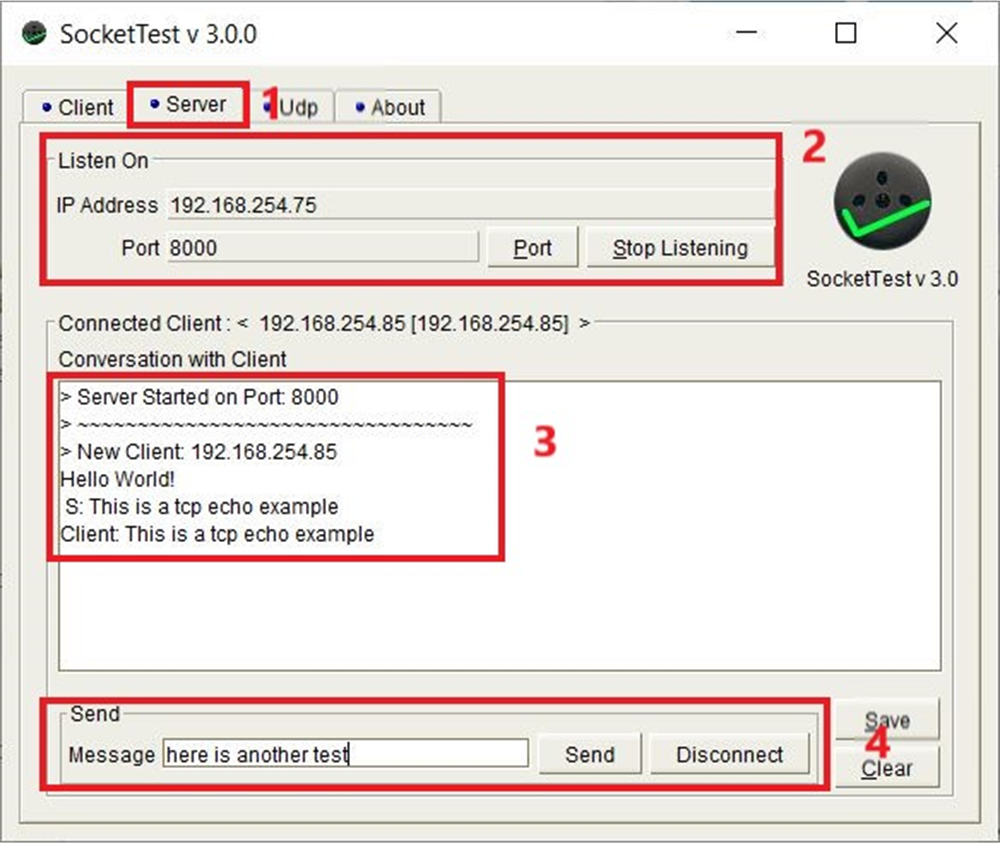
Follow the steps shown in Figure 10-1 to setup the SocketTest server:
- Open the Server tab in SocketTest.
- Enter the server IP address as well as the port number. The IP address is the PC from which the SocketTest is running on. The IP and port number need to match the settings defined in the enet_tcpecho_client_lwip.c as shown in Section 10.1. Finally, press the “Start Listening” button. Wait for the greetings message conversation window once the client connects.
- After the client connects to the SocketTest server, it will send a “Hello World!\n\r” greetings message. The conversation field in box 3 of Figure 10-1 displays the “Hello World!” message from the client IP address 192.168.254.85 as soon as the server accepts the connection from the client.
- Go to the Message field in the SocketTest shown in box 4 and type some message. Whatever message is entered is echoed by the client prepended with a “Client:” heading. In this example, the message entered is “This is a tcp echo example\n\r” with a total length of 28 characters.
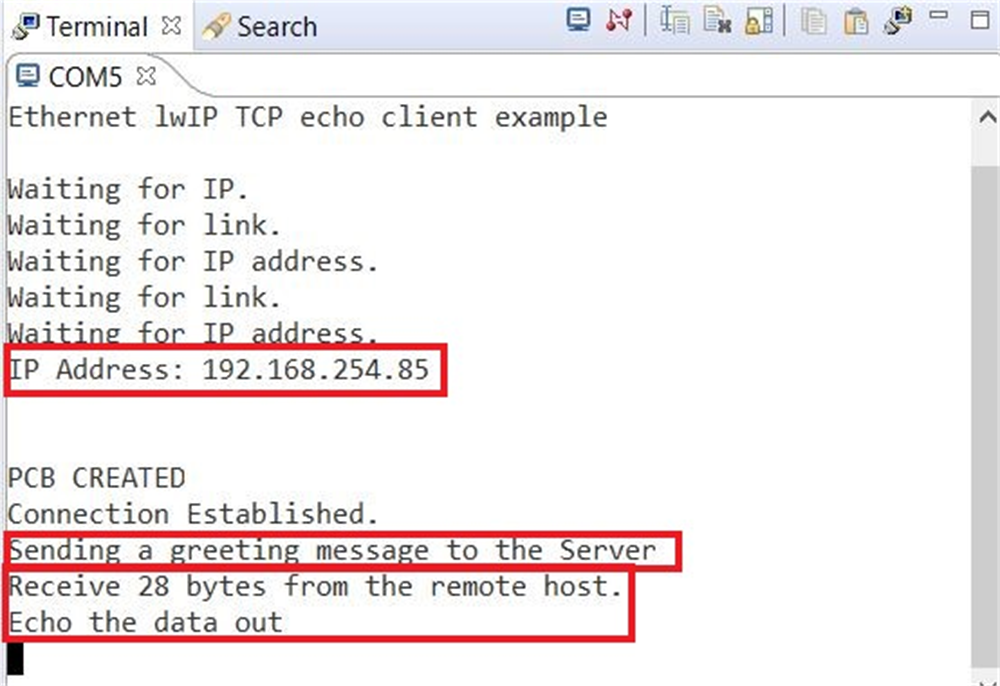
If you go back to the terminal window, it also indicates the same number of characters it receives from the remote host.
 Figure 10-1 SocketTest Server Configuration
for Enet_tcpecho_client_lwip
 Figure 10-2 Enet_tcpecho_client_lwip
Output