SLUUCW4 November   2023 BQ27Z558


  1.   1
  2.   Description
  3.   Features
  4.   Applications
  5.   5
  6. 1Evaluation Module Overview
    1. 1.1 Introduction
    2. 1.2 Kit Contents
    3. 1.3 Specification
    4. 1.4 Device Information
  7. 2Hardware
    1. 2.1 Hardware Setup
      1. 2.1.1 Hardware Requirements
      2. 2.1.2 Connecting the BQ27Z558 Circuit Module to a Battery Pack
      3. 2.1.3 EVM Jumpers Description
    2. 2.2 Chemical ID
      1. 2.2.1 Chemical ID Selection Process Description
      2. 2.2.2 Hardware Requirements and Setup
      3. 2.2.3 Logging Data in bqStudio
      4. 2.2.4 GPCChem Tool
      5. 2.2.5 Programming a Chemical ID
      6. 2.2.6 Further Resources for Chemical ID Process
    3. 2.3 Calibrating Gauge Measurements
      1. 2.3.1 Voltage Calibration
      2. 2.3.2 Current Calibration
    4. 2.4 Learning Cycle and Golden Image
      1. 2.4.1 Learning Cycle Process Description
      2. 2.4.2 Data Memory Configuration
      3. 2.4.3 Learning Cycle Steps
      4. 2.4.4 Low Temperature Optimization
      5. 2.4.5 Creating the Golden Image File
      6. 2.4.6 Programming the Golden Image File
    5. 2.5 BQ27Z558-Based Circuit Module
      1. 2.5.1 Circuit Module Connections
      2. 2.5.2 Pin Description
  8. 3Software
    1. 3.1 Software Setup
      1. 3.1.1 System Requirements
      2. 3.1.2 Software Installation
    2. 3.2 Troubleshooting Unexpected Dialog Boxes
    3. 3.3 Using bqStudio
      1. 3.3.1 Starting the Program
      2. 3.3.2 Setting Programmable BQ27Z558 Options
    4. 3.4 Gauge Communication
      1. 3.4.1 Advanced Communication in bqStudio
      2. 3.4.2 Standard Data Commands
      3. 3.4.3 Manufacturer Access Commands
      4. 3.4.4 Further Resources on Gauge Communication
  9. 4Hardware Design Files
    1. 4.1 Schematic
    2. 4.2 PCB Layout
    3. 4.3 Bill of Material
  10. 5Additional Information
    1.     Trademarks

GPCChem Tool

Convert the .log file to a .csv file by renaming the file format. Create a blank .csv file and copy into the first, second, third, and fourth columns the time, voltage, current, and temperature, respectively. Make sure that your units for each of these are seconds, millivolts, milliamps, and Celsius. The first row can be names for each of the columns, which the tool skips assuming there is only one row of names before the data begins. Figure 2-5 is an example of the required .csv file formatting as well as the first few rows of data.
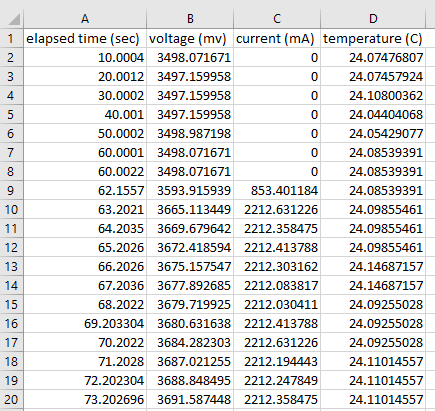
GUID-7B7E6CD8-44E6-4C3C-A7A6-7D705D165545-low.pngFigure 2-5 Cell Formatting for .csv
  1. Save this created file with the name “roomtemp_rel_dis_rel.csv”.
  2. Create a second file config.txt and write the following:
    1. ProcessingType = 2
    2. NumCellSeries = 1
    3. ElapsedTimeColumn = 0
    4. VoltageColumn = 1
    5. CurrentColumn = 2
    6. TemperatureColumn = 3
  3. Create a folder with any name. Put both the roomtemp_rel_dis_rel.csv and config.txt files in this folder, and convert the folder to a .zip file. Submit this .zip file to the GPC Tool through the web interface found on ti.com.

After processing, an e-mail is sent to the e-mail address provided when logging into ti.com to use the GPC Tool with a report that indicates the results of the tool’s process. The report contains the selected ChemID and a list of additional ChemIDs that satisfy the “less than 3%” error criteria. For example, this can be useful to verify that a ChemID used previously is still good. If any formatting mistakes or other errors are present, then those are reflected in the report.