SWRA625B August 2018 – February 2020 CC1352P , CC1352R , CC2652P , CC2652R , CC2652R7 , CC2652RSIP
- Z-Stack End Device Power Consumption Measurement With the SimpleLink Wireless MCU Family
- Revision History
4.2.2 ZC Node
Open the workspace file zc_light_sink_CC26X2R1_LAUNCHXL_tirtos_ccs.projectspec with the correct version of CCS. The project file is found in the following folder after installing the SimpleLink CC13X2/CC26X2 SDK [5]:
C:\ti\simplelink_cc13x2_26x2_sdk_<version>\examples\rtos\<LaunchPad>\zstack\zc_light_sink\tirtos\ccs
NOTE
When performing measurements on a GPD, a GPS application must be in the network. The easiest way to accommodate this is by using the ZC Light Sink project described.
With Zigbee 3.0, Base Device Behavior was introduced to allow for common network commissioning, such as automatic Finding & Binding mode, for a simplified commissioning process in Zigbee devices. In Section 4.2.5, it is explained how to start commissioning devices into a Zigbee network. To enable convenient features, such as storing storing and restoring the binding information after a device reset, ensure that the NV_RESTORE predefine symbol is defined in the project, which is defined by default in the projectspec. For more information about the NV_RESTORE compile option, see the Z-Stack Overview in the Z-Stack User's Guide[6].
When programming a board with NV_RESTORE option defined for the first time with a new application, it is important to always erase the flash to ensure that all old data is erased to avoid a freshly programmed device behave strangely based on old stored NV data.
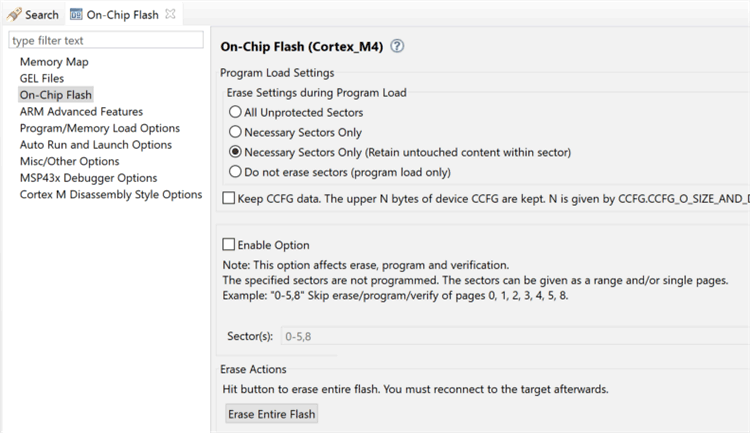
To erase the flash, first start a Debug Session on the device by right clicking on the project in Project Explorer → Debug As → Code Composer Debug Session. This will recompile the project if any changes were done. Once the Debug Session is started, click Tools → On-Chip Flash. Ensure 'Necessary Sectors Only (Retain untouched content within sector)' is selected, and click 'Erase Entire Flash' button, shown in Figure 4.
 Figure 4. Erase Flash Option