SBAU378A September 2021 – January 2022 ADS1148 , ADS1248
- Trademarks
- 1Introduction
- 2Getting Started With the ADS1x48EVM
-
3ADS1x48EVM Overview
- 3.1 Analog and Digital Power Supplies
- 3.2 Voltage Reference Options
- 3.3 Clock Options
- 3.4 Digital Interface
- 3.5
Analog Input Connections
- 3.5.1 Connecting a Thermocouple to J5 on the ADS1x48EVM
- 3.5.2 Connecting a Thermistor to J5 on the ADS1x48EVM
- 3.5.3
Connecting an RTD to J6 on the ADS1x48EVM
- 3.5.3.1 Connecting a 2-Wire RTD Using a Low-Side RREF to J6 on the ADS1x48EVM
- 3.5.3.2 Connecting a 2-Wire RTD Using a High-Side RREF to J6 on the ADS1x48EVM
- 3.5.3.3 Connecting a 3-Wire RTD Using One IDAC and a Low-Side RREF to J6 on the ADS1x48EVM
- 3.5.3.4 Connecting a 3-Wire RTD Using One IDAC and a High-Side RREF to J6 on the ADS1x48EVM
- 3.5.3.5 Connecting a 3-Wire RTD Using Two IDACs and a Low-Side RREF to J6 on the ADS1x48EVM
- 3.5.3.6 Connecting a 3-Wire RTD Using Two IDACs and a High-Side RREF to J6 on the ADS1x48EVM
- 3.5.3.7 Connecting a 4-Wire RTD Using a Low-Side RREF to J6 on the ADS1x48EVM
- 3.5.3.8 Connecting a 4-Wire RTD Using a High-Side RREF to J6 on the ADS1x48EVM
- 3.5.3.9 Summary of ADS1x48EVM RTD Configuration Settings
- 3.5.4 Connecting a General-Purpose Input to J5 on the ADS1x48EVM
- 4ADS1x48EVM GUI
- 5Bill of Materials, Printed Circuit Board Layout, and Schematic
- 6Revision History
3.5.2 Connecting a Thermistor to J5 on the ADS1x48EVM
Unlike a thermocouple, thermistors are not self-powered and require a constant voltage or current source to operate. Typically, constant voltage is preferred because the thermistor impedance can vary from hundreds of ohms at low temperature to hundreds of thousands of ohms at high temperature (or vice versa for a thermistor with a negative temperature coefficient). A resistor is then added in series with the thermistor to create a resistor divider that can be measured by an ADC.
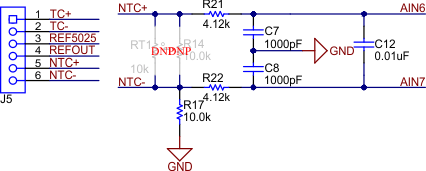
Connect an external thermistor directly to the J5:5 and J5:6 pins on the J5 terminal block, which represent the NTC+ and NTC– nets, respectively. The differential filter for this differential input pair has a cutoff frequency of 1.93 kHz. Additionally, each input has a common-mode filter with a cutoff frequency of 38.63 kHz. NTC+ and NTC– are connected through the filter resistors to two analog inputs (AIN6 and AIN7, respectively) on the ADS1x48. Figure 3-9 shows the portion of the ADS1x48EVM schematic with J5 and the thermistor input structure.
 Figure 3-9 Thermistor Input Structure on the ADS1x48EVM
Figure 3-9 shows two DNP components: a thermistor (RT1) and a 10-kΩ linearization resistor (R14). RT1 can be used for CJC for thermocouple measurements (see Section 3.5.2.1). R14 helps linearize the thermistor output voltage over a smaller temperature range. See section 2.8.2 in the A Basic Guide to Thermocouple Measurements application report to learn more about the benefits of using a linearization resistor when measuring a thermistor. Finally, resistor R17 in Figure 3-9 is the bias resistor used in conjunction with the external resistor to form a resistor divider. Resistor R17 is chosen to be 10 kΩ because 10 kΩ is a commonly-used nominal thermistor impedance. Choosing both resistors to have the same nominal impedance balances the resistor divider at 25°C.
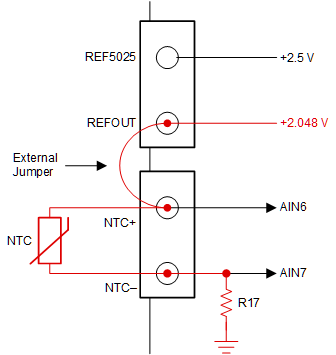
As stated earlier in this section, thermistors are not self-powered and require a bias source to operate. As Figure 3-10 shows, connect the constant voltage output from REFOUT to NTC+ via an external jumper to bias the sensor. Alternatively, NTC+ can be connected to the REF5025 output instead. In either case, ensure that the reference output used to bias the resistor divider is the same reference selected for the ADC measurements.
 Figure 3-10 Connecting a Thermistor to the J5 Terminal Block on the ADS1x48EVM
The steps for setting up a thermistor measurement with the ADS1x48EVM are summarized below:
- Connect the sensor to the NTC± terminals on J5
- Connect an external jumper between NTC+ and REF5025 or REFOUT
- Populate R14 with a 10-kΩ resistor if necessary
- Choose the ADC measurement channels to be MUX_SP[2:0] = AIN6 and MUX_SN[2:0] = AIN7
- Select the ADC reference source to be the same constant voltage output from step #2