SBOU180B november   2016  – july 2023 INA260


  1.   1
  2.   INA260EVM-PDK and Software Tutorial
  3.   Trademarks
  4. 1Overview
    1. 1.1 INA260EVM-PDK Contents
    2. 1.2 INA260EVM-PDK Features
    3. 1.3 Related Documentation from Texas Instruments
  5. 2INA260EVM-PDK Hardware
    1. 2.1 SM-USB-DIG Platform Description
    2. 2.2 INA260EVM PCB Description
      1. 2.2.1 EVM Power Supply
      2. 2.2.2 EVM Analog Inputs
    3. 2.3 EVM Digital Inputs and Outputs
  6. 3INA260EVM-PDK (Rev A) Setup
    1. 3.1 One-Time GUI Software Installation
    2. 3.2 INA260EVM Jumper Settings
    3. 3.3 Connecting the Hardware
    4. 3.4 System Power-Up
  7. 4INA260EVM GUI Software
    1. 4.1 Configuration Tool
      1. 4.1.1 Step 1: Set the I2C Address
      2. 4.1.2 Step 2: Configure Operation
      3. 4.1.3 Step 3: Set Conversion Times
      4. 4.1.4 Step 4: Configure Alert
    2. 4.2 Results Bar
    3. 4.3 Graph Tool
    4. 4.4 Registers Tool
  8. 5INA260EVM Documentation
    1. 5.1 Schematic
    2. 5.2 PCB Layout
    3. 5.3 Bill of Materials
  9. 6Revision History

One-Time GUI Software Installation

The GUI software must be installed on a computer running Windows XP or later. Windows 7 is the recommended operating system.

Note:

For the GUI text to be rendered correctly, the text size under Control Panel >> Appearance and Personalization >> Display (shown in Figure 3-1) must be set to Smaller - 100%.
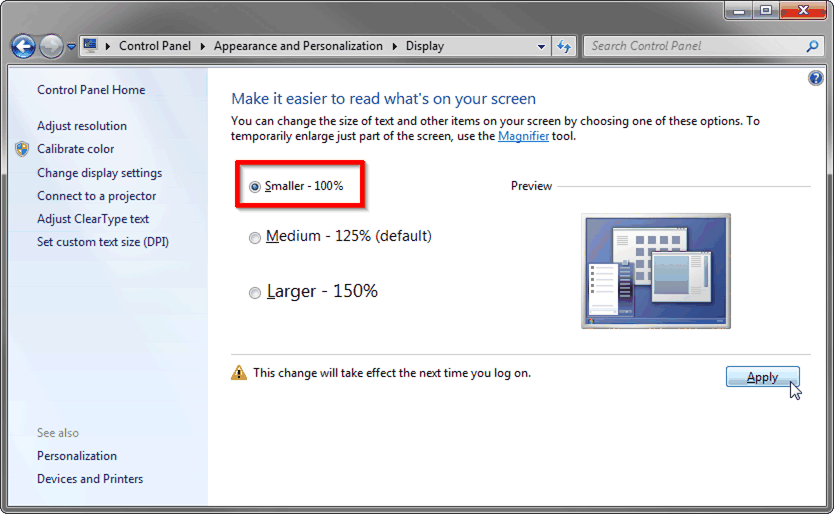
GUID-295F0389-B455-4B88-BA43-E31FE4F76CA7-low.gif Figure 3-1 Recommended Display Settings

Make sure the hardware is not connected to the computer. Download the INA260EVM GUI from the INA260 Tools & Software folder. Extract the contents of the downloaded .zip file and run Setup_INA260EVM.exe. Follow the on-screen instructions provided in Figure 3-2 to complete the software installation.
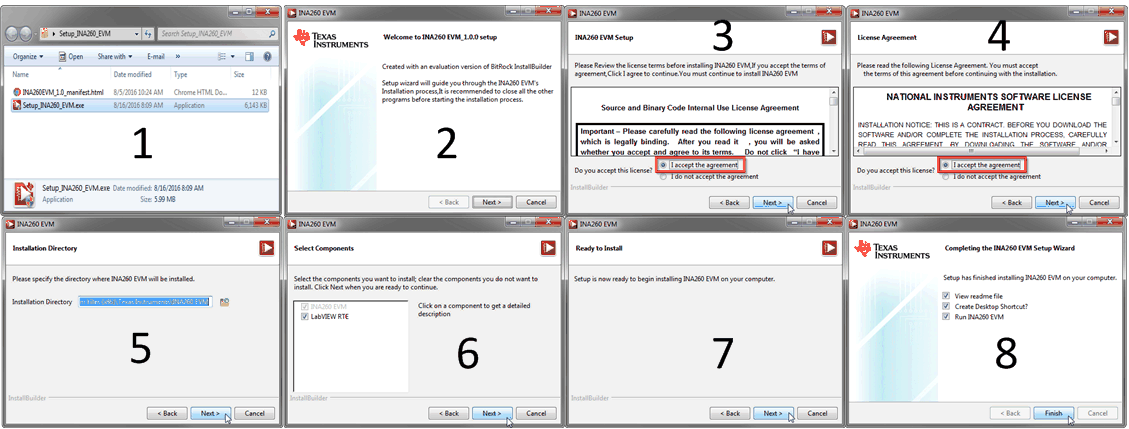
GUID-39F420AC-446D-4B16-BC91-3B36F352651B-low.gif Figure 3-2 INA260EVM GUI Installation