SNOSA40K November 2002 – December 2016 LP2996-N , LP2996A
PRODUCTION DATA.
- 1 Features
- 2 Applications
- 3 Description
- 4 Revision History
- 5 Pin Configuration and Functions
- 6 Specifications
- 7 Detailed Description
- 8 Applications and Implementation
- 9 Power Supply Recommendations
- 10Layout
- 11Device and Documentation Support
- 12Mechanical, Packaging, and Orderable Information
Package Options
Mechanical Data (Package|Pins)
Thermal pad, mechanical data (Package|Pins)
- DDA|8
Orderable Information
10 Layout
10.1 Layout Guidelines
- The input capacitor for the power rail must be placed as close as possible to the PVIN pin.
- VSENSE must be connected to the VTT termination bus at the point where regulation is required. For motherboard applications an ideal location would be at the center of the termination bus.
- VDDQ can be connected remotely to the VDDQ rail input at either the DIMM or the chipset. This provides the most accurate point for creating the reference voltage.
- For improved thermal performance excessive top side copper can be used to dissipate heat from the package. Numerous vias from the ground connection to the internal ground plane helps. Additionally these can be placed underneath the package if manufacturing standards permit.
- Take care when routing the VSENSE trace to avoid noise pickup from switching I/O signals. A 0.1-µF ceramic capacitor placed close to VSENSE can also be used to filter any unwanted high frequency signal. This can be an issue especially if long VSENSE traces are used.
- VREF must be bypassed with a 0.01-µF or 0.1-µF ceramic capacitor for improved performance. This capacitor must be placed as close as possible to the VREF pin.
10.2 Layout Examples
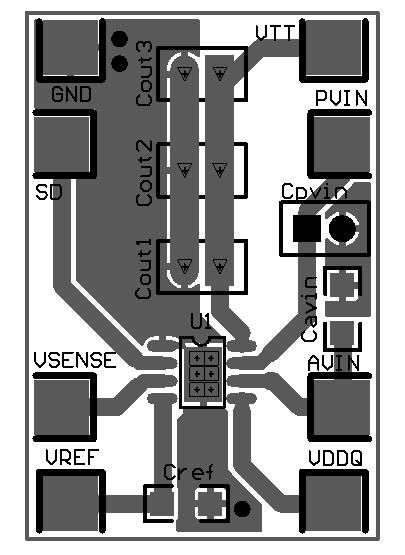 Figure 31. Layout Example of the SO PowerPAD Package (Top Layer)
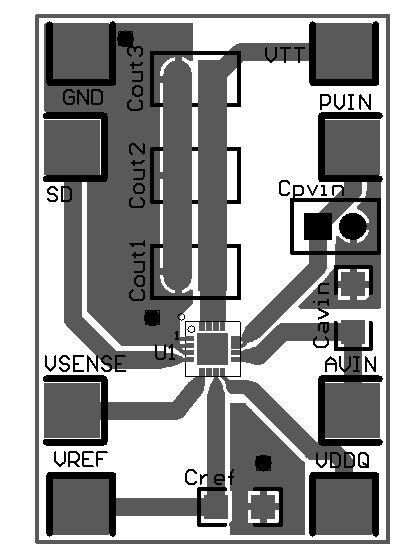 Figure 32. Layout Example of the WQFN Package (Top Layer)
10.3 Thermal Considerations
Because the LP2996-N and LP2996A are linear regulators, any current flow from VTT results in internal power dissipation generating heat. To prevent damaging the part from exceeding the maximum allowable junction temperature, derate the part according to the maximum expected ambient temperature and power dissipation. The maximum allowable internal temperature rise (TR(MAX)) can be calculated with Equation 3 given the maximum ambient temperature (TA(MAX)) of the application and the maximum allowable junction temperature (TJ(MAX)).
From this equation, the maximum power dissipation (PD(MAX)) of the part can be calculated with Equation 4.
The RθJA of the LP2996-N and LP2996A is dependent on several variables: the package used; the thickness of copper; the number of vias and the airflow. For instance, the RθJA of the SOIC is 163°C/W with the package mounted to a standard 8×4 2-layer board with 1-oz copper, no airflow, and 0.5-W dissipation at room temperature. This value can be reduced to 151.2°C/W by changing to a 3×4 board with 2-oz copper that is the JEDEC standard. Figure 33 shows how the RθJA varies with airflow for the two boards mentioned.
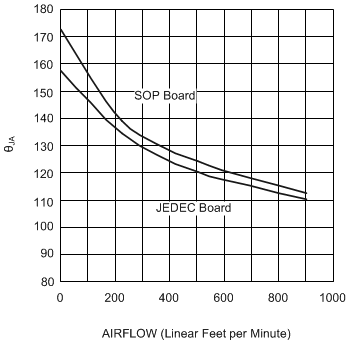 Figure 33. RθJA vs Airflow (SOIC)
Additional improvements can be made by the judicious use of vias to connect the part and dissipate heat to an internal ground plane. Using larger traces and more copper on the top side of the board can also help. With careful layout, it is possible to reduce the RθJA further than the nominal values shown in Figure 33
Layout is also extremely critical to maximize the output current with the WQFN package. By simply placing vias under the thermal pad, the RθJA can be lowered significantly. Figure 34 shows the WQFN thermal data when placed on a 4-layer JEDEC board with copper thickness of 0.5 oz, 1 oz, 1 oz, and 0.5 oz (respectively). The number of vias with a pitch of 1.27 mm is increased to the maximum of 4, where a RθJA of 50.41°C/W can be obtained. Via wall thickness for this calculation is 0.036 mm for 1-oz copper.
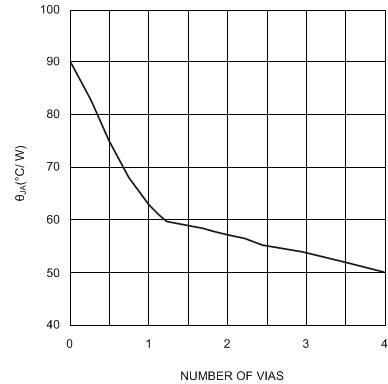
| 4-layer JEDEC board |
Additional improvements in lowering the RθJA can be achieved with a constant airflow across the package. Maintaining the same conditions as above and utilizing the 2×2 via array, Figure 35 shows how the RθJA varies with airflow.
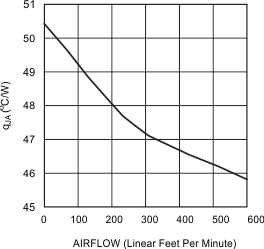
| JEDEC board with 4 vias |
Optimizing the RθJA and placing the device in a section of a board exposed to lower ambient temperature allows the part to operate with higher power dissipation. The internal power dissipation can be calculated by summing the three main sources of loss: output current at VTT, either sinking or sourcing, and quiescent current at AVIN and VDDQ. During the active state, when the shutdown pin (SD) is not held low, the total internal power dissipation can be calculated with Equation 5.
where
- PAVIN = IAVIN × VAVIN
- PVDDQ = VVDDQ × IVDDQ = VVDDQ2 x RVDDQ
To calculate the maximum power dissipation at VTT both conditions (sinking and sourcing current) at VTT must be examined. Although only one equation is added into the total, because VTT cannot source and sink current simultaneously.
Calculate sinking with Equation 6.
Or calculate sourcing with Equation 7.
The power dissipation of the LP2996-N and LP2996A can also be calculated during the shutdown state. During this condition the output (VTT) is tri-stated; Therefore, that term in the power equation disappears as it cannot sink or source any current, and leakage is negligible. The only losses during shutdown are the reduced quiescent current at AVIN and the constant impedance that is seen at the VDDQ pin.
where
- PAVIN = IAVIN × VAVIN
- PVDDQ = VVDDQ × IVDDQ = VVDDQ2 × RVDDQ