SPRAD03 March 2022 AM2431 , AM2431 , AM2432 , AM2432 , AM2434 , AM2434 , AM6411 , AM6411 , AM6412 , AM6412 , AM6421 , AM6421 , AM6422 , AM6422 , AM6441 , AM6441 , AM6442 , AM6442
- Trademarks
- 1 System Overview
- 2 Hardware Prerequisites
- 3 Hardware Configuration
- 4 HW Pinouts, Default Jumpers, and Connections
- 5 Schematics
- 6 Jumper Settings and Descriptions
- 7 LEDs
- 8 Software Architecture
- 9 Actuation and Feedback Timing
- 10Benchmark Results
-
11Detailed Demo User's Guide
- 11.1 Step 0. Getting the Software and Building
- 11.2 Step 1. Getting Started With the Hardware
- 11.3 Step 2. Configure ROQ437 EnDat2.2 Encoder for Faster EnDat 2.2 Recovery Time (only needs to be done once the first time you use the ROQ437 encoder)
- 11.4 Step 3. Open Loop Iq Control (BUILDLEVEL == OPEN_LOOP_IQ_ID)
- 11.5 Step 4. Closed Loop Iq/Id Control (BUILDLEVEL == CLOSED_LOOP_IQ_ID)
- 11.6 Step 5. Closed Loop Speed Control (BUILDLEVEL == CLOSED_LOOP_SPEED)
- 11.7 Step 6. Closed Loop Position Control (BUILDLEVEL == CLOSED_LOOP_POSITION)
- 12Build Using MCU+SDK 08.00.00.21 & CCS 10.3.1
- 13Summary
- 14Appendix A: Detailed Motor Control R5F Processing Time
- 15References
11.6 Step 5. Closed Loop Speed Control (BUILDLEVEL == CLOSED_LOOP_SPEED)
This build level closes the speed loop in addition to the current loop.
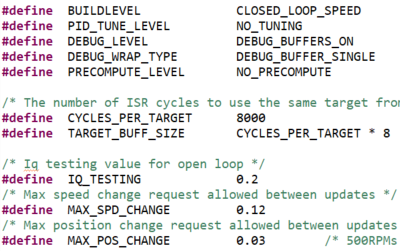
- Go to the settings.h file and
change the definitions to match the following (closed loop speed control, debug
buffers on, 8000 cycles per set point):
 Figure 11-24 Closed Loop Speed -
BUILDLEVEL
 - If desired, go to the
single_chip_servo.c file and modify the Speed set point array. Default values
shown below.

- Build the project in Debug mode, then load it into MAIN_Cortex_R5_0_0.
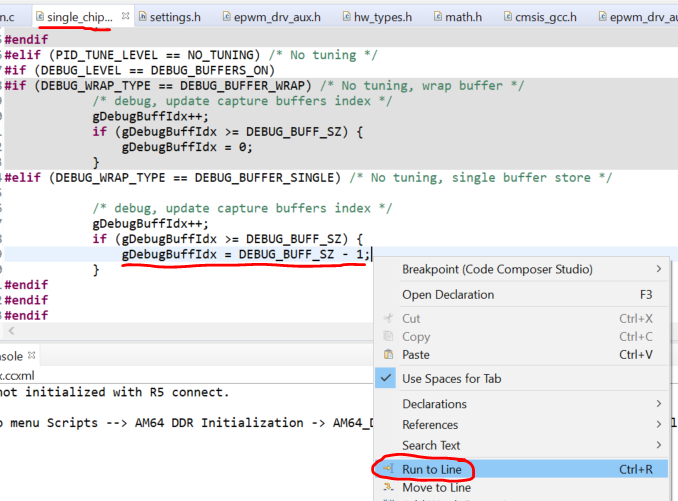
- Once the project is loaded, open
the 'single_chip_servo.c' file and find the following line, then right-click and
select 'Run to Line'.
 Figure 11-25 Closed Loop Speed -
Run to Line
 - Running to this line allows the control code to run through the 8 different setpoints and fill up the debug buffer so that we can view the graph.
- Check
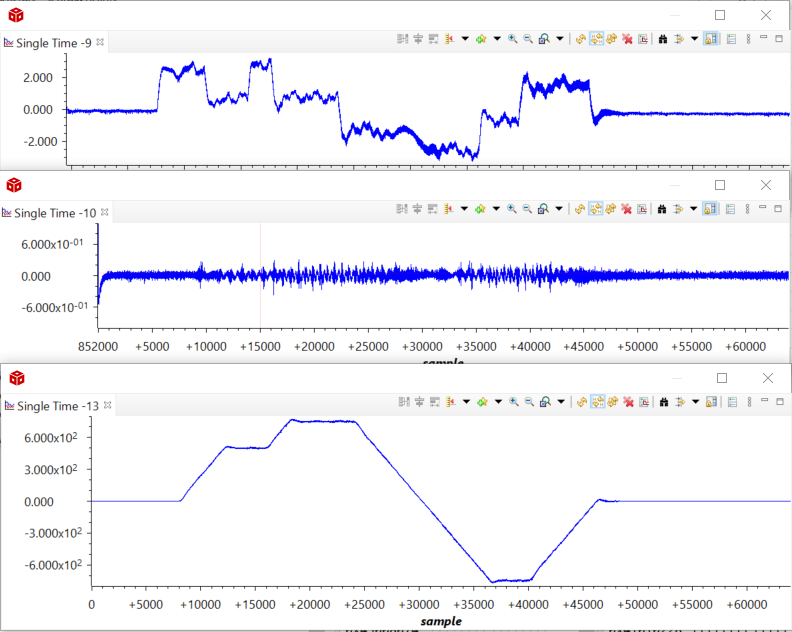
the output by importing the following graphs:
 Figure 11-26 Closed Loop Speed -
ID, IQ, Speed Graph 1
 - Example output shown below (Iq,
Id, and speed graphed from top to bottom). Notice how Iq ramps and stays high
during the speed ramps and goes close to zero to maintain speed. The speed graph
at the bottom shows that the speed ramps to the requested value and then levels
out. The ramp is slope is determined by the MAX_SPD_CHANGE definition in the
settings.h file. You'll notice that during the ramp from 750 to -500 and then
-750 that -500 was basically skipped because the ramp wasn't steep enough to
reach it within the cycles allowed.
 Figure 11-27 Closed Loop Speed -
ID, IQ, Speed Graph 2