SLAAEC6A October 2023 – January 2024
- 1
- Description
- Get Started
- Features
- Applications
- 6
- 1Evaluation Module Overview
-
2Hardware
- 2.1 System Overview
- 2.2
Hardware Overview
- 2.2.1 AC-MB Settings
- 2.2.2 TAx5x1xQ1EVM-K Hardware Settings
- 2.2.3 Diagnostics Hardware Setup
- 2.2.4 GPIO1 Hardware Configurations
- 2.2.5 GPO1A Hardware Configurations
- 2.2.6 GPI1A Hardware Configurations
- 2.2.7 GPI2A Hardware Configurations
- 2.2.8 I2C Address Hardware Configurations
- 2.2.9 Audio Serial Interface Hardware Configurations
-
3Software
- 3.1 Software Description
- 3.2 PurePath Console 3 Installation
- 3.3
TAx5x1x-Q1 EVM GUI
- 3.3.1 Software Overview
- 3.3.2 Configuration View
- 3.3.3 End System Integration View
- 3.3.4 Register Map View
- 3.3.5 Preset Configuration
- 3.3.6 I2C Monitor View
- 3.4 Configuration Examples
- 4Hardware Design Files
- 5Additional Information
- 6Revision History
2.2.1.1 Audio Serial Interface Settings
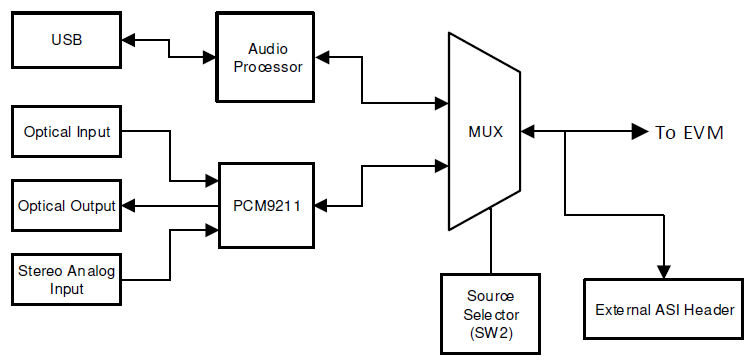
The AC-MB provides the digital audio signals to the evaluation module (EVM) from the universal serial bus (USB), optical jack, stereo audio jack, and external audio serial interface (ASI) header. Figure 3-3 shows a block diagram of the ASI routing on the AC-MB.
 Figure 2-3 AC-MB Audio Interface Block Diagram
The SW2 switch on the AC-MB selects the audio serial bus that interfaces with the PCM6xx0EVM. Next to the SW2 switch, the AC-MB has a quick reference table to identify the audio serial interface source options and switch settings. The AC-MB acts as the controller for the audio serial interface. The AC-MB has three different modes of operation: USB, optical or analog, or external ASI.
The serial interface clocks and data are provided from the USB interface. The USB audio class driver on the operating system determines the sampling rate and format. The default settings for the USB audio interface are 32-bit frame size, 48-kHz sampling rate, BCLK and FSYNC ratio of 256, and the format is time-division multiplexing (TDM).