SLVUBX1 December 2020 TPS63810
7 Setup Details
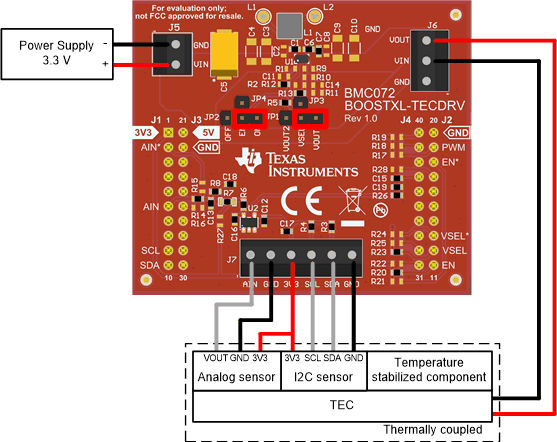
Figure 7-1 shows the hardware setup of the system. A 3.3-V power supply connected to J5 terminal block is used to power the BOOSTXL-TECDRV BoosterPack. Make sure that the jumper on JP2 header is connecting EN and ON pins, and that the jumper on JP1 header is connecting VSEL and VOUT1 pins. Connect the TEC module to J6 terminal block, with positive (red) wire connected to VOUT connection and negative (black) wire to VIN connection. In this arrangement, the sensor and the component that is thermally stabilized need to be mounted on the cold side of the TEC module. Nevertheless, when finally turning on the system, if the temperature drifts away from the set temperature, the wires of the TEC module can be simply swapped reverse the TEC polarity.
 Figure 7-1 Hardware Setup
The BOOSTXL-TECDRV BoosterPack can be used with an analog or a digital I2C temperature sensor.
If an I2C temperature sensor is used, connect it to J7 block terminal using the 3V3, GND, SDA and SCL connections. Resistors R3 and R4 on the BoosterPack are the pull-up resistor for the I2C lines. 2.2-kΩ resistors are already mounted on the board, and can be removed or changed if needed.
If an analog temperature sensor is used, connect it to J7 block terminal using the 3V3, GND and AIN connections. 3V3 connection is useful in case when an active sensor that requires a power supply, such as the LMT70, is used. In case a PTC or an NTC thermistor is used, it can be connected between AIN and GND connections. A 10-kΩ, 0.1% resistor R7 on the BoosterPack is already mounted, serving as the high side resistor that forms a voltage divider with the thermistor.
The provided firmware assumes that a digital I2C temperature sensor TMP117 is used. To change the sensor type, the sensType variable needs to be set to either SENS_TYPE_I2C for digital, or SENS_TYPE_ANL for analog sensor.
If a digital sensor is used it needs to be initialized. For the TMP117 in particular, this is done in the initialization part of the code, where it is configured for continuous conversion without averaging. The value that is read from the sensor is converted into temperature using the following conversion:
tempSens = tmp*0.0078125
where tempSens is the sensed temperature in °C and tmp is the value received from TMP117. For more information on the TMP117, refer to the TMP117 High-Accuracy, Low-Power, Digital Temperature Sensor with SMBus™ -and I2C-Compatible Interface data sheet.
If an analog temperature sensor is used, the value read from the ADC needs to be converted to temperature before being used in the PID controller. Use the thermistor design tool to view resistance tables for TI devices, and begin your design with example temperature conversion methods and code.
The initial PID controller parameters can be set by changing the PID_KP, PID_KI, PID_KD constants. It should be noted that the provided firmware implements PI controller, which is sufficient for majority of controllers for thermal processes. To prevent the integrator from saturation, an anti-windup is implemented using the back-calculation method. The anti-windup can be tuned modifying the PID_KAWU constant. All PID parameters can be changed in GUI during runtime, to fine tune the system response.