SNLU254A November 2020 – July 2022 DS160PT801
2 EVM Power
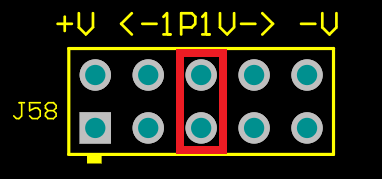
Onboard regulation is used to step down the input 12-V and 3.3-V supplies to power both DS160PT801 retimers and other devices on the riser card EVM. There are LEDs to indicate power good for the 1.17-V, 1.8-V and 3.3-V power supplies. The 1.17-V power supply level can be adjusted in 50-mV increments between 1.0 V and 1.2 V. Connector J58 is used to make these adjustments. By default, the jumper for J58 is set to the 3-4 position, which is 1.15 V. The center of the header is a 1.1 V supply level, increasing supply levels to the left and decreasing supply levels to the right. The EVM must be powered off completely 15 seconds to change voltage level.

Figure 2-1 1.17-V Power Supply Pin Controls
To facilitate debug and prototype system bring up, the DS160PT801X16 EVM can be powered in two different ways. One method is through the Gold Finger connector. The other is with the SATA connector at the right side of the riser card design. The SATA connector can be used to power the EVM separately from the system power supply. This can be used to help diagnose power supply issues and allow for pre-configuration of the DS160PT801 through the SMBus interface before system power-up.
Figure 2-2 DS160PT801X16EVM Power Network