TIDUEH2C April 2021 – September 2022
2.2 Design Considerations
The Shunt Current: Ifull
The first step in designing a current shunt monitor is determining the maximum current that the shunt resistor will need to conduct. For this design discussion, we will use an example application of a battery-operated motor drive circuit to determine the design of the shunt measurement. In motor drives, the maximum current is the inrush current that occurs at start up. Since inrush is a transient condition from a cold start, the shunt power rating does not have to include the peak inrush current, although the peak may be an important max input value for software-controlled startup or hardware overcurrent interruption based on the low-side shunt. The shunt power derating for inrush current will depend on the motor torque constant, load, and target acceleration. A good rule of thumb is that a motor will draw six times its rated current during start up. Each of the three shunt resistors should therefore be rated to conduct double the full load current. In this example, the full rated load current is 20 A and the shunt resistor current rating is 45 Arms per phase.
The Shunt Power: Wshunt
The next step is to determine the shunt power rating based on the available heatsinking. The shunt resistor is a power component and should be given the same thermal consideration as a power switch. The shunt power rating often assumes ideal heatsinking conditions which should be verified in custom hardware. Although a 2512 resistor package is rated for 2 W, the true thermal limit is determined by the PCB heatsinking ability. If unable to effectively sink 2 W of heat, 170 ⁰C is approaching the melting point of solder, and the resistor solder joint may melt well below its 2 W rating. Temperature, which increases resistance, will also affect measurement accuracy.
An easy way to increase the shunt power rating, space permitting, is to use parallel shunt resistors, since the negative thermal feedback will keep the current evenly distributed, just like for parallel switches. In this example, a single resistor is used, but use of two stacked resistors per phase was successfully tested. This shunt has a <1 % thermal variation up to 170 ⁰C and a 2 W power rating. With a fast-settling high-speed amplifier to drive the ADC, use of 0.1 % gain-setting resistors can keep this thermal limit as the accuracy floor of the system.
Some have tried to replace the shunt resistors entirely with the Rdson of the low-side MOSFETs. While this is possible in theory, the resistance will vary much more strongly across individual devices than for a 1% shunt resistor, and greater attention to individual device detail will be necessary. Also, this requires the full battery voltage to be applied between the inputs of the difference amplifier when the switch is open, resulting in a much higher amplifier input current. Using a high-speed amplifier can keep a shunt resistor's power sufficiently low for all but the most thermally sensitive applications.
The Shunt Value: Rshunt
Once the maximum allowable shunt power has been determined, the next step is picking the right shunt resistor value. To minimize shunt power, this means determining the minimum possible resistance. Theoretically, this is based on the shunt inductance, since fast current edge rates will produce a higher gain from the shunt inductance compared to the DC resistance. A larger shunt resistance can maintain consistent impedance over a higher frequency range. The shunt in this example is the CRE2512-FZ-R001E-2. This 1-mΩ resistor has < 5 nH inductance, suitable for frequencies ≤ 300 kHz.
In practice, a larger minimum resistance is often required due to the amplifier's limited gain at the bandwidth required to measure the minimum pulse width. However, using a high-speed amplifier allows a larger gain and minimizes shunt resistance.
The Amplifier Gain: AV/V
The amplifier gain should be chosen to match the maximum software-controlled current to the full ADC input range with some headroom. In battery-based applications, the maximum current is typically around the same maximum current expected from the battery. Meeting the full ADC input range increases the signal-to-noise ratio and increases the resolution of the data used by the motor controller. In this example, a gain of 67-V/V was chosen to convert a ± 20-A (24.6-A ceiling) signal to a ±1.65-V signal for a 3.3-V ADC with a 1-mΩ shunt resistor. A 12-bit ADC results in a measurement resolution of 12 mA.
While it is often not necessary to accurately measure the peak inrush current, the series gain resistors should be large enough to protect the amplifiers' inputs during the large shunt voltage transients. For extremely high inrush shunt voltages, diodes can be placed from each amplifier's input to each supply rail to increase the allowable input current, but this will add leakage current and increase the amplifier’s offset. Scaling up to larger resistors is often sufficient.
The Switching Frequency: fPWM
The motor's phase current frequency in Hz = (RPM / 60 seconds) × (Stator Poles). In a motor controller, reconstructing this sine wave with a higher PWM frequency can reduce ripple and the corresponding vibration noise and mechanical wear on the motor windings, especially at top speeds. To minimize distortion of the phase current, a rule of thumb is that the fPWM should be 60 times the maximum expected phase current frequency. In this example, a 600 RPM, 50 stator pole (23 rotor magnet pole pairs) motor is spun with a 500 Hz phase current frequency. A good switching frequency for this motor is fPWM = 60 × 500 Hz = 30 kHz. Switching frequencies of 15 kHz, 30 kHz, 45 kHz, and 60 kHz are compared in Figure 2-4, Figure 2-5, Figure 2-6, and Figure 2-7 for this motor at top speed with 10 A of field weakening current. The OPA2836-Q1 GBWP supports all of these frequencies, and the phase current of the motor controller more accurately reproduces a sinusoid as the fPWM increases.
 Figure 2-4 fPWM= 15 kHz, OPA2836 Gain = 67 V/V, Rshunt = 1 mΩ
 Figure 2-6 fPWM= 45 kHz, OPA2836 Gain = 67 V/V, Rshunt = 1 mΩ
 Figure 2-5 fPWM = 30 kHz, OPA2836 Gain = 67 V/V, Rshunt = 1 mΩ
 Figure 2-7 fPWM= 60 kHz, OPA2836 Gain = 67 V/V, Rshunt = 1 mΩ
A high fPWM is typically required for high RPM motors and motors with a high stator-pole count due to their high voltage and low inductance. TI offers excellent, high-ampere gate drivers to reduce switching time and switching losses for high-current switches, and in this example a < 100 ns switch settling time is achieved with a 1 us dead time (0.5 us for 60 kHz PWM). Since the shunt is in series with the low-side switch, it produces three types of signals during a cycle: 0 V when the switch is open, pure current when the switch is closed, and PWM current when the switch is modulated at the PWM frequency. The most challenging measurement occurs during the transition from open switch to PWM region, where the minimum pulse-width occurs (Dmin). The motor will still work with an amplifier GBWP below the minimum pulse width requirement, being able to power through a fraction of missed measurements, but this will begin to degrade the accuracy of the motor control and limit the top speed that can be achieved.
 Figure 2-8 < 1 us Minimum Pulse Width using OPA2836-Q1, Gain = 67 V/V, 60 kHz PWM, 5% Duty Cycle
At top speed, the minimum pulse measurement is its most important, being a larger fraction of the total measurements. With a fPWM = 60 × the electrical frequency, there will be 15 PWM periods between 0 % and 100% duty cycle . This implies a minimum duty cycle of 1/15 = 6.7%. Designing for a 5% duty cycle will accommodate slightly slower speeds and simplify calculation.
The Amplifier Gain Bandwidth Product: GBWP
The amplifier’s gain-bandwidth product should exceed (switching frequency ) × (Amplifier gain) / (Minimum Duty Cycle Ratio) as shown in Equation 1.
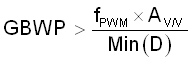
Additional bandwidth will improve settling time and increase the number of accurate data points available in a minimum width pulse. In this example, the maximum fPWM is 60 kHz, the minimum duty cycle is ~5%, and the amplifier gain is 67 V/V. This requires an amplifier with a gain-bandwidth product of at least 120 MHz. The OPA2836-Q1 satisfies this requirement with a large signal gain-bandwidth product of 120 MHz. Additionally, the OPA2836-Q1 features a low noise of 4.6 nV/rtHz to maximize the SNR of the system.
With these design considerations, a simplified equation can determine the required gain-bandwidth product for a current shunt amplifier. A fPWM = 60 × electrical frequency, a three-phase system, a shunt power rated for 6 × full load current at inrush, and a 1.65 × amplifier gain derating that leaves 65% measurement headroom from a mid-supply referenced 3.3-V ADC input is assumed.
eScooter
For RPM = 600, Stator Poles = 50, Ifull = 20 A and Wshunt = 2 W, the amplifier's gain-bandwidth product should be at least
eBike
To produce more power using a similar motor, the voltage can be increased from 42 V to 70 V. The RPM is now (70 / 42) × 600 = 1000, and the new motor current is 25 A. The shunt resistance must be reduced, the fPWM increased, and the amplifier's gain-bandwidth product should now be
Propeller ESC
For a 5 kW rated propeller motor, there are 12 stator poles (7 rotor magnet pole pairs). The target RPM is 8000, and the full motor current is 45 A. The Wshunt = 3W. The amplifier's gain-bandwidth product should now be
 Figure 2-9 OPA2836 Gain = 67 V/V, 45 kHz
PWM, Rshunt = 1/3 mΩ, 5kRPM
Figure 2-9 OPA2836 Gain = 67 V/V, 45 kHz
PWM, Rshunt = 1/3 mΩ, 5kRPMInrush Current
Before a brushless DC motor starts to rotate, the inverter circuit forms a synchronous buck converter with a shorted output, with the motor windings acting as the inductor (Figure 2-10). This creates a high starting current condition known as inrush.
 Figure 2-10 Synchronous ¼ Buck Converter with
Vin=42 V and Vout = Short
Figure 2-10 Synchronous ¼ Buck Converter with
Vin=42 V and Vout = ShortIn this example, Hall-Effect sensors have given the initial fixed rotor position for sensor-controlled start up. In phase V, the high-side switch (SW_VH) is permanently open and the low-side switch (SW_VL) is permanently closed. In phase U, the high-side switch (SW_UH) is pulsed with a fixed duty cycle of 25% and the low-side switch (SW_UL) is pulsed with a complimentary 75% duty cycle. During the 25% cycle, the full voltage of the battery quickly ramps up the current through the series U and V stator pole windings. During the 75% cycle, this winding current circulates in a loop (through ground and backwards through RshU and SW_UL) at a constant, incrementally increasing value. The windings, switches, and shunt resistors produce only a small opposing voltage due to series resistance. Since this high current circulates in a loop between the motor and the switches, a battery fuse cannot detect or protect the motor inverter from the high current in this stalled condition. The current through the phase V low-side shunt (RshV) here is four times higher than the current from the battery, which only supplies current during 25% of the cycle.
The large current forms a large magnetic field in the windings, and if the magnetic force exceeds the inertia of the motor, the rotor begins to accelerate. The U and V windings acquire an increasing voltage based on the rotor speed to oppose the current, the Hall-Effect sensor outputs update based on the new rotor position, and SW_VL opens, extinguishing the V winding current into the high voltage of the battery and allowing RshV to cool down. Typically, the motor accelerates quickly, and the winding voltage increases towards 25% of the battery voltage. This voltage is detected by the microcontroller, which switches to field-oriented control and limits the motor current to ≤ 20 A for the rest of operation (Figure 2-11).
 Figure 2-11 >100-A Peak Measured Inrush Current: Vs = 5 V, Vref = 1.65 V, OPA2836-Q1 AV/V = 67, Rshunt = 0.5 mΩ,
However, for heavy loads, high attempted acceleration, or a mismatched motor, the winding voltage will not increase quickly enough to stabilize the winding current. Although this current will be shared between the three shunt resistors, a high and sustained three phase current load will still cause the shunt resistors to overheat and fail. Low-side shunt monitors accurately measure inrush current and can be used in soft-starting and power-factor-correction techniques to sufficiently reduce this transient value with varying degrees of complexity.