SBAA463A january 2021 – april 2023 TMAG5170 , TMAG5170-Q1 , TMAG5170D-Q1 , TMAG5173-Q1 , TMAG5273
3.2 Sensor Calibration
In some systems, the sensor placement may be mechanically constrained such that neither 45° alignment In-Plane or On-Axis is possible. In these cases, sensor output matching will be necessary for optimal performance. Angular position calculations require that the components maintain a fixed magnitude throughout rotation to produce consistent results.
The circular shape of the magnet allows transcendental functions, sine and cosine, to describe angular changes in position. As long as both of these functions are scaled equally, the resulting calculated rotational path will be circular. If the scaling of each component is unequal, the predicted path becomes elliptical. Angle error will be introduced by attributing an elliptical reference to a circular rotation (or movement).
To resolve this, the simplest method is to ensure the inputs to the CORDIC calculation are equal in magnitude. TMAG5170 device allows the user to adjust the CORDIC inputs by implementing a gain attenuation factor to any one channel.
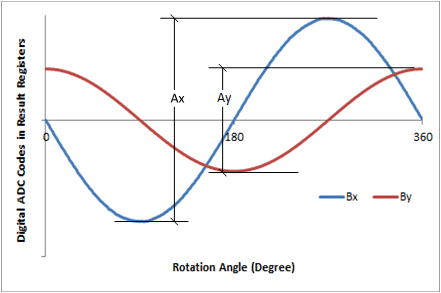
Figure 3-3 illustrates a case where the amplitude of the X component, Ax, is greater than the amplitude of the Y component, Ay. Ax must be reduced to match the scale of Ay.
 Figure 3-3 Magnitude Correction for Angular
Calculations
Figure 3-3 Magnitude Correction for Angular
CalculationsThe calibration process to set the peak values for TMAG5170 is simple:
- Set the device to acquire the maximum number of samples per conversion by setting CONV_AVG register to 32x.
- Rotate the magnet a full 360° rotation and record the output values for the axes of interest.
- Determine the peak value for each axis
- Note which axis achieves the greatest magnitude input. Depending on sensor orientation and placement relative to the magnet, it is possible that this could be any of X, Y, or Z.
- Calculate the gain adjustment:

- The ratio should always have the larger peak value on the denominator, such that G < 1. This axis will be attenuated by the Gain Factor, and is selected using GAIN_SELECTION register.
- Multiply the Gain Factor, G, by 1024. Program the nearest integer value into the GAIN_VALUE register.
This feature allows the user to simultaneously correct for sensitivity mismatch and any error resulting from non-ideal alignment. Providing this correction allows the sensor to be placed anywhere near the magnet where two sufficiently large inputs are present.