SBAU378A September 2021 – January 2022 ADS1148 , ADS1248
- Trademarks
- 1Introduction
- 2Getting Started With the ADS1x48EVM
-
3ADS1x48EVM Overview
- 3.1 Analog and Digital Power Supplies
- 3.2 Voltage Reference Options
- 3.3 Clock Options
- 3.4 Digital Interface
- 3.5
Analog Input Connections
- 3.5.1 Connecting a Thermocouple to J5 on the ADS1x48EVM
- 3.5.2 Connecting a Thermistor to J5 on the ADS1x48EVM
- 3.5.3
Connecting an RTD to J6 on the ADS1x48EVM
- 3.5.3.1 Connecting a 2-Wire RTD Using a Low-Side RREF to J6 on the ADS1x48EVM
- 3.5.3.2 Connecting a 2-Wire RTD Using a High-Side RREF to J6 on the ADS1x48EVM
- 3.5.3.3 Connecting a 3-Wire RTD Using One IDAC and a Low-Side RREF to J6 on the ADS1x48EVM
- 3.5.3.4 Connecting a 3-Wire RTD Using One IDAC and a High-Side RREF to J6 on the ADS1x48EVM
- 3.5.3.5 Connecting a 3-Wire RTD Using Two IDACs and a Low-Side RREF to J6 on the ADS1x48EVM
- 3.5.3.6 Connecting a 3-Wire RTD Using Two IDACs and a High-Side RREF to J6 on the ADS1x48EVM
- 3.5.3.7 Connecting a 4-Wire RTD Using a Low-Side RREF to J6 on the ADS1x48EVM
- 3.5.3.8 Connecting a 4-Wire RTD Using a High-Side RREF to J6 on the ADS1x48EVM
- 3.5.3.9 Summary of ADS1x48EVM RTD Configuration Settings
- 3.5.4 Connecting a General-Purpose Input to J5 on the ADS1x48EVM
- 4ADS1x48EVM GUI
- 5Bill of Materials, Printed Circuit Board Layout, and Schematic
- 6Revision History
4 ADS1x48EVM GUI
The ADS1x48EVM requires a communication driver that is installed automatically. However, this FAQ can help troubleshoot driver-related issues if any arise.
The following steps describe the ADS1x48 GUI software installation:
- Connect the micro-USB-to-USB cable from the PAMBoard directly to a USB port on the computer. Do not connect the cable through a USB hub.
- Open up the web-based GUI available on the EVM
landing page (ADS1148EVM-PDK or ADS1248EVM-PDK).
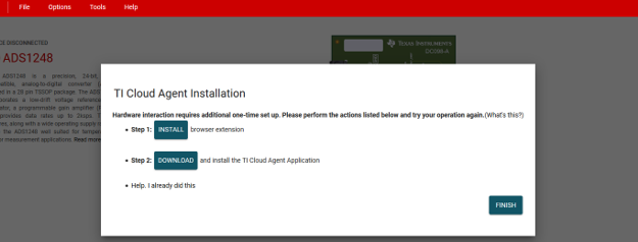
- First-time users may be prompted to download and install the browser extension for Firefox™ or Chrome™ and the TI Cloud Agent Application as shown in Figure 4-1. Installing the TI Cloud Agent is a one-time download and installation.
- Refresh the GUI such that a green signal displays and the Hardware Connected indicator shows in the bottom status ribbon (see Figure 4-2).
 Figure 4-1 Browser Extension and TI Cloud Agent Installation
When connected, the ADS1x48EVM GUI has multiple pages to help navigate and control the ADS1x48EVM:
The following sections step through each GUI page in more detail.