SLUUCD4 April 2021 TPS92682-Q1
- Trademarks
- General Texas Instruments High Voltage Evaluation (TI HV EMV) User Safety Guidelines
- 1Description
- 2REACH Compliance
- 3Performance Specifications
- 4Performance Data and Typical Characteristic Curves
- 5Schematic, PCB Layout, and Bill of Materials
- 6Software
- 7TPS92682EVM-125 Power UP and Operation
7.2 GUI Devices Window
In TPS92682EVM-125, channel-1 is configured as a CV mode SEPIC and channel-2 as a CC mode SEPIC converter. The settings shown in red in Figure 7-7 can be used to configure and turn on and regulate the output of the two channels.
 Figure 7-7 Devices Window
Apply the settings shown in Figure 7-8.
- Select the Internal PWM box to set the PWM dimming to internal.
- To set the switching frequency, fSW to 400kHz, do not change the Channel Clock Div from the default value of 2.
- Select the Channel 1 Constant Voltage box to set channel 1 in CV mode.
- Enter Channel 2 Soft Start value to 100.
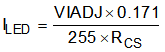
- Enter the desired value for the CH1 and CH2 V/I
Adjust DAC. This DAC controls the output voltage
of channel 1 and ILED current of
channel 2. For TPS92682EVM-125, the DAC maximum
value of 255 corresponds with an output voltage of
approximately 30 V for channel 1 and
ILED of approximately 1.7 A for channel
2. The relation between ILED and the
DAC value is shown in Equation 1. Equation 1.where RCS is the current sense resistor (R20 for channel 2)
- The EVM generates the internal PWM using a 10-bit DAC counter. Set the PWM duty cycle to 1023 for channel 1 (100% duty cycle for CV channel) and a value between zero and 1023 for PWM dimming for channel 2.
- By default CHx-Slope is set to code "5", which corresponds to 250 mV of peak slope. For the TPS92682EVM-125, it is recommended to set the slopes for two channels to a code "2” and "1" as shown in Figure 7-8
 Figure 7-8 Devices Window Setting
After applying these settings, the fault status registers FLT1 (0x11) and FLT2 (0x12) must be checked. Before enabling and turning on the outputs, the fault registers must be read (cleared). The Power Cycle (PC) bit must be cleared in order for the TPS92682-Q1 is enabled. The fault status can be obtained by pushing the Read Faults button in Figure 7-9.
 Figure 7-9 Fault Status after Pushing the Read Faults Once
The first time the Read Fault button is pushed, the previous status of the fault registers are shown and the faults are cleared. The second time the Read Faults button is pushed, the cleared faults will change to green as shown in Figure 7-10.
 Figure 7-10 Fault Status after Pushing the Read Faults Twice
Some of the faults or diagnostic bits, as undercurrent (UC) and undervoltage (UV) may remain red as the channels are not turned on. For example, the output undervoltage (UV) remains red as the load voltage is initially zero. Therefore, this fault is disabled by default until the soft-start sequence is complete. The output overvoltage (OV), cycle-by-cycle current limit (ILIM), IS Open (ISO), RT Open (RTO), Power Cycle (PC) and Thermal Warning (TW) should be cleared (change status to green) before enabling the channels.
Before enabling the channels, make sure to connect LED loads to the outputs of the TPS92682EVM-125. By setting the Channel 1 and Channel 2 Enable check boxes, the two channels are turned on. At this point after clicking Read Faults, for 100% PWM duty cycle, all faults as shown in Figure 7-11 are cleared, except the UC fault for channel 1, which is configured in CV mode. UC fault is ignored in CV mode.
 Figure 7-11 Enabling the EVM
To turn off the channels, de-select the Channel 1 and Channel 2 Enable boxes.
If a power cycle occurs, all the registers reset to default values. In this case, it is necessary to repeat all the steps described in Section 7 before re-enabling the converter.