SLAU834 October 2020 ISO7760 , ISO7762 , MSP432E401Y , TPS92520-Q1 , TPS92682-Q1
- Trademarks
- 1Description
- 2Features and Specifications
- 3Schematic, PCB Layout, and Bill of Materials
- 4Software
-
5LEDMCUEVM-132 Power UP and Operation
- 5.1 GUI Start-up
- 5.2 MCU Control Window
- 5.3 SPI Command Window
- 5.4
GUI Devices Window and Example Connections and Power Up
- 5.4.1 TPS92520EVM-133 Connections and Power UP
- 5.4.2 TPS92520EVM-133 Devices Window
- 5.4.3 TPS92518EVM-878 Connections and Power Up
- 5.4.4 TPS92518EVM-878 Devices Window
- 5.4.5 TPS92682EVM-069 + TPS92520EVM-133 Connection and Power UP
- 5.4.6 TPS92520, TPS92682 - LPP074 - E1 Devices Window
- 5.4.7 TPS92682EVM-069 + TPS92520EVM-133 + TPS92662EVM6-901 Connection and Power UP
- 5.4.8 TPS92662EVM6-901 Devices Window
1.2 Connector Description
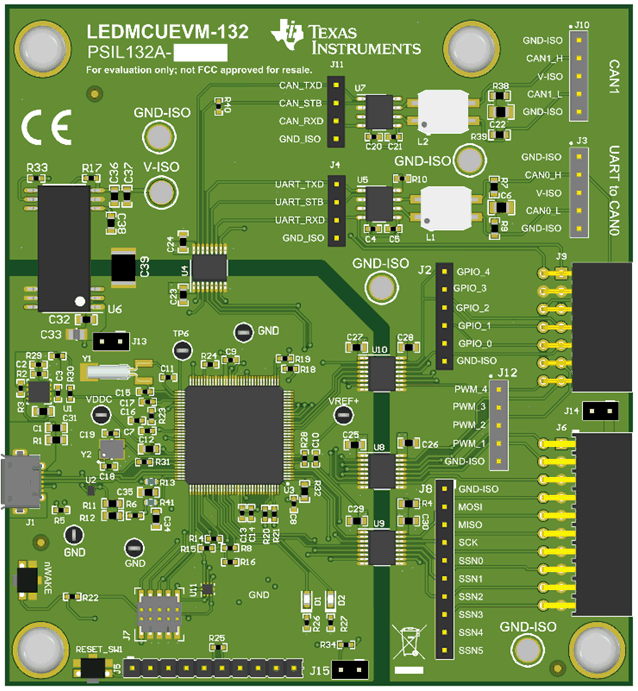
Table 1-1 describes the connectors and Table 1-2 lists the test points on the EVM and how to properly connect, set up, and use the LEDMCUEVM-132.
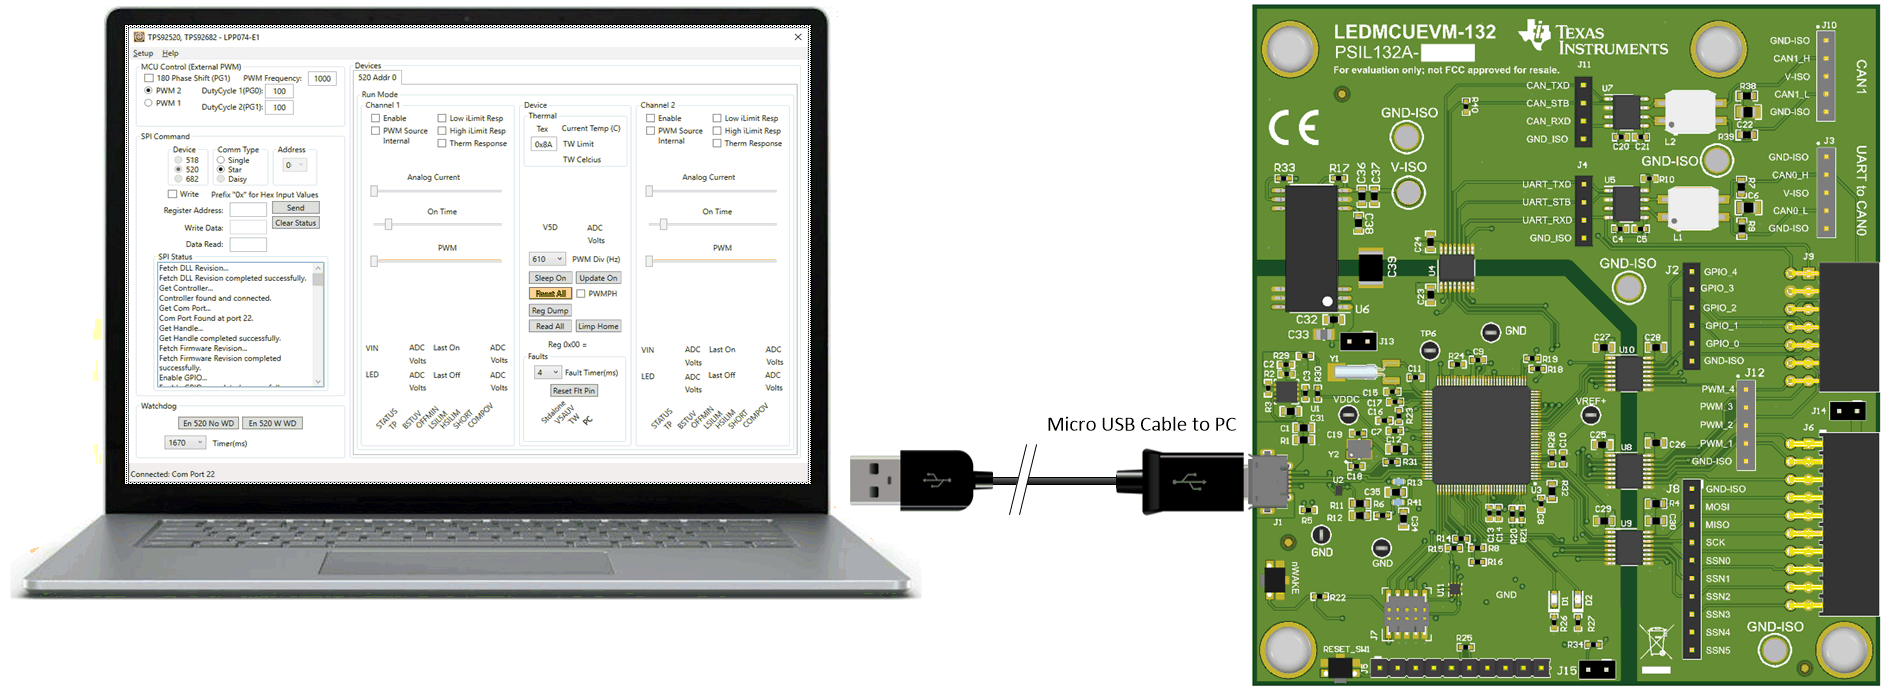
Figure 1-1 shows the connection diagram and the default jumper locations of the LEDMCUEVM-132.

 Figure 1-1 Connection Diagram of Computer, USB Cable, and LEDMCUEVM-132
| Connector | Function | Description |
|---|---|---|
| J6 | Provide primary SPI, SSN, and PWM signals to compatible EVMs | J6 includes the MISO, MOSI, SCK, SSN0-3, PWM1, PWM2, GPIO-0, and ground pins. |
| J9 | Provide additional control signals to EVMs | J9 includes SNN4-5, PWM3-4, CANH-L, UART_RX-TX, GPIO1-4, PWM3-4, and GND-ISO, which is the ground of the EVM attached. |
| J1 | Micro-USB connector to PC | Connector that uses Micro-USB cable to connect to the PC for GUI control. |
| J3 | CAN0 bus signals that are generated from UART signals | J3 has CAN0_H, CAN0_L, V-ISO (5V), and GND-ISO, which is the ground of the attached EVM. The UART RXD and TXD signals are sent to an CAN-Transceiver to general the differential signals for CAN0 bus. J3 is a standard 100 mil header that can be used as test points or can be used to connect to an EVM by a cable harness. |
| J4 | UART signals | J4 are the single ended UART TXD and RXD signals that are from the MCU. J4 is a standard 100 mil header that can either be used as test points or can be used to connect to an EVM by a cable harness. |
J8 | All SPI signals | J8 has all the SPI signals put together in one location for probing signals. It includes MISO, MOSI, SCK, SNN0-5, and GND-ISO. J8 is a standard 100 mil header that can either be used as test points or can be used to connect to an EVM by a cable harness. |
| J12 | All PWM signals | J12 has all four PWM signals (PWM1, PWM2, PWM3, and PWM4) created be the MCU and GND-ISO. J12 is a standard 100 mil header that can either be used as test points or can be used to connect to an EVM by a cable harness. |
| J2 | All GPIO signals | J9 has all five GPIO signals (GPIO_0, GPIO_1, GPIO_2, GPIO_3, and GPIO_4) on the header. J2 is a standard 100 mil header that can either be used as test points or can be used to connect to an EVM by a cable harness. |
J10 | CAN1 differential bus signals | J10 connects to the differential CAN1 bus which was generated from CAN1 port of MCU that is connected to the CAN transceiver. J10 is a standard 100 mil header that can either be used as test points or can be used to connect to an EVM by a cable harness. |
J11 | CAN1 single ended bus signals | J11 connects directly to the CAN1 signal ended signals that come from the MCU and go to the CAN transceiver. J11 is a standard 100 mil header that can either be used as test points or can be used to connect to an EVM by a cable harness. |
J5 | Launch Pad emulator connector | This is allows for the use of the LauchPad™ emulator connections from other LaunchPads. |
J7 | XDIS110 programming connector | This connector allows for the debugging or programming of the MSP432 device. |
J13 | 3v3 external supply connection | This allows for the connection of an external 3V3 supply that is not generated from the USB 5-V connection. |
J15 | BOOT-LOADER mode jumper | This jumper is used to place the MSP432 in boot-loader mode when an update to the firmware is needed. |
| Test Point | Description |
|---|---|
| GND (TP9, TP10, TP12) | These test points are connected to the GND connection from the PC through the USB cable. |
| GND-ISO (TP20, TP21, TP22, and TP25) | The test points are connected to the isolated grounds that connect to the secondary side of the digital isolators the the isolate 5-V supply. GND-ISO connects to the GND connections of the EVMs. |
| V-ISO (TP24) | This test point connects to V-ISO, which is an isolated 5 V that power the digital isolators and can be used by EVMs as an external 5-V supply. |
VREF+ (TP11) | This test point connects to reference voltage of the MSP432. |
| nHIG (TP6) | This test point connects to the inhibit pin of the MSP432. |
| VDDC (TP7) | This test point connects to the VDDC pin of the MSP432. |