SPRAD12A July 2022 – February 2023 F29H850TU , F29H859TU-Q1 , TMS320F280021 , TMS320F280021-Q1 , TMS320F280023 , TMS320F280023-Q1 , TMS320F280023C , TMS320F280025 , TMS320F280025-Q1 , TMS320F280025C , TMS320F280025C-Q1 , TMS320F280033 , TMS320F280034 , TMS320F280034-Q1 , TMS320F280036-Q1 , TMS320F280036C-Q1 , TMS320F280037 , TMS320F280037-Q1 , TMS320F280037C , TMS320F280037C-Q1 , TMS320F280038-Q1 , TMS320F280038C-Q1 , TMS320F280039 , TMS320F280039-Q1 , TMS320F280039C , TMS320F280039C-Q1 , TMS320F280040-Q1 , TMS320F280040C-Q1 , TMS320F280041 , TMS320F280041-Q1 , TMS320F280041C , TMS320F280041C-Q1 , TMS320F280045 , TMS320F280048-Q1 , TMS320F280048C-Q1 , TMS320F280049 , TMS320F280049-Q1 , TMS320F280049C , TMS320F280049C-Q1 , TMS320F28075 , TMS320F28075-Q1 , TMS320F28076 , TMS320F28374D , TMS320F28374S , TMS320F28375D , TMS320F28375S , TMS320F28375S-Q1 , TMS320F28376D , TMS320F28376S , TMS320F28377D , TMS320F28377D-EP , TMS320F28377D-Q1 , TMS320F28377S , TMS320F28377S-Q1 , TMS320F28378D , TMS320F28378S , TMS320F28379D , TMS320F28379D-Q1 , TMS320F28379S , TMS320F28384D , TMS320F28384D-Q1 , TMS320F28384S , TMS320F28384S-Q1 , TMS320F28386D , TMS320F28386D-Q1 , TMS320F28386S , TMS320F28386S-Q1 , TMS320F28388D , TMS320F28388S , TMS320F28P550SG , TMS320F28P550SJ , TMS320F28P559SG-Q1 , TMS320F28P559SJ-Q1 , TMS320F28P650DH , TMS320F28P650DK , TMS320F28P650SH , TMS320F28P650SK , TMS320F28P659DH-Q1 , TMS320F28P659DK-Q1 , TMS320F28P659SH-Q1
- Abstract
- Trademarks
- 1 Introduction
- 2 SysConfig
- 3 Time-Base (TB) Submodule
- 4 Counter-Compare (CC) and Action-Qualifier (AQ) Submodules
- 5 Deadband (DB) Submodule
- 6 Verifying the Output
- 7 Trip-Zone (TZ) and Digital Compare (DC) Submodules
- 8 Event-Trigger (ET) Submodule
- 9 Global Load
- 10Summary
- 11References
- 12Revision History
1 Introduction
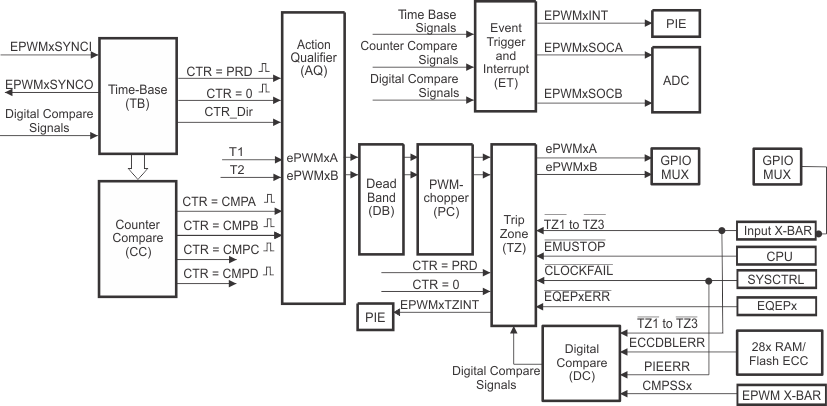
The ePWM module is separated into submodules, each with their own functionality. #FIG_RDT_LRW_WTB shows how the submodules are connected to each other. Throughout this application report, each of the different submodules is explained in detail.
 Figure 1-1 Block Diagram for the ePWM Module
The application use-case that is discussed throughout this application report has the following criteria:
Use-Case
- Output frequency of 400 kHz for EPWM1/2/3
- Phase shift of 120° for EPWM2 with respect to EPWM1
- Phase shift of 240° for EPWM3 with respect to EPWM1
- Duty cycle of 45% for EPWM1/2/3
- Active high complementary signal pairs with 200 nsec of rising/falling edge delay for EPWM1/2/3
- Cycle-by-Cycle trip zone protection through comparator signal on EPWM2
- One-Shot trip protection through general-purpose input/output (GPIO) on EPWM3
- Interrupt generation every time the time-base counter equals zero on EPWM1
- Global loading to support asynchronous updates of action qualifier settings
- Link CMPA/CMPB of EPWM1 to EPWM2 and EPWM3