SPRACM9B June 2019 – November 2020 F29H850TU , F29H859TU-Q1 , TMS320F28384D , TMS320F28384S , TMS320F28386D , TMS320F28386S , TMS320F28388D , TMS320F28388S , TMS320F28P650DH , TMS320F28P650DK , TMS320F28P650SH , TMS320F28P650SK , TMS320F28P659DH-Q1 , TMS320F28P659DK-Q1 , TMS320F28P659SH-Q1
- Trademarks
- 1 Introduction
- 2 Benefits of the TMS320F2838x MCU for High-Bandwidth Current Loop
- 3 Current Loops in Servo Drives
- 4 Outline of the Fast Current Loop Library
- 5 Fast Current Loop Evaluation
- 6 Incremental Build Level 1
- 7 Incremental Build Level 2
- 8 Incremental Build Level 3
- 9 Incremental Build Level 4
- 10Incremental Build Level 5
- 11Incremental Build Level 6
- 12Incremental Build Level 7
- 13Incremental Build Level 8
- 14References
- 15Revision History
11.5 Running the SFRA GUIs
If the high voltage (HV) power input to the target platform is turned off before, restore it back now. From the debug environment, the steps to be followed are as shown below:
- Verify that sfraTestLoop is set to SFRA_TEST_D_AXIS so as to test Id loop.
- Set FCL_params.wccD to the desired value, within limits, (when test is performed for Q axis, adjust this parameter for Q axis - FCL_params.wccQ)
- Set speedRef = 0.05 (in pu, 1 pu = 250Hz) and then set runMotor = MOTOR_RUN to run the motor. Now motor shaft should start spinning and settle at the commanded speed.
- The state machine variable (lsw) is auto-promoted in a sequence, its states are as follows:
- lsw = ENC_ALIGNMENT --> lock the rotor of motor into alignment with stator phase A
- lsw = ENC_WAIT_FOR_INDEX --> motor in run mode and waiting for the first instance of QEP index pulse (applicable with QEP encoder only)
- lsw = ENC_CALIBRATION_DONE --> motor in run mode - (signifies occurence of QEP index pulse and completion of calibration when QEP is used, or, completion of calibration when other encoders are used)
- Now the GUI can be called into perform a frequency sweep of the D axis current loop by clicking on the 'Start Sweep' button in the GUI. The sweep progress will be indicated by a green bar in the location marked as ‘NO DATA’.
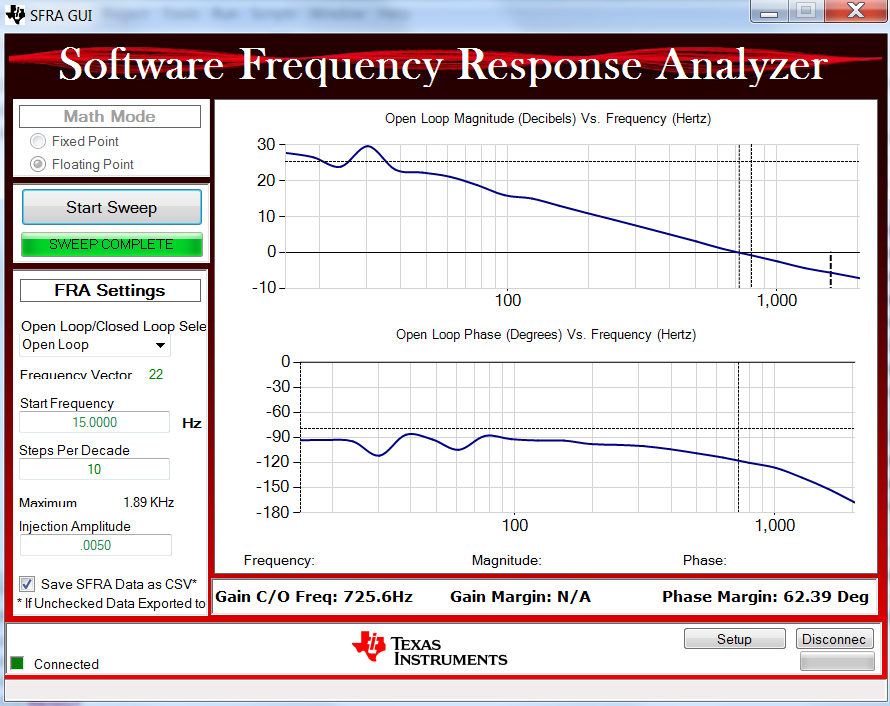
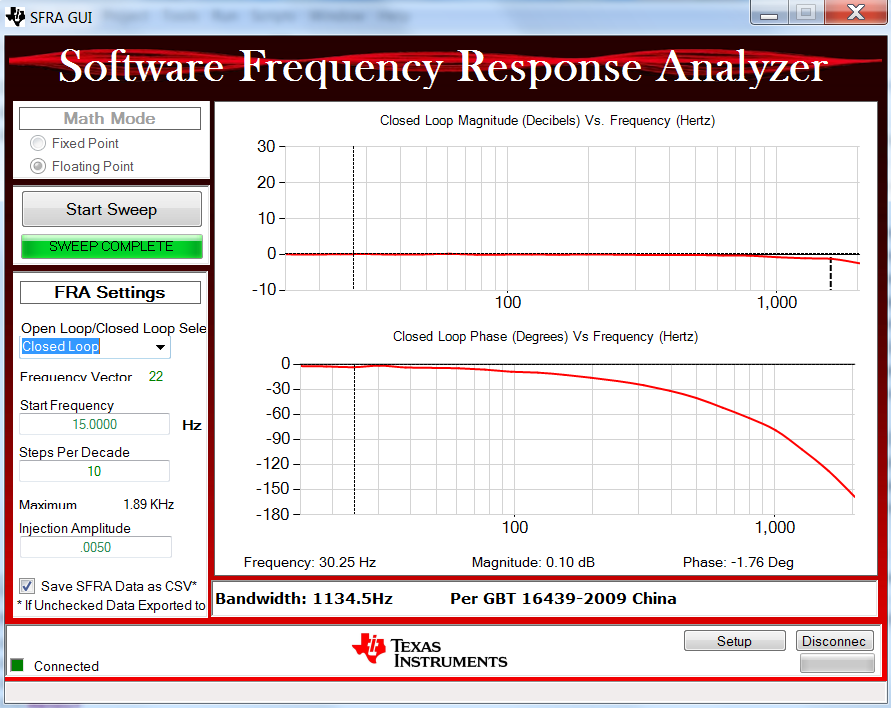
- When the frequency sweep is fully done, it will compute the Bode plot and display the results as shown in Figure 11-6 and Figure 11-7.
- The GUI also computes and displays the loop bandwidth, gain margin and phase margin.
- Repeat the test, if desired, by chaning FCL_params.wccD, and at different speed and load conditions.
- To disconnect the GUI, click the 'Disconnect' button on the GUI.
- To stop the motor, reduce the HV dc input voltage and set runMotor to MOTOR_STOP.
- After the motor stops, take the controller out of real-time mode and reset.
 Figure 11-6 SFRA Open Loop Bode Plots of the Current Loop Showing Magnitude and Phase Angle
 Figure 11-7 SFRA Closed Loop Bode Plots of the Current Loop Showing Magnitude and Phase Angle