SWRU580 April 2021 CC2564C , CC2564MODA , CC2564MODN
- Trademarks
- 1 Introduction
- 2 A2DP (AUD) Demo Guide
- 3 A3DP Sink Demo Guide
- 4 A3DP Source Demo Guide
- 5 HFP Demo Guide
- 6 HFP Audio Gateway Demo Guide
- 7 HID Demo Guide
- 8 HSP Demo Guide
- 9 Map Demo Guide
- 10PBAP Demo Guide
- 11SPP Demo Guide
- 12SPPLE Demo Guide
- 13SPPDMMulti Demo Guide
- 14ANP Demo Guide
- 15HFP Demo Guide
- 16HTP Demo Guide
- 17PASP Demo Guide
- 18HOGP Demo Guide
- 19PXP Demo Guide
- 20FMP Demo Guide
- 21CSCP Demo Guide
- 22Revision History
12.3 Demonstrating SPP LE on an iOS Device with the LightBlue App
The LightBlue app is a free iOS app that allows you to test and demonstrate the GATT Profile using Bluetooth Low Energy (BLE). It allows you to create custom services and interact with servers with custom services. The app supports both the client and server roles of GATT. Here we will explain how to use the app with the SPPLEDemo application.
SPP LE Service OverviewSPP LE is not an official Bluetooth service. It is a custom service that is designed to demonstrate using Bluetooth Low Energy to send and receive data in a similar manner that Classic Bluetooth's SPP profile does. It uses a credit based protocol to send and receive data. In order for a device to send data to a remote device with the SPP LE protocol the remote device must have provided the device with "credits". These credits specify how much data the device is allowed to send. When a device has sent its maximum number of credits, it must wait for the remote device to provide it with more credits before it can continue sending. In this application 1 credit is equivalent to 1 byte (octet) of data.
CharacteristicsSPP LE implements its credit-based protocol using GATT characteristics. The SPP LE service has 4 characteristics:
| Name | UUID | Purpose |
|---|---|---|
| Rx Characteristic | 0x8B00ACE7-EB0B-49B0-BBE9-9AEE0A26E1A3 | Client sends data to the server using this characteristic with an ATT Write Request. |
| Tx Credits Characteristic | 0xBA04C4B2-892B-43BE-B69C-5D13F2195392 | Client sends its credits to the server using this characteristic with an ATT Write Request. |
| Tx Characteristic | 0x0734594A-A8E7-4B1A-A6B1-CD5243059A57 | Server sends data to the client using this characteristic with an ATT Handle Value Notification. |
| Rx Credits Characteristic | 0xE06D5EFB-4F4A-45C0-9EB1-371AE5A14AD4 | Server sends its credits to the client using this characteristic with an ATT Handle Value Notification. |
The client and server use these characteristics to send and receive data and credits. Next we'll demonstrate SPPLEDemo as the server and LightBlue as the client. If you haven't already done so, download the LightBlue app from the App Store and turn on Bluetooth on your iOS device.
Connecting the Devices
First we need to establish a connection between the devices. To do this open the LightBlue app, you'll seen a screen similar to the following:
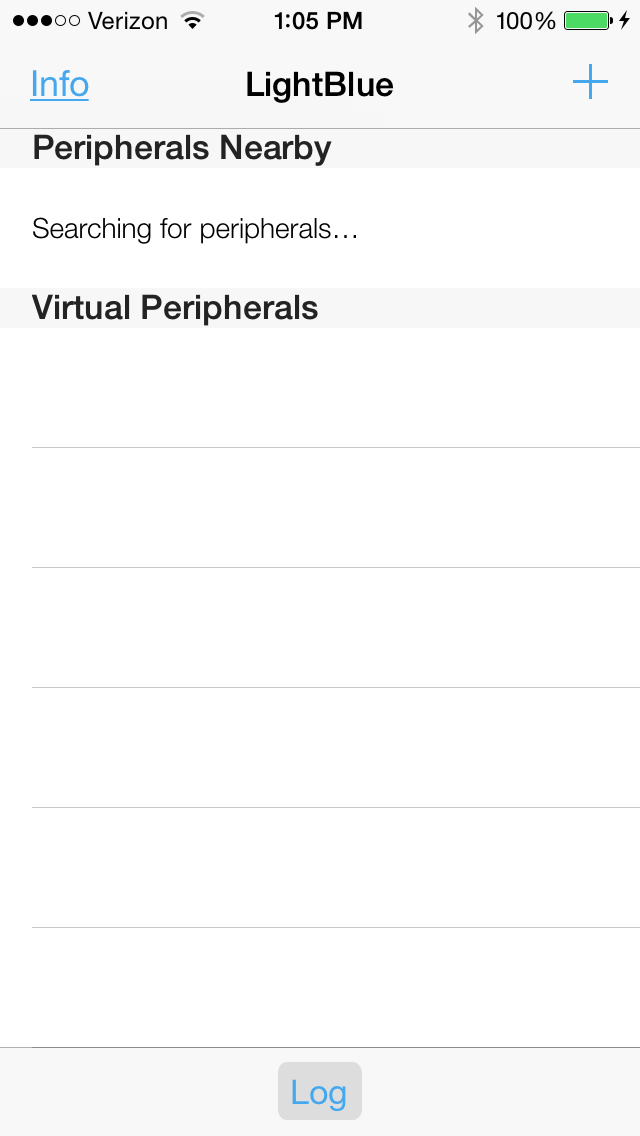 Figure 12-9 SPPLE Demo LightBlue
Startup
Figure 12-9 SPPLE Demo LightBlue
StartupIn the SPPLEDemo terminal start the app as a server, register the SPP LE Service, and begin advertising using the Server, RegisterSPPLE, and AdvertiseLE 1 commands. You will see the following in the terminal:
OpenStack().
Bluetooth Stack ID: 1.
Device Chipset: 4.1.
BD_ADDR: 0x0017e9d3581a

******************************************************************
* Command Options: Server, Client, Help                          *
******************************************************************

SPP+LE>Server

******************************************************************
* Command Options General: Help, GetLocalAddress, SetBaudRate    *
*                          Quit,                                 *
* Command Options BR/EDR:  Inquiry, DisplayInquiryList, Pair,    *
*                          EndPairing, PINCodeResponse,          *
*                          PassKeyResponse,                      *
*                          UserConfirmationResponse,             *
*                          SetDiscoverabilityMode,               *
*                          SetConnectabilityMode,                *
*                          SetPairabilityMode,                   *
*                          ChangeSimplePairingParameters,        *
*                          GetLocalName, SetLocalName,           *
*                          GetClassOfDevice, SetClassOfDevice,   *
*                          GetRemoteName, SniffMode,             *
*                          ExitSniffMode, Open, Close, Read,     *
*                          Write, GetConfigParams,               *
*                          SetConfigParams, GetQueueParams,      *
*                          SetQueueParams, Loopback,             *
*                          DisplayRawModeData, AutomaticReadMode,*
*                          CBSend.                               *
* Command Options GAPLE:   SetDiscoverabilityMode,               *
*                          SetConnectabilityMode,                *
*                          SetPairabilityMode,                   *
*                          ChangePairingParameters,              *
*                          AdvertiseLE, StartScanning,           *
*                          StopScanning, ConnectLE,              *
*                          DisconnectLE, PairLE,                 *
*                          LEPasskeyResponse,                    *
*                          QueryEncryptionMode, SetPasskey,      *
*                          DiscoverGAPS, GetLocalName,           *
*                          SetLocalName, GetLERemoteName,        *
*                          SetLocalAppearance,                   *
*                          GetLocalAppearance,                   *
*                          GetRemoteAppearance,                  *
* Command Options SPPLE:   DiscoverSPPLE, RegisterSPPLE, LESend, *
*                          ConfigureSPPLE, LERead, Loopback,     *
*                          DisplayRawModeData, AutomaticReadMode *
******************************************************************

SPP+LE>RegisterSPPLE
Sucessfully registered SPPLE Service.

SPP+LE>AdvertiseLE 1
   GAP_LE_Advertising_Enable success.
Now that SPPLEDemo is advertising you will see the device shown in LightBlue:
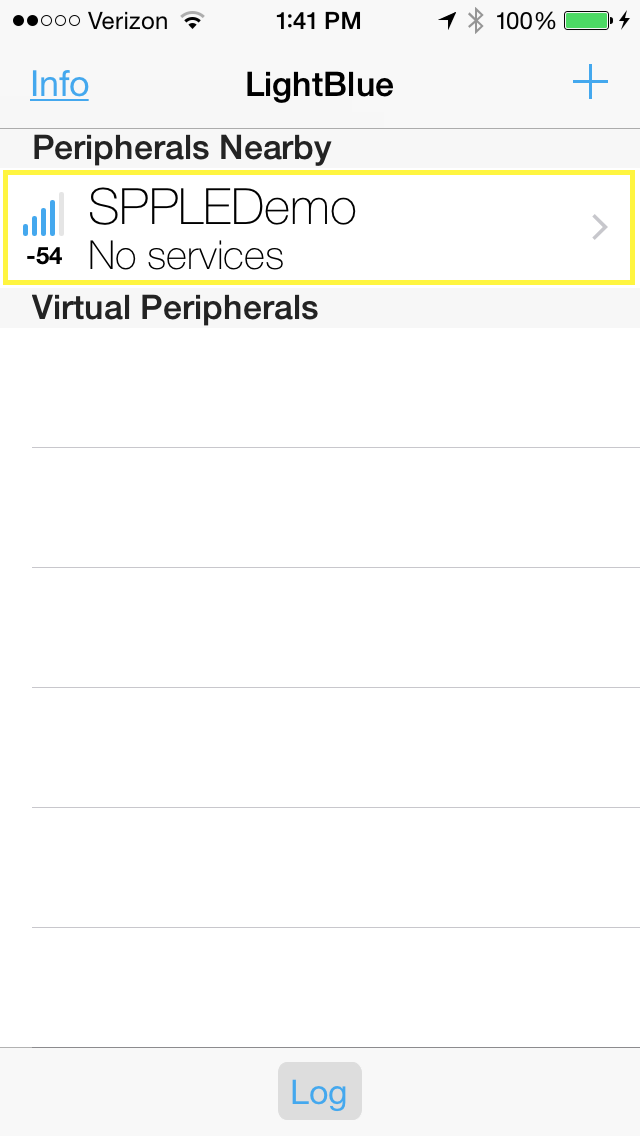 Figure 12-10 SPPLE Demo Discovered by
LightBlue
Figure 12-10 SPPLE Demo Discovered by
LightBlueNext select the SPPLEDemo device in LightBlue, after doing so you should see the following screen:
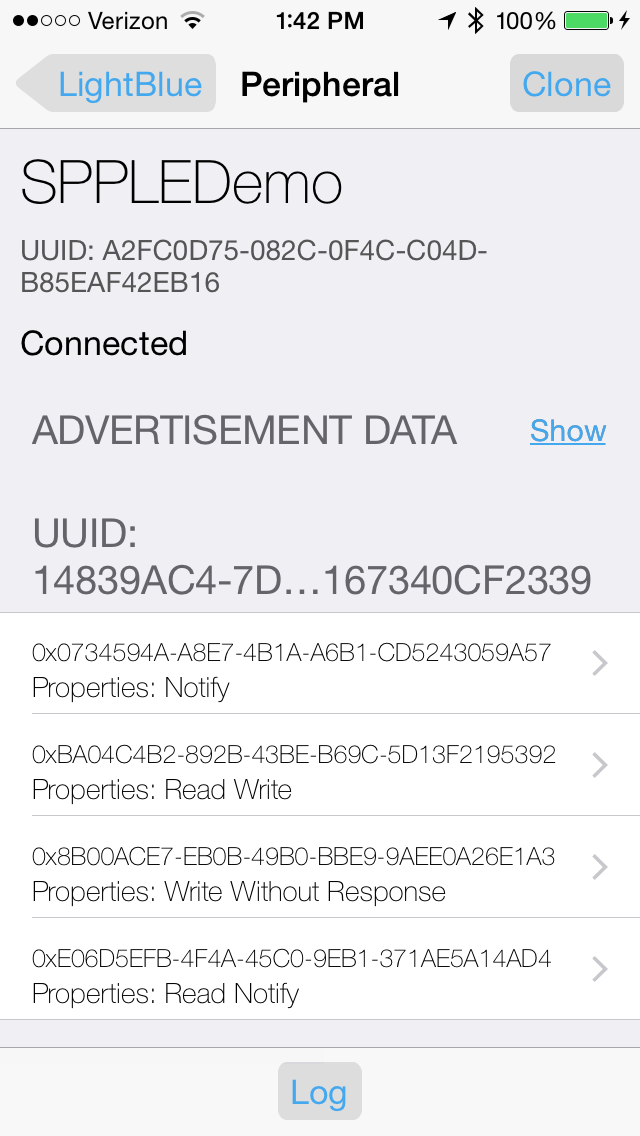 Figure 12-11 SPPLE Demo Connected
LightBlue
Figure 12-11 SPPLE Demo Connected
LightBlueIn the SPPLEDemo terminal you will see the following:
etLE_Connection_Complete with size 16.
   Status:       0x00.
   Role:         Slave.
   Address Type: Random.
   BD_ADDR:      0x5cfc3252180b.

SPP+LE>
etGATT_Connection_Device_Connection with size 16:
   Connection ID:   2.
   Connection Type: LE.
   Remote Device:   0x5cfc3252180b.
   Connection MTU:  23.
The devices are now connected.
Enabling NotificationsNext enable notifications on the Tx Characteristic and Rx Credits Characteristic in LightBlue by doing the following:
- Opening the Tx Characteristic (0x0734594A-A8E7-4B1A-A6B1-CD5243059A57).
- Choosing Listen for notifications.
- Press the back button in the top left corner.
- Opening the Rx Credits Characteristic (0xE06D5EFB-4F4A-45C0-9EB1-371AE5A14AD4).
- Choosing Listen for notifications.
- Pressing the back button in the top left corner.
You will notice that after enabling notifications on the Rx Credits Characteristic (0xE06D5EFB-4F4A-45C0-9EB1-371AE5A14AD4) that SPPLEDemo sends its initial credits to LightBlue and you will see 0x8300 displayed twice in the app:
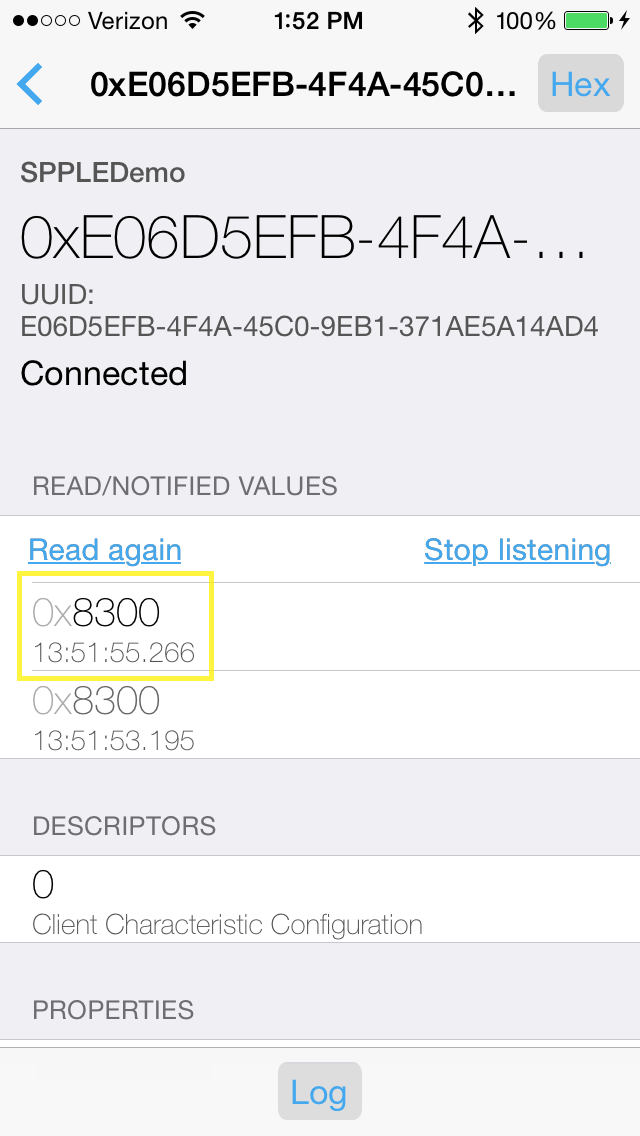 Figure 12-12 SPPLE Demo LightBlue Initial
Credits Received
 At this point the client (LightBlue) can send data to the server (SPPLEDemo). To send data from LightBlue to SPPLEDemo do the following:
- 1. Open the Rx Characteristic (0x8B00ACE7-EB0B-49B0-BBE9-9AEE0A26E1A3).
- Choose Write new value.
- Type 414243 (ABC in ASCII).
- Choose Done.
In the SPPLEDemo terminal you will see a data indication event. To read the data run the LERead 5cfc3252180b command, you will see the following in the terminal:
Data Indication Event, Connection ID 1, Received 3 bytes.

SPP+LE>LERead 5cfc3252180b
Read: 3.
ABC
Now if you open the Rx Credits Characteristic (0xE06D5EFB-4F4A-45C0-9EB1-371AE5A14AD4) you will see that SPPLEDemo has credited LightBlue with 3 more credits:
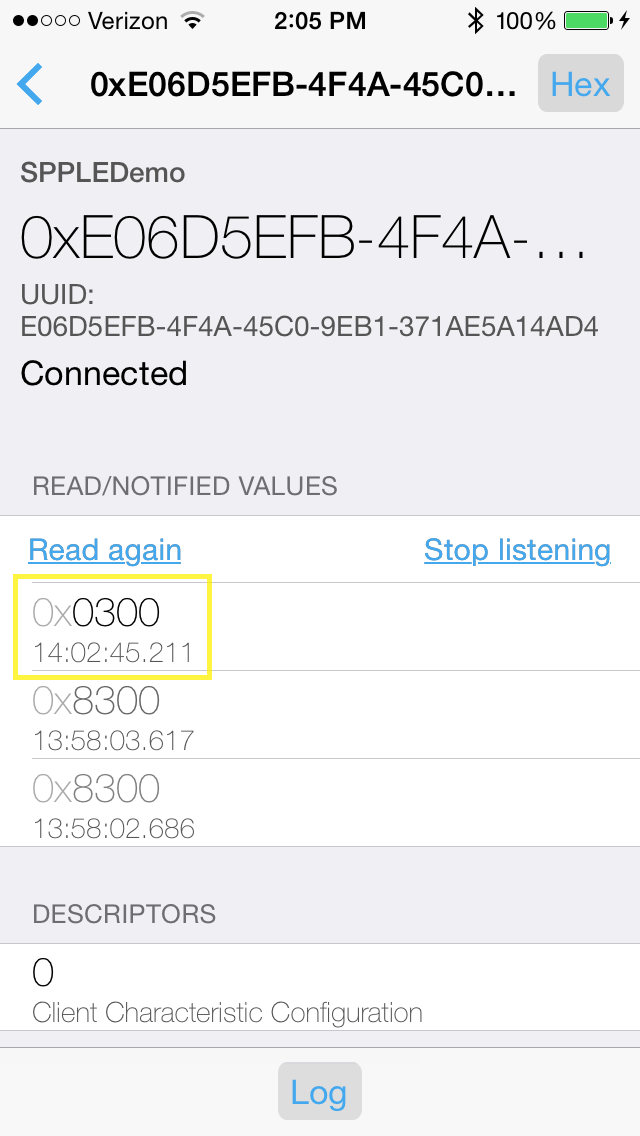 Figure 12-13 SPPL Demo LightBlue Additional
Credits Received
 Now we will send data from SPPLEDemo to LightBlue. First LightBlue needs to provide SPPLEDemo with transmit credits. To provide SPPLEDemo with transmit credits do the following in LightBlue:
- Open the Tx Credits Characteristic (0xBA04C4B2-892B-43BE-B69C-5D13F2195392).
- Choose "Write new value".
- Type 6400. (100 credits = 0x0064 little-endian)
- Choose Done.
- Press the back button in the top left corner.
We have now given SPPLEDemo 100 credits. Now we can send data in SPPLEDemo using the LESend 5cfc3252180b 100 command. You should see the following in the terminal:
SPP+LE>LESend 5cfc3252180b 100

Send Complete, Sent 100.
You can check that LightBlue received the data by:
- Opening the Tx Characteristic (0x0734594A-A8E7-4B1A-A6B1-CD5243059A57).
- You will see a long 0x30313233... string of the received data in the list of NOTIFIED VALUES as seen below
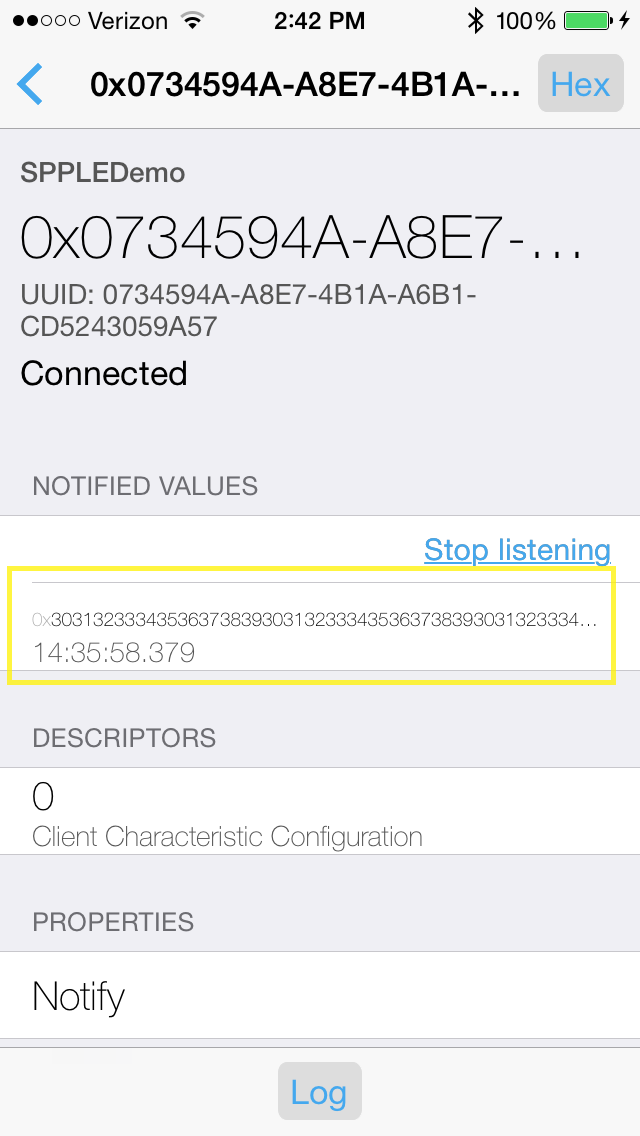 Figure 12-14 SPPLE Demo LightBlue Read Data
 Now that LightBlue has received the data it needs to return the transmit credits to SPPLEDemo. This can be done by repeating the sequence above and re-writing 0x6400 to the Tx Credits Characteristic (0xBA04C4B2-892B-43BE-B69C-5D13F2195392).
LightBlue as the Server/SPPLEDemo as the ClientThe first step to connecting the devices is to add the SPP LE Service and its characteristics to LightBlue. It is possible to do this manually by creating a blank virtual peripheral in LightBlue and then adding the necessary service and characteristics, however, it's easier to simply clone SPPLEDemo when it is acting as the server. To clone SPPLEDemo first connect the 2 devices as described above. After the 2 devices are connected choose the Clone option in the top right corner of the display. The app will return to the devices list and you will now see SPPLEDemo listed as a Virtual Peripheral as seen below:
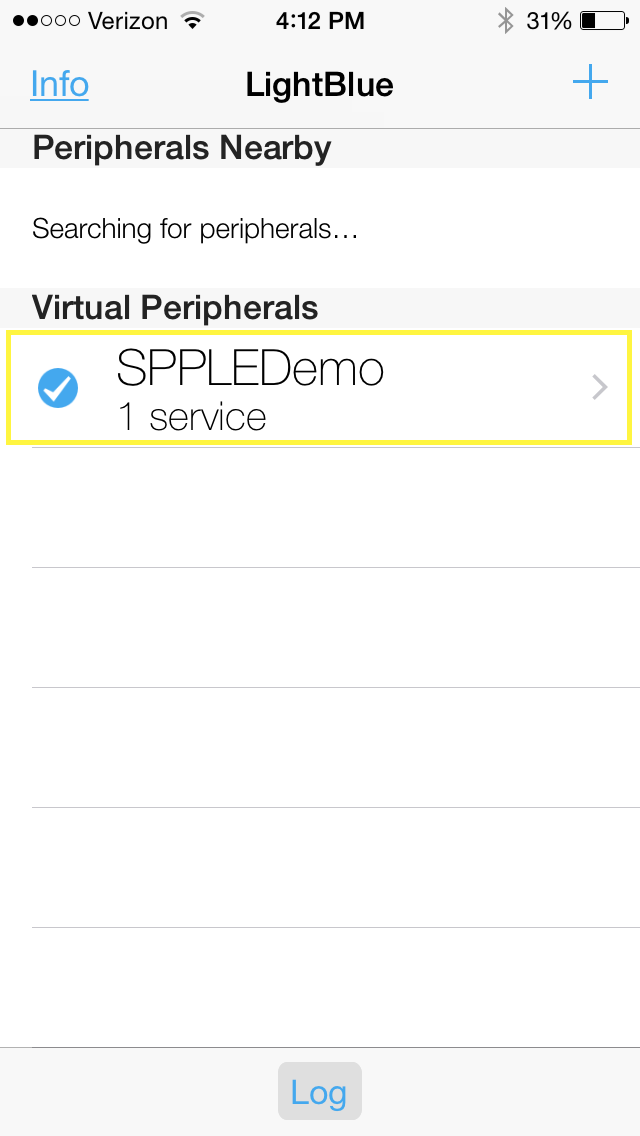 Figure 12-15 SPPLE Demo LightBlue Virtual
Peripheral
 Now that we have cloned the SPP LE service we can now continue with connecting the devices. Next, restart SPPLEDemo and when prompted start the app as a client. Next scan for the iOS device using the StartScanning command. When the iOS device has been found stop the scan using the StopScanning command. Now we can connect to the iOS device using the ConnectLE 5c75524c733a 1 command. After this you have about 10 seconds to run the DiscoverSPPLE 5c75524c733a command. After the SPP LE service discovery completes you have about 25 seconds to run the ConfigureSPPLE 5c75524c733a. If you wait longer than these times the iOS device will disconnect from SPPLEDemo. After the SPP LE characteristics are configured the 2 apps will stay connected, however, note that if the iOS device goes to sleep it will still close the connection. After running the commands just described you will see output similar to the following in SPPLEDemo's terminal:
OpenStack().
Bluetooth Stack ID: 1.
Device Chipset: 4.1.
BD_ADDR: 0xd03972cdab68

******************************************************************
* Command Options: Server, Client, Help                          *
******************************************************************

SPP+LE>Client

******************************************************************
* Command Options General: Help, GetLocalAddress, SetBaudRate    *
*                          Quit,                                 *
* Command Options BR/EDR:  Inquiry, DisplayInquiryList, Pair,    *
*                          EndPairing, PINCodeResponse,          *
*                          PassKeyResponse,                      *
*                          UserConfirmationResponse,             *
*                          SetDiscoverabilityMode,               *
*                          SetConnectabilityMode,                *
*                          SetPairabilityMode,                   *
*                          ChangeSimplePairingParameters,        *
*                          GetLocalName, SetLocalName,           *
*                          GetClassOfDevice, SetClassOfDevice,   *
*                          GetRemoteName, SniffMode,             *
*                          ExitSniffMode, Open, Close, Read,     *
*                          Write, GetConfigParams,               *
*                          SetConfigParams, GetQueueParams,      *
*                          DisplayRawModeData, AutomaticReadMode,*
*                          SetQueueParams, Loopback,             *
*                          CBSend.                               *
* Command Options GAPLE:   SetDiscoverabilityMode,               *
*                          SetConnectabilityMode,                *
*                          SetPairabilityMode,                   *
*                          ChangePairingParameters,              *
*                          AdvertiseLE, StartScanning,           *
*                          StopScanning, ConnectLE,              *
*                          DisconnectLE, PairLE,                 *
*                          LEPasskeyResponse,                    *
*                          QueryEncryptionMode, SetPasskey,      *
*                          DiscoverGAPS, GetLocalName,           *
*                          SetLocalName, GetLERemoteName,        *
*                          SetLocalAppearance,                   *
*                          GetLocalAppearance,                   *
*                          GetRemoteAppearance,                  *
* Command Options SPPLE:   DiscoverSPPLE, RegisterSPPLE, LESend, *
*                          ConfigureSPPLE, LERead, Loopback,     *
*                          DisplayRawModeData, AutomaticReadMode *
******************************************************************

SPP+LE>StartScanning
Scan started successfully.

SPP+LE>
etLE_Advertising_Report with size 36.
  1 Responses.
  Advertising Type: rtConnectableUndirected.
  Address Type: atRandom.
  Address: 0x5c75524c733a.
  RSSI: -71.
  Data Length: 21.
  AD Type: 0x01.
  AD Length: 0x01.
  AD Data: 0x1a
  AD Type: 0x07.
  AD Length: 0x10.
  AD Data: 0x39 0x23 0xcf 0x40 0x73 0x16 0x42 0x9a 0x5c 0x41 0x7e 0x7d 0xc4 0x9a 0x83 0x14

SPP+LE>
etLE_Advertising_Report with size 36.
  1 Responses.
  Advertising Type: rtScanResponse.
  Address Type: atRandom.
  Address: 0x5c75524c733a.
  RSSI: -71.
  Data Length: 11.
  AD Type: 0x09.
  AD Length: 0x09.
  AD Data: 0x53 0x50 0x50 0x4c 0x45 0x44 0x65 0x6d 0x6f

SPP+LE>StopScanning
Scan stopped successfully.

SPP+LE>ConnectLE 5c75524c733a 1
Connection Request successful.

SPP+LE>
etLE_Connection_Complete with size 16.
   Status:       0x00.
   Role:         Master.
   Address Type: Random.
   BD_ADDR:      0x5c75524c733a.

SPP+LE>
etGATT_Connection_Device_Connection with size 16:
   Connection ID:   1.
   Connection Type: LE.
   Remote Device:   0x5c75524c733a.
   Connection MTU:  23.

SPP+LE>
Exchange MTU Response.
Connection ID:   1.
Transaction ID:  1.
Connection Type: LE.
BD_ADDR:         0x5c75524c733a.
MTU:             131.

SPP+LE>
SPP+LE>DiscoverSPPLE 5c75524c733a
GATT_Start_Service_Discovery success.

SPP+LE>
Service 0x000f - 0x001b, UUID: 14839ac47d7e415c9a42167340cf2339.


SPP+LE>
Service Discovery Operation Complete, Status 0x00.

SPP+LE>ConfigureSPPLE 5c75524c733a
SPPLE Service found on remote device, attempting to read Transmit Credits, and configured CCCDs.

SPP+LE>
Write Response.
Connection ID:   1.
Transaction ID:  15.
Connection Type: LE.
BD_ADDR:         0x5c75524c733a.
Bytes Written:   2.

SPP+LE>
Write Response.
Connection ID:   1.
Transaction ID:  16.
Connection Type: LE.
BD_ADDR:         0x5c75524c733a.
Bytes Written:   2.
Now that the 2 devices are connected and configured we can now send and receive data between them. Now select the SPPLEDemo Virtual Peripheral in LightBlue to see the virtual peripheral's characteristics. You will see the following or similar on your iDevice's display:
At this point SPPLEDemo has provided LightBlue with transmit credits and did so when the ConfigureSPPLE command was ran. You should be able to confirm this by opening the SPPLEDemo Virtual Peripheral and choosing the Credits Characteristic (0xBA04C4B2-892B-43BE-B69C-5D13F2195392), however, as mentioned above LightBlue does not show updated values of characteristics when they are written to and we have no way to confirm that LightBlue received the data. Even though we can't confirm that LightBlue has received transmit credits, we can still send data from LightBlue to SPPLEDemo. This is true because LightBlue is primarily only a GATT Profile demonstration, it doesn't have any knowledge of the SPP LE protocol that we are using. It is unaware of the transmit credits it has or doesn't have, and, for this reason, we can send data from LightBlue to SPPLEDemo with or without transmit credits. To send data to SPPLEDemo use the Tx Characteristic (0x0734594A-A8E7-4B1A-A6B1-CD5243059A57') and do the following in LightBlue:
- Open the Tx Characteristic and choose the No value/hex option.
- Type in 414243.
- Choose Done.
In SPPLEDemo you will see a data indication. To read the data use the LERead 5c75524c733a command. You should see ABC displayed in the terminal, as seen below:
Data Indication Event, Connection ID 1, Received 3 bytes.

SPP+LE>LERead 5c75524c733a
Read: 3.
ABC
To send data from SPPLEDemo, LightBlue must first provide it with credits. This can be done using the following in LightBlue:
- Open the Rx Credits Characteristic (0xE06D5EFB-4F4A-45C0-9EB1-371AE5A14AD4).
- Type in 6400. (100 credits = 0x0064 little-endian)
- Choose Done.
SPPLEDemo now has 100 transmit credits. Next, to send data in SPPLEDemo use the LESend 5c75524c733a 100 command. You will see the following in your terminal.
SPP+LE>LESend 5c75524c733a 100

Send Complete, Sent 100.
As mentioned earlier we have no way confirm that LightBlue actually received the data, this is a LightBlue limitation.
LightBlue as the Server/SPPLEDemo as the Client
The first step to connecting the devices is to add the SPP LE Service and its characteristics to LightBlue. It is possible to do this manually by creating a blank virtual peripheral in LightBlue and then adding the necessary service and characteristics, however, it's easier to simply clone SPPLEDemo when it is acting as the server. To clone SPPLEDemo first connect the 2 devices as described above. After the 2 devices are connected choose the Clone option in the top right corner of the display. The app will return to the devices list and you will now see SPPLEDemo listed as a Virtual Peripheral as seen below:
Now that we have cloned the SPP LE service we can now continue with connecting the devices. Next, restart SPPLEDemo and when prompted start the app as a client. Next scan for the iOS device using the StartScanning command. When the iOS device has been found stop the scan using the StopScanning command. Now we can connect to the iOS device using the ConnectLE 5c75524c733a 1 command. After this you have about 10 seconds to run the DiscoverSPPLE 5c75524c733a command. After the SPP LE service discovery completes you have about 25 seconds to run the ConfigureSPPLE 5c75524c733a. If you wait longer than these times the iOS device will disconnect from SPPLEDemo. After the SPP LE characteristics are configured the 2 apps will stay connected, however, note that if the iOS device goes to sleep it will still close the connection. After running the commands just described you will see output similar to the following in SPPLEDemo's terminal:
OpenStack().
Bluetooth Stack ID: 1.
Device Chipset: 4.1.
BD_ADDR: 0xd03972cdab68

******************************************************************
* Command Options: Server, Client, Help                          *
******************************************************************

SPP+LE>Client

******************************************************************
* Command Options General: Help, GetLocalAddress, SetBaudRate    *
*                          Quit,                                 *
* Command Options BR/EDR:  Inquiry, DisplayInquiryList, Pair,    *
*                          EndPairing, PINCodeResponse,          *
*                          PassKeyResponse,                      *
*                          UserConfirmationResponse,             *
*                          SetDiscoverabilityMode,               *
*                          SetConnectabilityMode,                *
*                          SetPairabilityMode,                   *
*                          ChangeSimplePairingParameters,        *
*                          GetLocalName, SetLocalName,           *
*                          GetClassOfDevice, SetClassOfDevice,   *
*                          GetRemoteName, SniffMode,             *
*                          ExitSniffMode, Open, Close, Read,     *
*                          Write, GetConfigParams,               *
*                          SetConfigParams, GetQueueParams,      *
*                          DisplayRawModeData, AutomaticReadMode,*
*                          SetQueueParams, Loopback,             *
*                          CBSend.                               *
* Command Options GAPLE:   SetDiscoverabilityMode,               *
*                          SetConnectabilityMode,                *
*                          SetPairabilityMode,                   *
*                          ChangePairingParameters,              *
*                          AdvertiseLE, StartScanning,           *
*                          StopScanning, ConnectLE,              *
*                          DisconnectLE, PairLE,                 *
*                          LEPasskeyResponse,                    *
*                          QueryEncryptionMode, SetPasskey,      *
*                          DiscoverGAPS, GetLocalName,           *
*                          SetLocalName, GetLERemoteName,        *
*                          SetLocalAppearance,                   *
*                          GetLocalAppearance,                   *
*                          GetRemoteAppearance,                  *
* Command Options SPPLE:   DiscoverSPPLE, RegisterSPPLE, LESend, *
*                          ConfigureSPPLE, LERead, Loopback,     *
*                          DisplayRawModeData, AutomaticReadMode *
******************************************************************

SPP+LE>StartScanning
Scan started successfully.

SPP+LE>
etLE_Advertising_Report with size 36.
  1 Responses.
  Advertising Type: rtConnectableUndirected.
  Address Type: atRandom.
  Address: 0x5c75524c733a.
  RSSI: -71.
  Data Length: 21.
  AD Type: 0x01.
  AD Length: 0x01.
  AD Data: 0x1a
  AD Type: 0x07.
  AD Length: 0x10.
  AD Data: 0x39 0x23 0xcf 0x40 0x73 0x16 0x42 0x9a 0x5c 0x41 0x7e 0x7d 0xc4 0x9a 0x83 0x14

SPP+LE>
etLE_Advertising_Report with size 36.
  1 Responses.
  Advertising Type: rtScanResponse.
  Address Type: atRandom.
  Address: 0x5c75524c733a.
  RSSI: -71.
  Data Length: 11.
  AD Type: 0x09.
  AD Length: 0x09.
  AD Data: 0x53 0x50 0x50 0x4c 0x45 0x44 0x65 0x6d 0x6f

SPP+LE>StopScanning
Scan stopped successfully.

SPP+LE>ConnectLE 5c75524c733a 1
Connection Request successful.

SPP+LE>
etLE_Connection_Complete with size 16.
   Status:       0x00.
   Role:         Master.
   Address Type: Random.
   BD_ADDR:      0x5c75524c733a.

SPP+LE>
etGATT_Connection_Device_Connection with size 16:
   Connection ID:   1.
   Connection Type: LE.
   Remote Device:   0x5c75524c733a.
   Connection MTU:  23.

SPP+LE>
Exchange MTU Response.
Connection ID:   1.
Transaction ID:  1.
Connection Type: LE.
BD_ADDR:         0x5c75524c733a.
MTU:             131.

SPP+LE>
SPP+LE>DiscoverSPPLE 5c75524c733a
GATT_Start_Service_Discovery success.

SPP+LE>
Service 0x000f - 0x001b, UUID: 14839ac47d7e415c9a42167340cf2339.


SPP+LE>
Service Discovery Operation Complete, Status 0x00.

SPP+LE>ConfigureSPPLE 5c75524c733a
SPPLE Service found on remote device, attempting to read Transmit Credits, and configured CCCDs.

SPP+LE>
Write Response.
Connection ID:   1.
Transaction ID:  15.
Connection Type: LE.
BD_ADDR:         0x5c75524c733a.
Bytes Written:   2.

SPP+LE>
Write Response.
Connection ID:   1.
Transaction ID:  16.
Connection Type: LE.
BD_ADDR:         0x5c75524c733a.
Bytes Written:   2.
Now that the 2 devices are connected and configured we can now send and receive data between them. Now select the SPPLEDemo Virtual Peripheral in LightBlue to see the virtual peripheral's characteristics. You will see the following or similar on your iDevice's display:
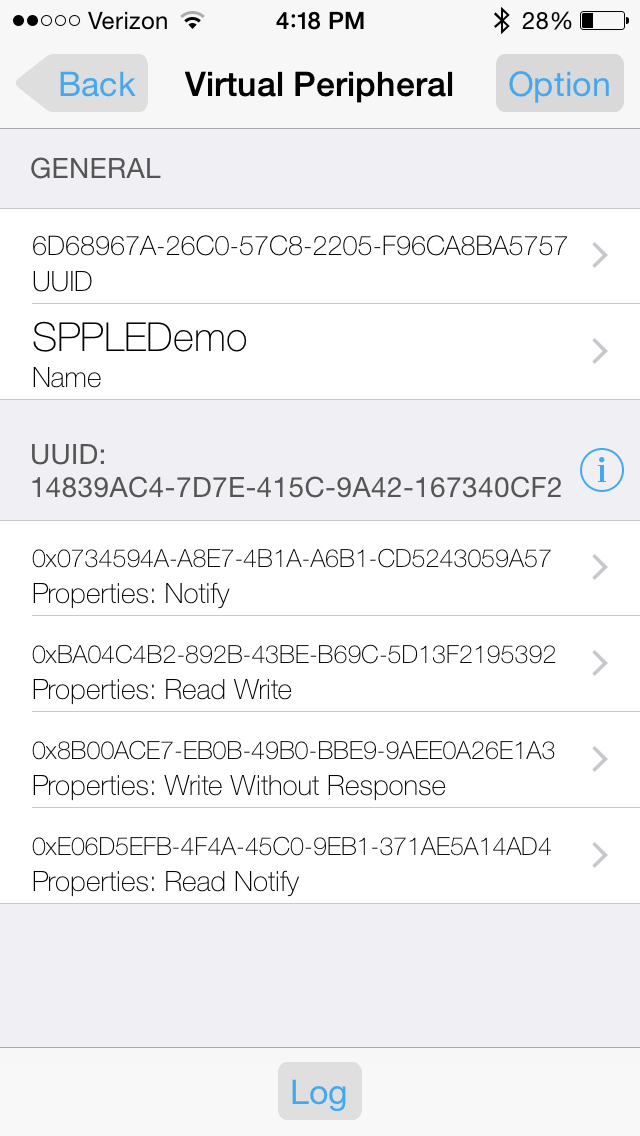 Figure 12-18 SPPLE Demo LightBlue
Characteristics
 At this point SPPLEDemo has provided LightBlue with transmit credits and did so when the ConfigureSPPLE command was ran. You should be able to confirm this by opening the SPPLEDemo Virtual Peripheral and choosing the Credits Characteristic (0xBA04C4B2-892B-43BE-B69C-5D13F2195392), however, as mentioned above LightBlue does not show updated values of characteristics when they are written to and we have no way to confirm that LightBlue received the data. Even though we can't confirm that LightBlue has received transmit credits, we can still send data from LightBlue to SPPLEDemo. This is true because LightBlue is primarily only a GATT Profile demonstration, it doesn't have any knowledge of the SPP LE protocol that we are using. It is unaware of the transmit credits it has or doesn't have, and, for this reason, we can send data from LightBlue to SPPLEDemo with or without transmit credits. To send data to SPPLEDemo use the Tx Characteristic (0x0734594A-A8E7-4B1A-A6B1-CD5243059A57') and do the following in LightBlue:
- Open the Tx Characteristic and choose the No value/hex option.
- Type in 414243.
- Choose Done.
In SPPLEDemo you will see a data indication. To read the data use the LERead 5c75524c733a command. You should see ABC displayed in the terminal, as seen below:
Data Indication Event, Connection ID 1, Received 3 bytes.

SPP+LE>LERead 5c75524c733a
Read: 3.
ABC
To send data from SPPLEDemo, LightBlue must first provide it with credits. This can be done using the following in LightBlue:
- 1. Open the Rx Credits Characteristic (0xE06D5EFB-4F4A-45C0-9EB1-371AE5A14AD4).
- Type in 6400. (100 credits = 0x0064 little-endian)
- Choose Done.
SPPLEDemo now has 100 transmit credits. Next, to send data in SPPLEDemo use the LESend 5c75524c733a 100 command. You will see the following in your terminal.
SPP+LE>LESend 5c75524c733a 100

Send Complete, Sent 100.
As mentioned earlier we have no way confirm that LightBlue actually received the data, this is a LightBlue limitation.
LightBlue as the Server/SPPLEDemo as the ClientThe first step to connecting the devices is to add the SPP LE Service and its characteristics to LightBlue. It is possible to do this manually by creating a blank virtual peripheral in LightBlue and then adding the necessary service and characteristics, however, it's easier to simply clone SPPLEDemo when it is acting as the server. To clone SPPLEDemo first connect the 2 devices as described above. After the 2 devices are connected choose the Clone option in the top right corner of the display. The app will return to the devices list and you will now see SPPLEDemo listed as a Virtual Peripheral as seen below:
 Figure 12-19 SPPLE Demo LightBlue Virtual
Peripheral
 Now that we have cloned the SPP LE service we can now continue with connecting the devices. Next, restart SPPLEDemo and when prompted start the app as a client. Next scan for the iOS device using the StartScanning command. When the iOS device has been found stop the scan using the StopScanning command. Now we can connect to the iOS device using the ConnectLE 5c75524c733a 1 command. After this you have about 10 seconds to run the DiscoverSPPLE 5c75524c733a command. After the SPP LE service discovery completes you have about 25 seconds to run the ConfigureSPPLE 5c75524c733a. If you wait longer than these times the iOS device will disconnect from SPPLEDemo. After the SPP LE characteristics are configured the 2 apps will stay connected, however, note that if the iOS device goes to sleep it will still close the connection. After running the commands just described you will see output similar to the following in SPPLEDemo's terminal:
OpenStack().
Bluetooth Stack ID: 1.
Device Chipset: 4.1.
BD_ADDR: 0xd03972cdab68

******************************************************************
* Command Options: Server, Client, Help                          *
******************************************************************

SPP+LE>Client

******************************************************************
* Command Options General: Help, GetLocalAddress, SetBaudRate    *
*                          Quit,                                 *
* Command Options BR/EDR:  Inquiry, DisplayInquiryList, Pair,    *
*                          EndPairing, PINCodeResponse,          *
*                          PassKeyResponse,                      *
*                          UserConfirmationResponse,             *
*                          SetDiscoverabilityMode,               *
*                          SetConnectabilityMode,                *
*                          SetPairabilityMode,                   *
*                          ChangeSimplePairingParameters,        *
*                          GetLocalName, SetLocalName,           *
*                          GetClassOfDevice, SetClassOfDevice,   *
*                          GetRemoteName, SniffMode,             *
*                          ExitSniffMode, Open, Close, Read,     *
*                          Write, GetConfigParams,               *
*                          SetConfigParams, GetQueueParams,      *
*                          DisplayRawModeData, AutomaticReadMode,*
*                          SetQueueParams, Loopback,             *
*                          CBSend.                               *
* Command Options GAPLE:   SetDiscoverabilityMode,               *
*                          SetConnectabilityMode,                *
*                          SetPairabilityMode,                   *
*                          ChangePairingParameters,              *
*                          AdvertiseLE, StartScanning,           *
*                          StopScanning, ConnectLE,              *
*                          DisconnectLE, PairLE,                 *
*                          LEPasskeyResponse,                    *
*                          QueryEncryptionMode, SetPasskey,      *
*                          DiscoverGAPS, GetLocalName,           *
*                          SetLocalName, GetLERemoteName,        *
*                          SetLocalAppearance,                   *
*                          GetLocalAppearance,                   *
*                          GetRemoteAppearance,                  *
* Command Options SPPLE:   DiscoverSPPLE, RegisterSPPLE, LESend, *
*                          ConfigureSPPLE, LERead, Loopback,     *
*                          DisplayRawModeData, AutomaticReadMode *
******************************************************************

SPP+LE>StartScanning
Scan started successfully.

SPP+LE>
etLE_Advertising_Report with size 36.
  1 Responses.
  Advertising Type: rtConnectableUndirected.
  Address Type: atRandom.
  Address: 0x5c75524c733a.
  RSSI: -71.
  Data Length: 21.
  AD Type: 0x01.
  AD Length: 0x01.
  AD Data: 0x1a
  AD Type: 0x07.
  AD Length: 0x10.
  AD Data: 0x39 0x23 0xcf 0x40 0x73 0x16 0x42 0x9a 0x5c 0x41 0x7e 0x7d 0xc4 0x9a 0x83 0x14

SPP+LE>
etLE_Advertising_Report with size 36.
  1 Responses.
  Advertising Type: rtScanResponse.
  Address Type: atRandom.
  Address: 0x5c75524c733a.
  RSSI: -71.
  Data Length: 11.
  AD Type: 0x09.
  AD Length: 0x09.
  AD Data: 0x53 0x50 0x50 0x4c 0x45 0x44 0x65 0x6d 0x6f

SPP+LE>StopScanning
Scan stopped successfully.

SPP+LE>ConnectLE 5c75524c733a 1
Connection Request successful.

SPP+LE>
etLE_Connection_Complete with size 16.
   Status:       0x00.
   Role:         Master.
   Address Type: Random.
   BD_ADDR:      0x5c75524c733a.

SPP+LE>
etGATT_Connection_Device_Connection with size 16:
   Connection ID:   1.
   Connection Type: LE.
   Remote Device:   0x5c75524c733a.
   Connection MTU:  23.

SPP+LE>
Exchange MTU Response.
Connection ID:   1.
Transaction ID:  1.
Connection Type: LE.
BD_ADDR:         0x5c75524c733a.
MTU:             131.

SPP+LE>
SPP+LE>DiscoverSPPLE 5c75524c733a
GATT_Start_Service_Discovery success.

SPP+LE>
Service 0x000f - 0x001b, UUID: 14839ac47d7e415c9a42167340cf2339.


SPP+LE>
Service Discovery Operation Complete, Status 0x00.

SPP+LE>ConfigureSPPLE 5c75524c733a
SPPLE Service found on remote device, attempting to read Transmit Credits, and configured CCCDs.

SPP+LE>
Write Response.
Connection ID:   1.
Transaction ID:  15.
Connection Type: LE.
BD_ADDR:         0x5c75524c733a.
Bytes Written:   2.

SPP+LE>
Write Response.
Connection ID:   1.
Transaction ID:  16.
Connection Type: LE.
BD_ADDR:         0x5c75524c733a.
Bytes Written:   2.
Now that the 2 devices are connected and configured we can now send and receive data between them. Now select the SPPLEDemo Virtual Peripheral in LightBlue to see the virtual peripheral's characteristics. You will see the following or similar on your iDevice's display:
 Figure 12-20 SPPLE Demo Characteristics
 At this point SPPLEDemo has provided LightBlue with transmit credits and did so when the ConfigureSPPLE command was ran. You should be able to confirm this by opening the SPPLEDemo Virtual Peripheral and choosing the Credits Characteristic (0xBA04C4B2-892B-43BE-B69C-5D13F2195392), however, as mentioned above LightBlue does not show updated values of characteristics when they are written to and we have no way to confirm that LightBlue received the data. Even though we can't confirm that LightBlue has received transmit credits, we can still send data from LightBlue to SPPLEDemo. This is true because LightBlue is primarily only a GATT Profile demonstration, it doesn't have any knowledge of the SPP LE protocol that we are using. It is unaware of the transmit credits it has or doesn't have, and, for this reason, we can send data from LightBlue to SPPLEDemo with or without transmit credits. To send data to SPPLEDemo use the Tx Characteristic (0x0734594A-A8E7-4B1A-A6B1-CD5243059A57') and do the following in LightBlue:
- 1. Open the Tx Characteristic and choose the No value/hex option.
- Type in 414243.
- Choose Done.
In SPPLEDemo you will see a data indication. To read the data use the LERead 5c75524c733a command. You should see ABC displayed in the terminal, as seen below:
Data Indication Event, Connection ID 1, Received 3 bytes.

SPP+LE>LERead 5c75524c733a
Read: 3.
ABC
Data Indication Event, Connection ID 1, Received 3 bytes. SPP+LE>LERead 5c75524c733a Read: 3. ABC